Error on installing a script for case fan control and power button from command line

I just received my Argon one for my raspberry pi 4 :slight_smile:

I would like to help and test your addon.
The problem is each time I uncomment the line “dtparam=i2c_arm=on” to get i2c, the pi doesn’t boot anymore. I was using this method I2c not working on the Pi4

Hi, no worries about replying late :wink:

I just open an issue on your repo: https://github.com/Misiu/argon40/issues/1

We could talk about this there, and go back here once the component will be ready?

2 Likes

Nice work on the custom component. Can’t believe argon40 has not addressed this.

1 Like

Tried implementing this but I get invalid config error on startup. Any ideas?

big thank you to @Misiu for the custom component!! I manage to get it working. Biggest difficulty for me was to enable l2c as the partition for hass overlay did not show up when i plug in into my PC so i couldnt change the file and ended up having to load up Linux to do it

For everyone having trouble with I2C/1wire - I’ve created a feature request Allow enabling I2C and 1wire via Home Assistant CLI.
Please upvote it :pleading_face:
Enabling both interfaces should be much easier and properly documented.

1 Like

I’m trying to enable I2C on my PI4. Did you follow those instructions on Windows?
I was able to finally do it, but I can’t remember which instructions I follow.
I’ve tried the one you linked (but I only see hassos-boot), then I tried https://github.com/home-assistant/operating-system/blob/ec6f7978b52823098c3d555f14c6097d0eb33916/Documentation/boards/raspberrypi.md#i2c and https://www.home-assistant.io/hassio/enable_i2c/

I want to find a proper way and correct the docs so it will work on PI4.

Hi Misiu,

Thanks for putting together this custom component!

FYI This is the method I used to enable I2C on my Raspberry Pi 4 Model B.

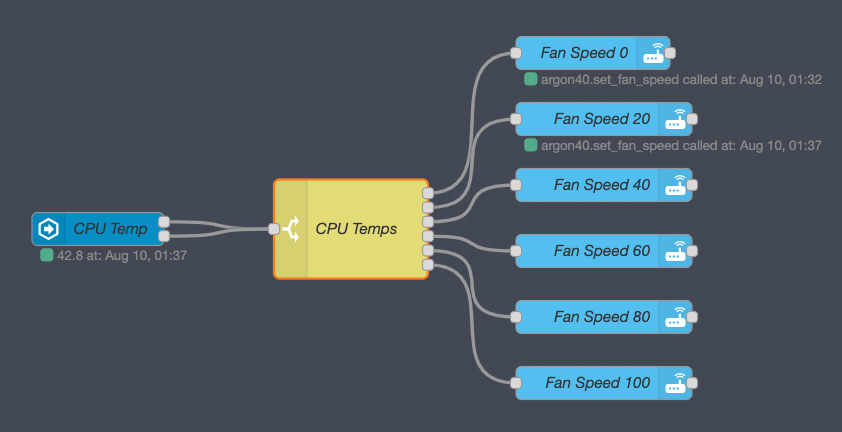
Your Argon40 component works great. I threw together an automation for HA to regulate the fan speed in discrete steps based on CPU temp which seems to be working smoothly.

Do you think you could add compatibility for the power button? It would be nice if it showed up as a sort of momentary switch in HA to be used in automations. To be honest, I’m not entirely sure what I would do with it, but because it’s on the Argon case it would be nice to have for use in HA.

Thanks again!

I’ve tried that guide on a fresh installed HassOS (4.10) and I failed.
I’m using Windows to create those files, so maybe that was the problem? I’ve tried saving files as ANSI and as UTF8, I’ve changed new line character from CR LF to LF (Unix style) and I had no luck :confused:
When I think about that, the only thing I didn’t try was to use another USB stick.
What USB port did you use? 2.0 or 3.0?
Do you remember if something should show in the logs saying the import was successful? (it should show something)

you can always create a PR to my repo with your automation, or post it here and I’ll update the readme :slight_smile:

I think you can use the power button already.
Argon one script is using pin 4 with pull down:

echo 'GPIO.setwarnings(False)' >> $powerbuttonscript
echo 'GPIO.setmode(GPIO.BCM)' >> $powerbuttonscript
echo 'shutdown_pin=4' >> $powerbuttonscript
echo 'GPIO.setup(shutdown_pin, GPIO.IN,  pull_up_down=GPIO.PUD_DOWN)' >> $powerbuttonscript

Please try adding this into config:

binary_sensor:
  - platform: rpi_gpio
    pull_mode: DOWN
    ports:
      4: Argon Power Button

ref: https://www.home-assistant.io/integrations/rpi_gpio/
maybe you will need to add invert_logic: true, but I can’t test that right now.

I’ll try to add separate events for short and long press for that button, but first I need to enable I2C :slight_smile:

looking too for support about this case fan control capabilities. I installed your repo and enabled i2c, bit can’t find the argon40.set_fan_speed service in home assistant. What went wrong?

Hi, I was looking at the button too, had seen the argon script and already tried the binary sensor for pin 4, but for me it doesnt work, no response. invert_logic: true just makes the sensor appear always on in stead of always off… Wondering whether this does work for others?

@WillemH I’ll test that and get back to you with detailed instruction.

Hmmm it might be because I’m running HassOS on Rpi4, and from other forum threads it looks like that may be why gpio pins cant be read

I have the same config.
image

the problem is RPI.GPIO isn’ that good at reading updates of GPIO.
I’ll try to write something, but not sure if I’ll be able to change anything (I’m also planning to use PRI.GPIO). I think gpiozero could be better, but can’t tell without trying :slight_smile:

I was able to detect double-tap.
code in my repo has that change. Please test if possible. If installing using HACS you must pick the master branch

automation:
  - alias: "Argon40 button double-tap"
    trigger:
      platform: event
      event_type: argon40_event
      event_data:
        action: double-tap
    action:
      - service: persistent_notification.create
        data:
          title: "Argon 40"
          message: "Button was double-tapped"

or

Thanks! Tested it and it works indeed :slight_smile:

How’s the progress so far? My Argon One case coming this week…

The worst part is enabling I2C, the rest is easy.
If you have the new case then you will be able to enable the always-on feature (using set-mode service)

The next step is the config flow. I’m working on this right now.

Thank you so much for all your hard work.

Got I2C enabled! I can hear the fan running now, haven’t done any automation for it yet.

It’s a mix between all these:


this:

and finally this:

So this is what I did:
Format a USB stick with FAT32/EXT4/NTFS and name it CONFIG (in all capitals)

In the root of the USB drive add a folder called modules

Inside that folder add a text file called rpi-i2c.conf with the following contents:

i2c-bcm2708
i2c-dev

If you are using a Windows machine make sure it does not save as rpi-i2c.conf.txt

In the root of the USB drive add a file called config.txt with the following contents:

dtparam=i2c1=on
dtparam=i2c_arm=on

If you are using a Windows machine make sure it does not save as config.txt.txt

Insert the USB drive into your Raspberry Pi.
Now go to your Home Assistant web interface, in the sidebar click Supervisor > System.

Now click Import from USB .

Reboot Host, don’t take out the USB, leave it plugged in the whole process. Note I did a Host Reboot and not reboot HA.

Thank you so much @Misiu working great with Node-Red:

2 Likes

Double-tap also confirm working, the fan is actually quite noisy no matter what speed you set. Very difficult to notice the difference sound between fan speeds, but you could feel the difference in the amount of air that comes out of the case. Since it’s pretty noisy, I’ve set the fan to switch off below 45 deg Celcius.

The double-tap sure makes things a little bit more convenient:
Screenshot 2020-08-10 at 1.55.41 PM

1 Like