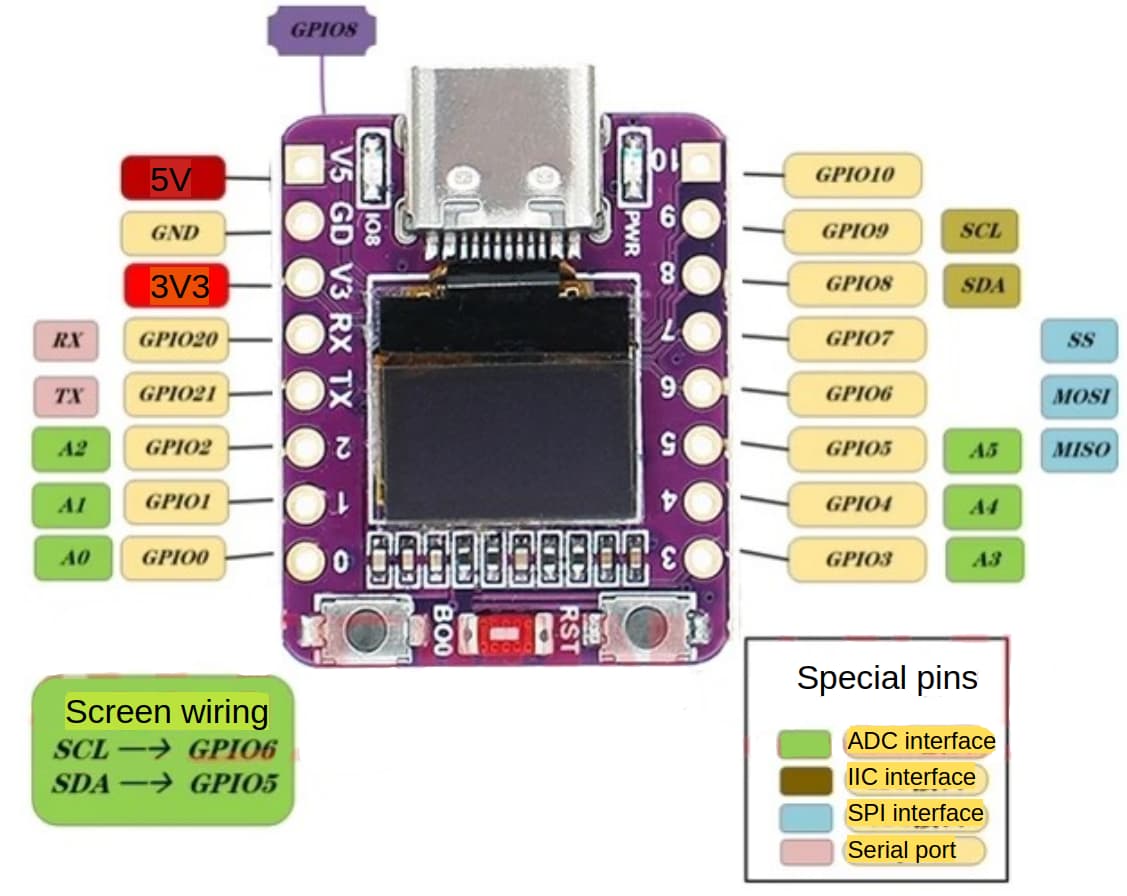
These tiny little ESP32-C3 boards with a small 72x40 sh1106 OLED display can be had for very cheap from certain popular online retailers. Couldn’t pass one by. Not sure yet what I’m going to use it for, but just the exercise of getting it up and running and making some of its built-in features work was a fun activity all in itself.
I’m fairly new to ESPHome so along the way I ended up with a small toolbox of little code trinkets I planning reuse in my future projects. YAML attached below.
substitutions:
  dev_name: abrobot
  friendly_name: Abrobot

esphome:
  name: ${dev_name}
  friendly_name: ${friendly_name}

esp32:
  board: esp32-c3-devkitm-1
  framework:
    type: esp-idf

# Enable logging
logger:

# Enable Home Assistant API
api:
#  encryption:
#    key: ""

ota:
  - platform: esphome
#    password: ""

wifi:
  ssid: !secret wifi_ssid
  password: !secret wifi_password

  # Enable fallback hotspot (captive portal) in case wifi connection fails
  ap:
    ssid: "Abrobot Fallback Hotspot"
#    password: ""

web_server:
captive_portal:

# Internal variables
globals:
  - id: click_type_text
    type: std::string
    restore_value: no
    initial_value: ""

  - id: click_type_map
    type: std::map<std::string, std::string>
    restore_value: no
    initial_value: '{ {"single", "Single Click"}, {"double", "Double Click"}, {"long", "Long Press"} }'

# Scripts
script:
  - id: button_click_handler
    parameters:
      click_type: string
    then:
      - globals.set:
          id: click_type_text
          value: !lambda 'return id(click_type_map).count(click_type) ? id(click_type_map)[click_type] : "Unknown";'
      # Send HA event
      - homeassistant.event:
          event: esphome.button_click
          data:
            device: ${dev_name}
            type: ${click_type}
            text: ${click_type_text}
      - logger.log:
          format: "%s"
          args: [ 'id(click_type_text).c_str()' ]
      # Clear display after a delay
      - script.execute: clear_click_type_timer

  - id: clear_click_type_timer
    mode: restart   # timer restarts if called again
    then:
      - delay: 5s
      - globals.set:
          id: click_type_text
          value: '""'

# GUI elements
button:
  - platform: restart
    name: Restart

text:
  - platform: template
    name: "Line 1"
    optimistic: true
    id: custom_message
    mode: text
    initial_value: "Hello World"

# HA helper
# Create a "helper" in HA with Entity ID "input_text.esp_text".
# Text value of the helper will be shown on the OLED display
text_sensor:
  - platform: homeassistant
    name: "ESP Text"
    id: esp_text_helper
    entity_id: input_text.esp_text
    on_value:
      then:
        - logger.log:
            format: "ESP Text: %s"
            args: ["x.c_str()"]

# Hardware features
light:
  - platform: status_led
    name: "Blue LED"
    id: light_status
    pin:
      number: GPIO08
      inverted: true

binary_sensor:
  - platform: gpio
    name: "Boo Button"
    id: binary_boo
    pin:
      number: GPIO09
      inverted: true
      mode: INPUT_PULLUP

    on_multi_click:
    - timing:
        - ON for at most 0.8s
        - OFF for at most 0.3s
        - ON for at most 0.8s
        - OFF for at least 0.2s
      then:
        - script.execute:
            id: button_click_handler
            click_type: 'double'
    - timing:
        - ON for 0.8s to 5s
        - OFF for at least 0.4s
      then:
        - script.execute:
            id: button_click_handler
            click_type: 'long'
        - light.toggle: light_status
    - timing:
        - ON for at most 0.8s
        - OFF for at least 0.4s
      then:
        - script.execute:
            id: button_click_handler
            click_type: 'single'

# Display
i2c:
  sda: GPIO5
  scl: GPIO6

font:
  - file: "gfonts://Roboto"
    id: roboto
    size: 11

display:
  - platform: ssd1306_i2c
    model: "SSD1306 72x40"
    update_interval: 0.5s
    address: 0x3C
    contrast: 70%
    lambda: |-
      it.printf(0, 0, id(roboto), "%s", id(custom_message).state.c_str());
      it.print(0, 13, id(roboto), id(esp_text_helper).state.c_str());
      it.print(0, 26, id(roboto), id(click_type_text).c_str());