Because the RS232 is already there and I have the hardware to plug into it. I may go 485 if I have to, but for now I’d like to use the Shine-S I already have. Actually I have 2, one I’m using as a test mule and one I’m keeping stock.
ok, i agree with you. try to use the verbose or very_verbose to see if any codes appear.
logger: level: VERBOSE
Really love your home assistant layout can you share config? 
Does Grid first work for you?
I think I may have found the issue on the SPH.

That suggests its not as easy as other inverters, in that more settings need to exist. I have found a different modbus register https://www.amosplanet.org/wp-content/uploads/2022/12/通信协议MAX_Growatt-Inverter-Modbus-RTU-Protocol_II-V1_13_20190116-English.pdf which includes options for the additional settings. I have not had a chance to explore how I’m going to do the bitmasks Modbus Controller — ESPHome but will look at it tomorrow. e.g.

I think the SPH6000 is just ignoring the write to 1044 as it is superceded by other registers Sniffing RS232 comms between SPH6000 and a Shine-S - #4 by scudderfish
Yes, but you need to first go the the Growatt web and enable one of the slots for grid first and set it to 00:00 - 23:59 and On, then you can change the overall priority via modbus… You can of course also set the slots via registers but I didn’t bother setting that up.
3 Likes
I was just about to set up my config so that on boot it sets up the first slots for grid/battery/load to 00:00-23:59 and then use the three enable toggles to switch as necessary 
I’ve admitted defeat and I’ve stopped using my Shine-S stick. I was getting a better config but it started crashing with occasional out of memory errors in the logs (if they made it that far). It crashed so hard I had to strip it down and reflash over serial.
I bit the bullet and bodged up an ESP32, an adjustable buck converter, a DB9 port and a MAX232 chip and once I’d got TX and RX the right way around on the DB9 it works swimmingly

The advantage I see of sticking with 232 over 485 is there is a very convenient 12v on pin 9 of the DB9 to power this abomination. Once I’m happy with it all I’ll make something neater and stick it in a case.
All hail the ESP32!
1 Like
Thanks, this was the last bit of guidance I needed. It might still be good to add something to adjust the power from 5 - 100%; will check during the easter break if I can build upon your design.
I had to setup a similar time slot for battery (00:00 - 23:59) to get that one going. I can now do 4 things with the battery using HA:
- Load from grid at maximum charging speed (Battery / AC Charge on)
- Use current consumption in the house from grid (Battery / AC Charge off)
- Use solar for house consumption and export excess to grid (Load)
- Discharge battery to Grid (Grid)
This is everything I had hoped for. Thanks for your help @Plawa - installed the SPH 8k today and my local control is fully operational thanks to you and others on this forum!
2 Likes
That was a lot easier than expected - below 4 write settings to adjust charge speed, charge max SoC, discharge speed, discharge min SoC; all for the SPH 3phase series but most likely compatible with SPA as well - tested this on my set up and this works great; use case, reduce charge speed when simultaneously charging car (to avoid blowing the fuses); automating charging and discharging to a specific SoC to get you “through the night” etc:
number:
  - platform: modbus_controller
    name: "${devicename} Discharge SoC"
    address: 1071
    value_type: U_WORD
    min_value: 10
    max_value: 100
    step: 1

  - platform: modbus_controller
    name: "${devicename} Discharge Power Rate"
    address: 1070
    value_type: U_WORD
    min_value: 10
    max_value: 100
    step: 1

  - platform: modbus_controller
    name: "${devicename} Charge SoC"
    address: 1091
    value_type: U_WORD
    min_value: 10
    max_value: 100
    step: 1

  - platform: modbus_controller
    name: "${devicename} Charge Power Rate"
    address: 1090
    value_type: U_WORD
    min_value: 10
    max_value: 100
    step: 1
Hi, sharing my setup for Growatt spf 5000 es,

Hw used:
- d1 mini (esp8266mod) that was laying around from previous projects with esphome latest (flashed through esphome gui flasher for the first time, then updated through esphome addon in HA)
- Hi-link 220v to 5v chip (power supply)
- RS485 to ttl (https://a.aliexpress.com/_m0sRSky)
- Varistor 275v (took it out from an old zigbee module)
- 120R ohm resistor between pinns A & B of rs to ttl converter (https://a.aliexpress.com/_mKjAcws)
- RJ-45 T-568B pinout (starts with orange/white ,orange …) (as per growatt manual)
Setup:
- Hi-link AC inputs to wall socket (AC plug)
- Hi-link Vo+ , Vo- to d1 mini pins 5v and gnd respectively (i used the 5v pin to power on the d1 mini)
- pins 3v3,Tx,Rx,Gnd to RS485 to ttl pins Vcc,Tx,Rx,Gnd respectively
- RJ45 white orange and orange pins to B- and A+ of rs485 to ttl converter (had to cycle all network cable pins to get the correct ones, first used orange/white and blue/white but only had tx working so i kept on switching till i found correct one)
Notes:
0/ I also plugged the cable of the d1 mini into the micro usb port in case i need to plug it into the pc but power is supplied from Hi-link chip (much more stable)
1/ Had to use board: esp01_1m, i’ve tried d1 mini and other but only this worked
2/ Baud rate 9600 - 115200 didn’t work
3/ modbus address 0x1
4/ formatting is very important in yaml or you’ll get syntax errors
5/ rs485 to ttl worked with both 5v or 3.3v but i adopted 3.3v not to fry it
6/ was able to go down to 1s sampling in code but this was clogging the chips so reverted to 5s
esphome yaml setup based on extract from Plawa @candidotsa @JohnGalt1717 and everyone else in this thread to make it possible to automate based on realtime (5s delay) input from growatt (thks guys)
still WIP:
substitutions:
  devicename: Growatt
  friendly_name: "Growatt SPF 5k"
  esp_name: ESP Growatt #Device Name
  update_realtime: 5s
  update_fast: 5s
  update_slow: 10s
  esp_hostname: "esp-growatt"
  ip_address: 10.0.0.36
  ip_gw: 10.0.0.1
  ip_netmask: 255.255.255.0


esphome:
  name: ${esp_hostname}

esp8266:
    board: esp01_1m

# Enable logging
logger:
    baud_rate: 0
    level: DEBUG
# Enable Home Assistant API
api:
    encryption:
      key: !secret api_key
ota:
    password: !secret ota_password

wifi:
    ssid: !secret wifi_ssid
    password: !secret wifi_password
    manual_ip:
      static_ip: ${ip_address}
      gateway: ${ip_gw}
      subnet: ${ip_netmask}
    #reboot_timeout: 2min
    ap:
      ssid: "${esp_name} Fallback Hotspot"
      password: !secret ap_password

captive_portal:

web_server:
    port: 80
    include_internal: true

uart:
    id: mod_bus
    baud_rate: 9600
    tx_pin: 1
    rx_pin: 3
    debug:
      direction: RX
      dummy_receiver: false
      after:
        delimiter: "\n"
      sequence:
        - lambda: UARTDebug::log_string(direction, bytes);

modbus:
  id: modbus1
  uart_id: mod_bus

modbus_controller:
  - id: growatt
    address: 0x1
    modbus_id: modbus1
    update_interval: ${update_realtime}
    setup_priority: -10

button:
  - platform: restart
    name: "${esp_name} Restart"

text_sensor:
  - platform: template
    name: "${friendly_name} Status"
    icon: mdi:eye
    entity_category: diagnostic
    lambda: |-
      if ((id(status).state) == 1) {
          return {"Normal"};
        } else if ((id(status).state) == 0)  {
          return {"Standby"};
        } else if ((id(status).state) == 2)  {
          return {"Discharge"};
        } else if ((id(status).state) == 3)  {
          return {"Fault"};
        } else if ((id(status).state) == 4)  {
          return {"Flash"};
        } else if ((id(status).state) == 5)  {
          return {"PV Charging"};
        } else if ((id(status).state) == 6)  {
          return {"AC Charging"};
        } else if ((id(status).state) == 7)  {
          return {"Combined Charging"};
        } else if ((id(status).state) == 8)  {
          return {"Combined Charging & Bypass"};
        } else if ((id(status).state) == 9)  {
          return {"PV Charging & Bypass"};
        } else if ((id(status).state) == 10)  {
          return {"AC Charging & Bypass"};
        } else if ((id(status).state) == 11)  {
          return {"Bypass"};
        } else if (id(status).state == 12)  {
          return {"PV Charge and Discharge"};
        } else {
          return {"Unknown"};
        }

sensor:

  - platform: modbus_controller
    address: 0
    register_type: "read"
    internal: true
    accuracy_decimals: 0
    id: status

  - platform: wifi_signal
    name: "WiFi Signal Sensor"
    update_interval: 60s

# PPV 1 since only 1 PV input
  - platform: modbus_controller
    name: "PV1 voltage "
    address: 1
    register_type: "read"
    unit_of_measurement: V
    device_class: voltage
    state_class: measurement
    entity_category: diagnostic
    icon: mdi:flash
    value_type: U_WORD
    accuracy_decimals: 1
    filters:
    - multiply: 0.1

  - platform: modbus_controller
    name: "PV1 Power"
    id: pv1_power_high
    address: 3
    register_type: "read"
    unit_of_measurement: W
    device_class: power
    state_class: measurement
    icon: mdi:solar-power-variant
    value_type: U_DWORD
    accuracy_decimals: 0
    internal: true
    filters:
    - multiply: 0.1

# Load Related
  - platform: modbus_controller
    name: "Load Consumption"
    id: op_power_high
    address: 9
    register_type: "read"
    unit_of_measurement: W
    device_class: power
    state_class: measurement
    icon: mdi:solar-power-variant
    value_type: U_DWORD
    accuracy_decimals: 0
    internal: true
    filters:
    - multiply: 0.1

  - platform: modbus_controller
    name: "Load Consumption (VA)"
    id: op_apparent_power
    address: 11
    register_type: "read"
    unit_of_measurement: VA
    device_class: power
    state_class: measurement
    icon: mdi:solar-power-variant
    value_type: U_DWORD
    accuracy_decimals: 0
    internal: true
    filters:
    - multiply: 0.1

  - platform: modbus_controller
    name: "Load %"
    address: 27
    register_type: "read"
    unit_of_measurement: "%"
    device_class: POWER_FACTOR
    state_class: measurement
    entity_category: diagnostic
    icon: mdi:flash
    value_type: U_WORD
    accuracy_decimals: 0
    filters:
    - multiply: 0.1

  - platform: modbus_controller
    name: "Load Input Current (A) in AC"
    address: 34
    register_type: "read"
    unit_of_measurement: A
    device_class: power
    state_class: measurement
    entity_category: diagnostic
    icon: mdi:flash
    value_type: U_WORD
    accuracy_decimals: 1
    filters:
    - multiply: 0.1

  - platform: modbus_controller
    name: "AC Output Voltage"
    address: 22
    register_type: "read"
    unit_of_measurement: V
    device_class: voltage
    state_class: measurement
    entity_category: diagnostic
    icon: mdi:flash
    value_type: U_WORD
    accuracy_decimals: 1
    filters:
    - multiply: 0.1

  - platform: modbus_controller
    name: "DC Output Voltage"
    address: 24
    register_type: "read"
    unit_of_measurement: V
    device_class: voltage
    state_class: measurement
    entity_category: diagnostic
    icon: mdi:flash
    value_type: U_WORD
    accuracy_decimals: 1
    filters:
    - multiply: 0.1

  - platform: modbus_controller
    name: "Load Input Current (A)"
    address: 7
    register_type: "read"
    unit_of_measurement: A
    device_class: power
    state_class: measurement
    entity_category: diagnostic
    icon: mdi:flash
    value_type: U_WORD
    accuracy_decimals: 1
    filters:
    - multiply: 0.1
# Temperatures Monitors

  - platform: modbus_controller
    name: "Inverter Temperature"
    address: 25
    register_type: "read"
    unit_of_measurement: °C
    device_class: temperature
    entity_category: diagnostic
    state_class: measurement
    icon: mdi:thermometer
    value_type: U_WORD
    accuracy_decimals: 1
    filters:
    - multiply: 0.1

  - platform: modbus_controller
    name: "PV Temperature"
    address: 32
    register_type: "read"
    unit_of_measurement: °C
    device_class: temperature
    entity_category: diagnostic
    state_class: measurement
    icon: mdi:thermometer
    value_type: U_WORD
    accuracy_decimals: 1
    filters:
    - multiply: 0.1

  - platform: modbus_controller
    name: "DC Bus Temperature"
    address: 26
    register_type: "read"
    unit_of_measurement: °C
    device_class: temperature
    entity_category: diagnostic
    state_class: measurement
    icon: mdi:thermometer
    value_type: U_WORD
    accuracy_decimals: 1
    filters:
    - multiply: 0.1

## %percentages ##

  - platform: modbus_controller
    name: "Battery Voltage"
    address: 17
    register_type: "read"
    unit_of_measurement: "V"
    device_class: voltage
    state_class: measurement
    entity_category: diagnostic
    icon: mdi:flash
    value_type: U_WORD
    accuracy_decimals: 1
    filters:
    - multiply: 0.01

  - platform: modbus_controller
    name: "Battery SoC"
    address: 18
    register_type: "read"
    unit_of_measurement: "%"
    device_class: POWER_FACTOR
    state_class: measurement
    entity_category: diagnostic
    icon: mdi:flash
    value_type: U_WORD
    accuracy_decimals: 0
    filters:
    - multiply: 1

  - platform: modbus_controller
    name: "MPPT Charger fan speed"
    address: 81
    register_type: "read"
    unit_of_measurement: "%"
    device_class: POWER_FACTOR
    state_class: measurement
    entity_category: diagnostic
    icon: mdi:flash
    value_type: U_WORD
    accuracy_decimals: 0
    filters:
    - multiply: 1

  - platform: modbus_controller
    name: "Inverter fan speed"
    address: 82
    register_type: "read"
    unit_of_measurement: "%"
    device_class: POWER_FACTOR
    state_class: measurement
    entity_category: diagnostic
    icon: mdi:flash
    value_type: U_WORD
    accuracy_decimals: 0
    filters:
    - multiply: 1
3 Likes
Does anyone know the modbus address for Load First SoC on the SPH series? On the website of Growatt it’s possible to set a max discharge SoC for Load First; I can’t find it though in any of the Modbus PDFs.
Hi, I have this installed on my shine GitHub - WilbertVerhoeff/Growatt: Growatt ShineWifi modbus with ESPHome code to run native in Home Assistant
and works perfectly. However the code this project is based on from otti, also supports write register.
I would be interested in setting a limiter based on how much surplus energy the house has (surplus information I already have over MQTT). Will this work with the ESPHome project? Do need ottis Code for that? Can I just bring in the lines of that code that allows me to do that into ESPHome?
Thanks for help and/or advise.
Hi, I have a 3-phase Growatt 10kw inverter with Growatt smart meter. I wonder if anyone has figured out the correct modbus register to read the total energy import from grid?
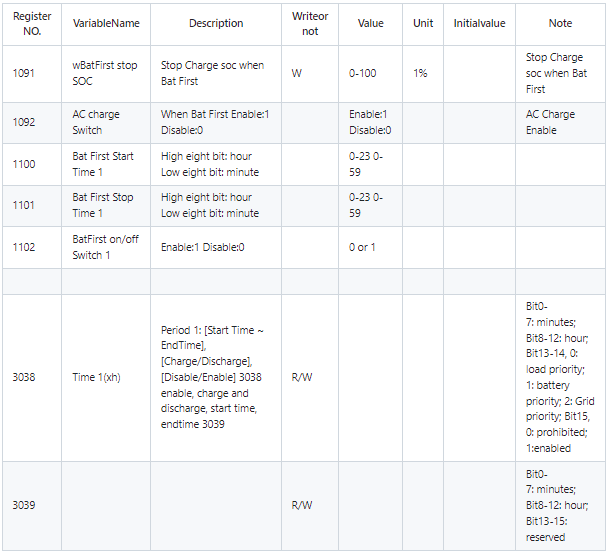
Did you ever figure this out, I’m having trouble saving Bat First Start and End Times on my SPH6000
I have found the following holding registers for protocol 1.24 and can write to 1091 and 1092 but the settings for 1000 and 1101 do not stick. There’s also 3038 and 3039 but I’m not sure what value I should be populating in these to test.
There is something odd going on With my stock shine stick plugged in, the command to write appears to come as one multifield write that sets all the battery fields in one go (which makes some sense given the nature of the dialog box, easier to update everything rather than figure out what the user changed)
01 10 04 42 00 13 26 00 64 00 64 00 01 00 00 00 00 00 00 00 00 00 00 00 00 00 00 02 00 05 00 00 01 00 00 00 00 00 00 00 00 00 00 00 00 d8 56
Plugging my ESP32 in, I can send a write command to update a time, and the inverter responds that the write works
2023-04-19 17:21:39.272044 > 01 06 04 4c 02 01 89 8d
2023-04-19 17:21:39.295933 < 01 06 04 4c 02 01 89 8d
(setting the ‘On’ time to 2:01am)
however, when that field gets polled later, it is back to 02 00
2023-04-19 17:22:03.043867 > 01 03 04 4c 00 03 c5 2c
2023-04-19 17:22:03.068165 < 01 03 06 02 00 05 00 00 01 e1 9b
I’ve emailed growatt on the off-chance they may explain it.
Hi. I don’t know if you can use min. On mine I can only choose hours.
No, same it I try to set only hours