I use packages.
Reading the article Convenient configuration (configuration) Home Assistant.
This is written in configuration.yaml as follows
homeassistant:
  packages: !include_dir_named includes/packages # We place any configurations in the folder packages
How to make a sensor with attributes?
We read about creating a sensor with attributes here
You can create a sensor and control not only the content of the state, but also what is contained in the attributes. Here is an example:
input_text:
  t_state:
  t_attribute:

sensor:
  - platform: template
    sensors:
      my:
        value_template: "{{ states('input_text.t_state') }}"
        attribute_templates:
          a: "{{ states('input_text.t_attribute') }}"
In the packages folder, we create a file with any name, I called face_identify_deepstack_sensor.yaml
In the face_identify_deepstack_sensor.yaml file, we insert the code, where image_processing.detect_face_eufy_camera is the name of my camera (the deepstack config is below) and I also use the auxiliary element number input_number. deepstack_confidence_face. It allows you to adjust the confidence of facial recognition through lovelace. Instead of image_processing. detect_face_beauty_camera, you need to specify the name of your camera
sensor:
- platform: template
sensors:
persons_names:
friendly_name: 'Names of identified persons'
icon_template: mdi:face-recognition
value_template: >
{% set detect_face = state_attr('image_processing.detect_face_eufy_camera','faces') | selectattr('faces','!=','name')| map(attribute='name') | join(', ') %}
{% set confidence_face = state_attr('image_processing.detect_face_eufy_camera','faces') | selectattr('faces','!=','confidence')| map(attribute='confidence') | join(', ') %}
{% set set_confidence = states('input_number.deepstack_confidence_face')%}
{% if detect_face and confidence_face >= set_confidence %}
{{ state_attr('image_processing.detect_face_eufy_camera','faces') | selectattr('faces','!=','name')| map(attribute='name') | join(', ') }}
{% else %}
unknown
{% endif %}
attribute_templates:
faces: "{{ state_attr('image_processing.detect_face_eufy_camera','faces') }}"
total_faces: "{{ state_attr('image_processing.detect_face_eufy_camera','total_faces') }}"
total_matched_faces: "{{ state_attr('image_processing.detect_face_eufy_camera','total_matched_faces') }}"
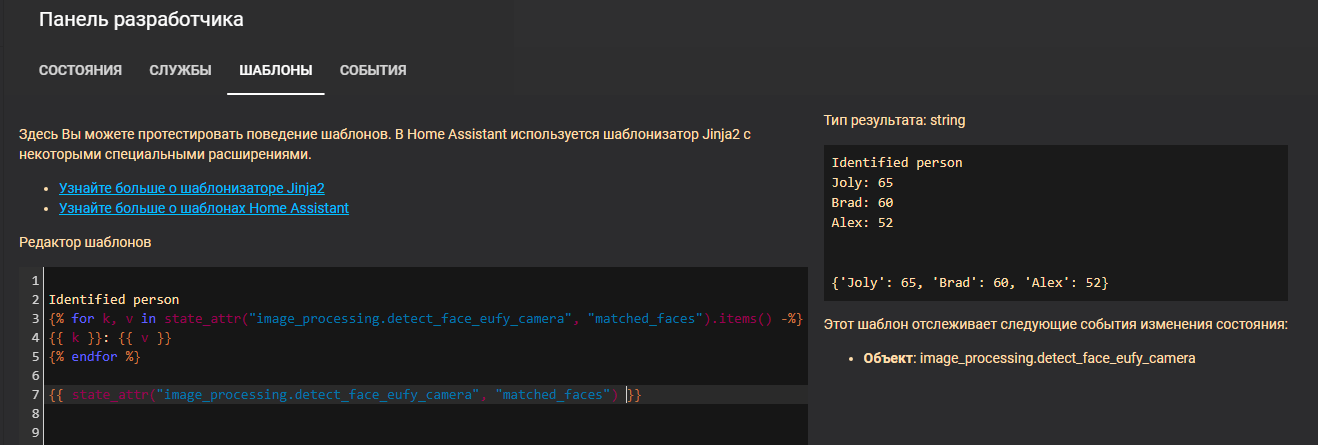
matched_faces: "{{ state_attr('image_processing.detect_face_eufy_camera','matched_faces') }}"
last_detection: "{{ state_attr('image_processing.detect_face_eufy_camera','last_detection') }}"
friendly_name: "{{ state_attr('image_processing.detect_face_eufy_camera','friendly_name') }}"
device_class: "{{ state_attr('image_processing.detect_face_eufy_camera','device_class') }}"
Creating an auxiliary element number input_number.deepstack_confidence_face. If you do it through the GUI
If you do it via yaml. To the input_number.yaml file
deepstack_confidence_face:
  name: "Deepstack: Face Recognition Confidence"
  min: 40
  max: 100
  step: 1
  mode: slider
  icon: mdi:face-recognition
These are the settings we use to work with deepstack
image_processing:
  - platform: deepstack_face
    ip_address: 192.168.1.47
    port: 5100
    timeout: 10000
    detect_only: False
    save_file_folder: /config/www/deepstack/snapshots/
    save_timestamped_file: False
    save_faces: False
    save_faces_folder: /config/www/deepstack/faces/
    show_boxes: False
    source:
# Connecting the camera Eufy Indoor Cam 2K Pan & Tilt
      - entity_id: camera.eufy_camera_hall
        name: detect_face_eufy_camera  #( this is the name of my camera. As we call it here, it will be called, so I have it called image_processing.detect_face_ugon_camera)
Explanation of options
detect_only: Configuring detect_only = True results in faster processing than recognition mode, but any trained faces will not be listed in the matched_faces attribute
save_timestamped_file: Whether to save a photo with the last date of the snapshot to the folder-true\false
save_faces: Whether to save faces to a folder - true\false
show_boxes: Enable/disable the selection of the face with a red frame - true\false
Deepstack Training Recommendation
For deepstack face recognition to work correctly, I use photos from different angles, this will allow me to recognize a person’s faces more correctly. If you upload photos that look straight, then there will often be erroneous recognition when viewing from an angle. It is also necessary to use confidence, the higher the confidence, the more correct it will be to identify the person. The best option for face recognition is a confidence of at least 70. So I created
Текст на русском (Text in Russian)
Я использую packages.
Читаем статью Удобная настройка (конфигурация) Home Assistant.
Прописывается это в configuration.yaml следующим образом
homeassistant:
  packages: !include_dir_named includes/packages # Размещаем любые конфигурации в папке packages
Как сделать сенсор c атрибутами?
Про создание сенсора с атрибутами читаем блог Ивана Бессарабова
Создание template сенсора с атрибутами
Можно создать сенсор и управлять не только содержимым стейта, но и тем что содержится в атрибутах. Вот пример:
input_text:
  t_state:
  t_attribute:

sensor:
  - platform: template
    sensors:
      my:
        value_template: "{{ states('input_text.t_state') }}"
        attribute_templates:
          a: "{{ states('input_text.t_attribute') }}"
В папке packages создаем файлик с любым именем, я назвал face_identify_deepstack_sensor.yaml
В файлик face_identify_deepstack_sensor.yaml вставляем код, где image_processing.detect_face_eufy_camera это имя моей камеры (конфиг deepstack ниже) и еще я использую вспомогательный элемент число input_number.deepstack_confidence_face. Оно позволяет регулировать уверенность распознавания лица через lovelace. Вам вместо image_processing.detect_face_eufy_camera нужно указывать имя своей камеры
sensor:
  - platform: template
    sensors:
      persons_names:
        friendly_name: 'Имена идентифицированных лиц'
        icon_template: mdi:face-recognition
        value_template: >
          {% set detect_face = state_attr('image_processing.detect_face_eufy_camera','faces') | selectattr('faces','!=','name')| map(attribute='name') | join(', ') %}
          {% set confidence_face = state_attr('image_processing.detect_face_eufy_camera','faces') | selectattr('faces','!=','confidence')| map(attribute='confidence') | join(', ') %}
          {% set set_confidence = states('input_number.deepstack_confidence_face')%}
          {% if detect_face and confidence_face >= set_confidence %}
          {{ state_attr('image_processing.detect_face_eufy_camera','faces') | selectattr('faces','!=','name')| map(attribute='name') | join(', ') }}
          {% else %}
          unknown
          {% endif %}
        attribute_templates:
          faces: "{{ state_attr('image_processing.detect_face_eufy_camera','faces') }}"
          total_faces: "{{ state_attr('image_processing.detect_face_eufy_camera','total_faces') }}"
          total_matched_faces: "{{ state_attr('image_processing.detect_face_eufy_camera','total_matched_faces') }}"
          matched_faces: "{{ state_attr('image_processing.detect_face_eufy_camera','matched_faces') }}"
          last_detection: "{{ state_attr('image_processing.detect_face_eufy_camera','last_detection') }}"
          friendly_name: "{{ state_attr('image_processing.detect_face_eufy_camera','friendly_name') }}"
          device_class: "{{ state_attr('image_processing.detect_face_eufy_camera','device_class') }}"
Создаем вспомогательный элемент число input_number.deepstack_confidence_face. Если делать через GUI
Если делать через через yaml. В файлик input_number.yaml
deepstack_confidence_face:
  name: "Deepstack: Уверенность распознавания лица"
  min: 40
  max: 100
  step: 1
  mode: slider
  icon: mdi:face-recognition
Вот эти настройки мы используем для работы deepstack
image_processing:
  - platform: deepstack_face
    ip_address: 192.168.1.47
    port: 5100
    timeout: 10000
    detect_only: False
    save_file_folder: /config/www/deepstack/snapshots/
    save_timestamped_file: False
    save_faces: False
    save_faces_folder: /config/www/deepstack/faces/
    show_boxes: False
    source:
# Подключаем камеру Eufy Indoor Cam 2K Pan & Tilt
      - entity_id: camera.eufy_camera_hall
        name: detect_face_eufy_camera  #( это имя нашей камеры, как мы тут именуем, так и будет называться, поэтому у меня оно именуется image_processing.detect_face_eufy_camera)
Пояснение по опциям
detect_only: Настройка detect_only = True приводит к более быстрой обработке, чем режим распознавания, но любые обученные лица не будут перечислены в атрибуте matched_faces
save_timestamped_file: Сохранять ли в папку фото с последней датой снимка - да\нет
save_faces: Сохранять ли лица в папку - да\нет
show_boxes: Включить\выключить выделение лица красной рамочкой - да\нет
Рекомендация по обучению deepstack
Для правильной работы распознавания лиц deepstack я использую фото с разными углами, это позволит более правильно распознавать лица человека. Если загружать фото которые смотрят прямо, то при угловом обзоре часто будет ошибочное распознавание. Также обязательно нужно использовать уверенность, чем выше уверенность, тем правильнее будет опознавать лицо. Самый оптимальный вариант для распознавания лица, это уверенность не ниже 70. Поэтому я создал