EDIT: This is no longer the best bed presense sensor, see: Bed Presence for ESPHome by Elevated Sensors instead. This topic is closed and no longer supported.
EDIT 2: To be clear (and to appease the conspiracy nutjobs) I have absolutely no affiliation with that product, I just really like it and use it myself. And every single poster on these forums has the option of requesting a topic they wrote be locked (or deleted) if they no longer wish to support it. This is not a moderator only privilege.
Once you have a sensor that can detect you are in bed you will wonder how you automated without it. I use it to turn everything off, turn on my bedside lamp, arm the alarm in perimeter mode, and put my announcements in “do not disturb mode”. When I get up it disarms the alarm and plays my morning announcements.
Unfortunately finding a reliable sensor has not been easy.
I have tried:
-
A strain gauge glued to a bed slat. It had a reliable detection range and was fast but required re-tuning of the trigger level occasionally as the wooden slat it was glued to changed shape with temperature and humidity. Some others who tried it reported sensor noise issues.
-
A pressure mat. This was very fast and worked reliably for months but eventually compressed and started false triggering. It was also expensive for the larger mats ($80 AUD) and they could be damaged by folding for postage (I had to return two).
And now this. A force sensitive resistor (FSR) Force Sensitive Resistor - Long - SEN-09674 - SparkFun Electronics
I have been extremely happy with the response and reliability. It does not drift like a strain gauge and can not be crushed like a pressure mat.
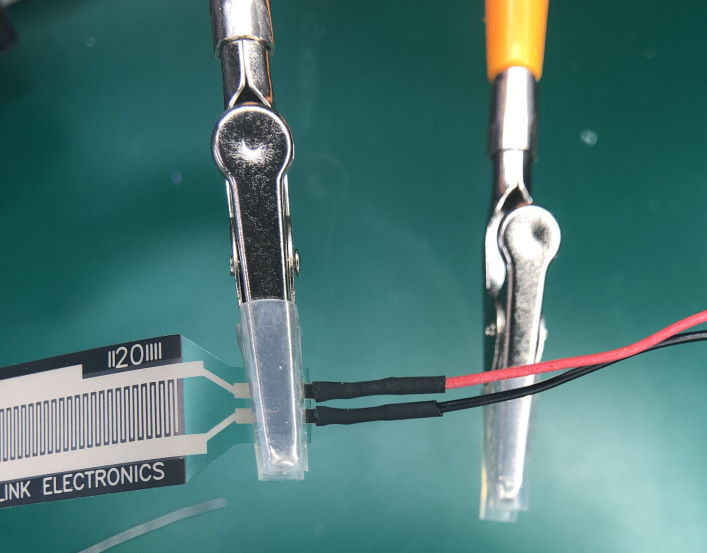
Don’t bother purchasing the recommended clips. I had absolutely no luck getting them to connect to the FSR (maybe I was doing it wrong?) and if you are quick with a soldering iron you can make a more reliable connection. Just be fast as possible when soldering and use the absolute minimum heat required for heatshrinking.
Tin your wires and the connections with solder first and if possible use something to stop the heat spreading up the connections. See where I have placed the helping hands alligator clip:

A bit of heatshrink helps with making the connection more robust

The FSR comes with adhesive backing but I used painter’s tape to secure it to a bed slat lightly so as not to be affected by the wood expanding and contracting with temperature or humidity.

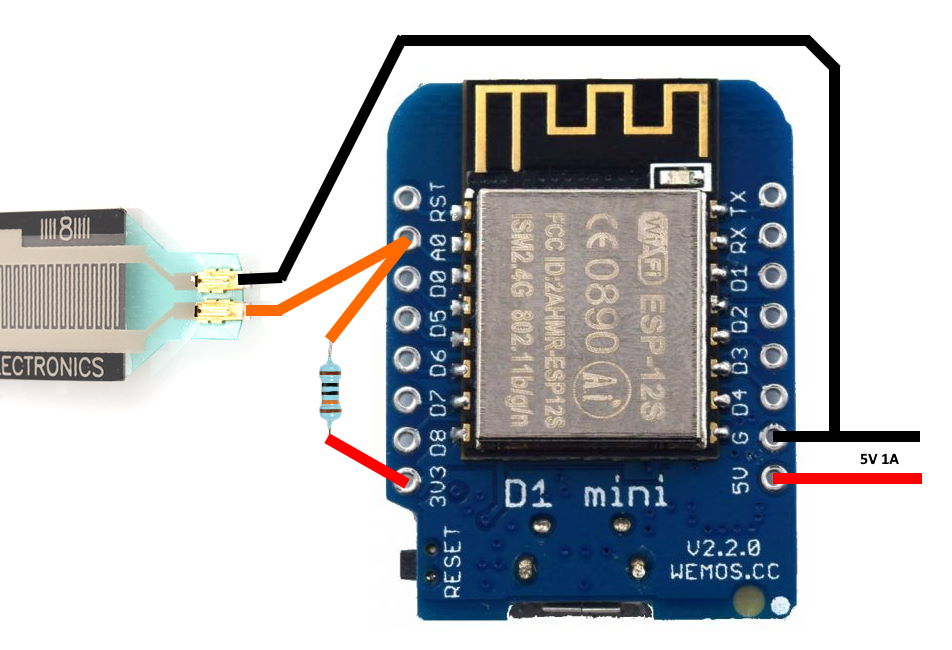
Connect it to an ESP board analogue input like this:

The choice of R1 is very important for the largest possible detection range.
To determine its value, measure the resistance of the FSR with a multimeter when you are in and out of bed. R1 can then be found using this formula:
R1 = SQRT( Rin_bed * Rout_of_bed)
Make the measurements a few times and take averages for each of the two values.
The result will depend on the thickness, weight and resilience of your mattress. For one bed I used 300 Ohms, for another 3K Ohms!. Do calculate this value properly.
Add the following to your ESP configuration:
For ESP32 boards:
binary_sensor:
  - platform: template
    name: "Master Bed Occupied"
    id: mb_o
    lambda: return id(master_bed_sensor).state < id(trigger_level).state;

sensor:
  - platform: adc
    pin: GPIO34
    attenuation: 11db
    name: "Master Bed Sensor"
    id: "master_bed_sensor"
    icon: mdi:bed
    update_interval: 0.5s
    filters:
      - sliding_window_moving_average:
          window_size: 10
          send_every: 1
      - or:
          - throttle: 180s
          - delta: 0.02

number:
  - platform: template
    name: Master Bed Trigger Level
    id: trigger_level
    optimistic: true
    restore_value: true
    min_value: 0
    max_value: 3.5
    step: 0.05
    icon: mdi:arrow-collapse-down
    unit_of_measurement: V
Note: for ESP8266 boards, change the sensor definition to:
sensor:
  - platform: adc
    pin: A0
    name: "Master Bed Sensor"
    id: "master_bed_sensor"
    icon: mdi:bed
    update_interval: 0.5s
    filters:
      - multiply: 3.3
      - sliding_window_moving_average:
          window_size: 10
          send_every: 1
      - or:
          - throttle: 180s
          - delta: 0.02
As the ADC voltage is 0 to 1V instead of 0 to 3.3V and the attenuation option is not used.
Results have been outstandingly repeatable and reliable:

Bonus Lovelace card, requires mini-graph-card and hui-element

entities:
  - color_thresholds_transition: hard
    entities:
      - entity: sensor.master_bed_sensor
        color: '#0da035'
        show_fill: false
      - entity: number.master_bed_trigger_level
        color: '#e45e65'
        show_fill: false
      - color: rgb(255,128,0)
        entity: binary_sensor.master_bed_occupied
        show_line: false
        y_axis: secondary
    group: false
    hour24: true
    hours_to_show: 48
    line_width: 2
    points_per_hour: 12
    show:
      icon: false
      name: false
      extrema: false
      average: false
      fill: fade
      labels: false
      state: true
    state_map:
      - label: Out
        value: 'off'
      - label: In
        value: 'on'
    type: custom:hui-element
    card_type: custom:mini-graph-card
    card_mod:
      class: inline-card-no-border
  - entity: number.master_bed_trigger_level
show_header_toggle: false
state_color: true
title: Master Bed Sensor
type: entities
 I was thinking at using weight sensors but was more tricky to install and setup ! sensors ordered at Sparkfun to build that asp