Garden Irrigation

I’m going to drop two other 8 channel relay board suggestions here for comment.
The first is a complete system controlled by Bluetooth for about $20US. Now I know little about bluetooth via HA so any comment welcome about how easy or hard getting HA on Raspberry Pi 3 BT to control this module ?
The second 8 channel module is controlled by Modbus serial. While this would need a serial interface to my HA Pi it might be easier than the above as HA seems to have a Modbus control component. Again any useful comment accepted as this is a third possible option now.
Due to the cheap price and fairly complete nature of these modules it is going to be economic enough to buy two, so to have a spare to swap out (which is important in a hot Australian summer…).
8 Channel BT controlled

8 Channel Modbus controlled

Edit: Found this info about the BT 8 way relay. Looks like it might be just serial strings over BT.
Parameter:
1.Operating voltage: DC 12V
2.External relay is required to play a switching function
3.Bluetooth name is QS-8RELAY password:123456
4.Revise the name fD 02 ef + The total length is 1 bytes + length + Device name byte (The longest is 10 bytes) + length + matching password(PIN the longest is 6 bytes)+ 5d
Modify successfully:df ff 00 00 5d Modify failed, No response:df 00 00 00 5d

8 way control code table:
1 way open: FD 02 20 01 01 5D 1 way Close: FD 02 20 01 00 5D
2 way open: FD 02 20 02 01 5D 2 way Close: FD 02 20 02 00 5D

8 way open: FD 02 20 08 01 5D 8 way Close: FD 02 20 08 00 5D
1-8 way open: FD 02 20 EF FF 5D 1-8 way Close: FD 02 20 EF 00 5D
Esc DF FD XX XX 5D //XXXXThere are 16 persons, 1 for open and 0 for Close

Specifications:
Application range: remote control switch
Model: QS - 64
Contact load: DC, AC
Contact form: switch
Rated current: 10A
Rated voltage: 5V 12V
Size: 7 x10cm/2.76 x 3.93inch
Power supply voltage: DC5V, DC 7-40v, AC90-240V
Input current: 1A
Communication mode: 4.0 Bluetooth (CC2540)
Communication distance: 6-10 m (specific for different actual conditions)
Delay time range: 1-255 seconds.
Control voltage: DC 0-277V 10A, DC0-30V 10A

Anyone using my garden irrigation system (I know there at least a couple of you from messages I have received) might want to look at this thread.

1 Like

A very neat way to do an eight station controller. One board that’s it !


WiFi eight channel relay on Git
info
Instructibles article using the board

i got too errors in log since 0.81.1
after modifying:
{{(float (duration) * 60) | round}}
by
{{duration | float | multiply (60) | round}}

I still have many mistakes

Help!, please

Thanks
**sorry for my bad English

Yes, I was about to post here about this…

Check this thread. A template question after 0.81 upgrade

There was a big change in 0.81 that affected template sensors. The change also highlight that I wasn’t setting them up the best way :roll_eyes:

The changes needed aren’t big, read the thread and hopefully you can work it out. Post here if not and I will try to help you.
.

1 Like

Here’s my (pretty simple and fun) apartment and rental friendly irrigation system. Main hardware is a cheap USB pump off Ebay, a smart switch (xiaomi), some Mi Flora sensors, and a xiaomi water sensor (which is not operational at this point).

1 Like

Hey All,

Got into HASS about a year now and slowly building up my smart home. Spent a bit of time making my own irrigation project. I really appreciate the code petr has provided, wish I had of seen it earlier, but will probably integrate a couple of pieces of code into my setup at some point.

I have done mine slightly differently, possibly made more work for myself in doing it the way I did. E.g. using a microcontroller board with two microcontrollers, multiple flow meters, fet relay board, moisture sensors.

But it works for me at least.

All the code is in my github repository.

https://github.com/rowdy15/HomeAssistant-IrrigationProject

So does the online weather adjustment work now?

I’ve created a component to estimate the time to irrigate. The model is taken from leaky bucket model from networking

component is here:
https://github.com/hhaim/hass/blob/master/custom_components/wb_irrigation/init.py

This is how you use add it

wb_irrigation:
  api_key: !secret openweathermap_key
  rain_factor: 120
  max_ev: 3750 
  min_ev: -1500.0
  name: "wb_irrigation"
  longitude: !secret accurate_longitude
  latitude: !secret accurate_latitude
  taps: 
    - name: p1
    - name: p2

1 Like

@hhaim: I’m not aware how to install extra components. Could you please give a short instruction how to do it? Any how does it work together with the “other” component? Do you add some automation asking your sensor for a special condition?
Sorry for noob question - I’m just a user :wink:

You can read in the following link how to install

This is not a full solution yet, just the complex part to add sensors that will estimate the irrigation time per pipe base on actual weather conditions. I will add the automation block soon (simple)

Hi iz3man

I’ve updated the automation you can look into the code again (in my case two taps)

The ingredients

  1. Sonoff 4ch pro (up to 4 taps) + Tasmota
  2. Appdaemon + hass

hass configuration:


wb_irrigation:
  api_key: !secret openweathermap_key
  rain_factor: 120
  max_ev: 3750 
  min_ev: -1500.0
  name: "wb_irrigation"
  longitude: !secret accurate_longitude
  latitude: !secret accurate_latitude
  taps: 
    - name: p1
    - name: p2

Create sensors wb_irrigation_p1 and wb_irrigation_p2 that will calculate the time to irrigate based on ev/rain
The units are ev (~100 for a cold day and ~300 for a very hot day). Rain will add factor* total_mm (ev) to the queue

The full configuration is here (with switch for tasmota and some sensors)

Appdaemon:

The automation part

# irrigation app
wb_irrigation:
  module: heat_app
  class: CWBIrrigation
  m_temp_celsius: 26 #fill from here https://www.holiday-weather.com/[your location]/averages/
  m_temp_hours: 12 #fill from here https://www.holiday-weather.com/[your location]/averages/
  enabled: input_boolean.wbi_enabled #disable irrigation  # disable the irrigation 
  water_sensor: sensor.water_total_external_norm # read total water  # optional to read water global sensor in litters 
  taps: 
     - name: p1  # the name of the tap
       days: [1,3,5]  # 1-7 1 for sunday, .. 7 for saturday 
       stime: "05:45:00" # time to start irrigating 
       m_week_duration_min: 60 # weakly total time in minutes at the hottest season 
       switch: switch.wbi_p1 # the switch for on/off - on the tap is open, off - close 
       manual_duration: input_number.wbi_p1_duration # the time in minuts for manual on/off 
       queue_sensor: sensor.wb_irrigation_p1   # the calculated queue/bucket sensor from wb_irrigation sensors  
       water_sensor: sensor.wbi_water_p1 # calculated from input water_sensor tht total for this tap 
       
     - name: p2
       days: [2,5]
       stime: "05:00:00"
       m_week_duration_min: 20
       switch: switch.wbi_p2
       manual_duration: input_number.wbi_p2_duration
       queue_sensor: sensor.wb_irrigation_p2
       water_sensor: sensor.wbi_water_p2

Thanks! That looks great. I’ll try to implement that and will report back.

@hhaim: What’s platform: accumulator ?

It is another custom component to accumulate time (week/month) faster without database query. In this case the total time each tap is open.

It is not mandatory

Thanks. Could you please tell me where to get it? Googled it, but it doesn’t give any results.

At the same place :slight_smile:

Copy this folder to your place and then try to remove what is not needed

Sorry. My fault. The most obvious was not my first thought. :wink:

I guess I’m making progress, but i have no clue what value to enter here:
m_temp_celsius: 26 #fill from here https://www.holiday-weather.com/[your location]/averages/
m_temp_hours: 12 #fill from here https://www.holiday-weather.com/[your location]/averages/

If i enter VIENNA for example, it give 19C for July and -1C for January. Same goes for sunshing which is 2h in January and 9h on July. Should i sum up all monthes and divide by 12? Or take the hottest only? Or …

Did i mention that i totally LOVE that component and i really appreciate your work and your effort of posting it here!!

Btw: I’m also struggeling with the automation stuff. I saw you’re using appdaemon and apps. I don’t use appdaemon at all. So how can i still use the automation stuff - as far as i understand it that’s the BRAIN behind all of it?!

You should take the August average day temperatures (the hottest for Vienna and Israel) - in your case it is 26 and 11 hours of day light. It is used to calculate the maximum evaporation.
The total week time of irrigation (automation yaml) should match this period of time (August) - in my case for p2 it is 60 min in August.

If you already have a working AppDaemon, it shouldn’t be a problem to copy the automation code and YAML and make it work.

Let me know what does not work you

Since so many things have changed from my initial configuration post, from July 2017 Garden Irrigation I thought I’d post an update for those who want to configure their irrigation timers.

Significant changes affected:

  • Front end with the intruduction of Lovelace UI
  • New input_datetime component
  • WUnderground that I updated to DarkSky

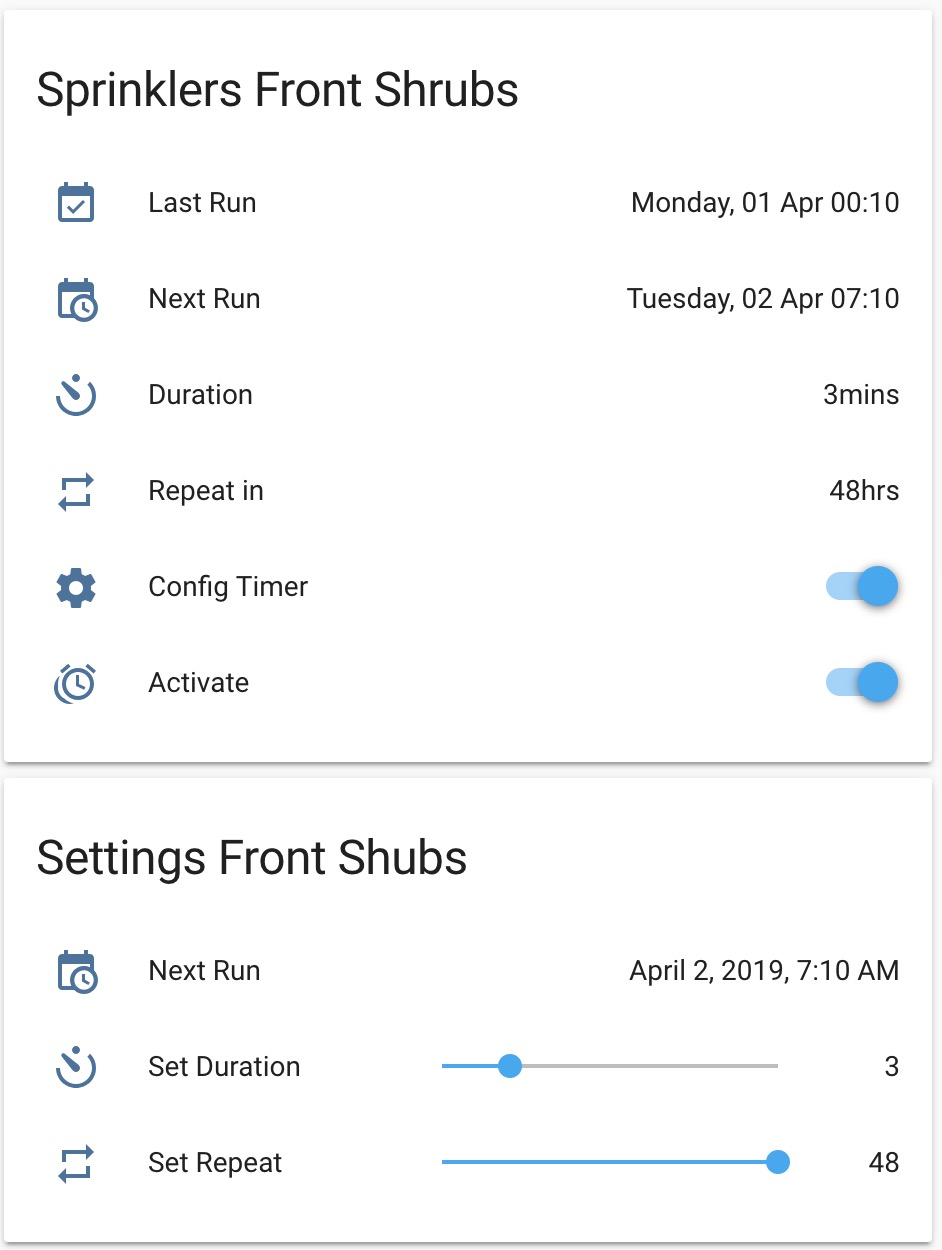
Withput much further ado here is the final look of the timer component in the standard view

and in a config view, after clicking the Config Timer button.

clicking on Next Run opens up a modal view of the input_datetime component, such as this

For the UI, I’m using Lovelace yaml config.

configuration.yaml

lovelace:
  mode: yaml

ui-lovelace.yaml

title: Home
views:
  - type: vertical-stack
    cards:
    - type: entities
      title: Sprinklers Front Shrubs
      show_header_toggle: false
      entities:
        - sensor.last_run_front_shrubs
        - sensor.next_run_front_shrubs
        - sensor.duration_front_shrubs
        - sensor.repeat_front_shrubs
        - input_boolean.config_front_shrubs
        - automation.activate_front_shrubs_timer
  - type: conditional
    conditions:
      - entity: input_boolean.config_front_shrubs
        state: "on"
    card:
      type: entities
      title: Settings Front Shubs
      show_header_toggle: false
      entities:
        - input_datetime.next_run_front_shrubs
        - input_number.duration_front_shrubs
        - input_number.repeat_front_shrubs

There are a few sensor components that are not strictly needed. But I prefer to have a non-editable sensors on the day-to-day view screens, showing the next run and last run, rather than exposing their input_datetime and input_number components. These sensors purely mirror their editable counterparts.

and this is the config for these sensors (please note they need to be indented under a sensor component)

configuration.yaml

- platform: template
    sensors:
## Front Shrubs
      next_run_front_shrubs_time:
        value_template: '{{as_timestamp(states.input_datetime.next_run_front_shrubs.state) | timestamp_custom("%H:%M")}}'
        friendly_name: "Time"
      next_run_front_shrubs:
        friendly_name: "Next Run"
        value_template: '{{as_timestamp(states.input_datetime.next_run_front_shrubs.state) | timestamp_custom("%A, %d %h %H:%M")}}'
      last_run_front_shrubs:
        friendly_name: "Next Run"
        value_template: '{{as_timestamp(states.input_datetime.last_run_front_shrubs.state) | timestamp_custom("%A, %d %h %H:%M")}}'
      time_delta_front_shrubs:
        friendly_name: "Front Shrubs Timedelta"
        value_template: '{{states.input_number.repeat_front_shrubs.state|int * 3600}}'
      duration_front_shrubs:
        value_template: '{{states.input_number.duration_front_shrubs.state | int}}mins'
        friendly_name: "Duration"
      repeat_front_shrubs:
        value_template: '{{ "{:02d}".format(states.input_number.repeat_front_shrubs.state|int)}}hrs'
        friendly_name: "Repeat in"

For completeness here are input_number components that I keep in

input_numbers/front_shrubs.yaml

duration_front_shrubs:
  name: "Set Duration"
  initial: 3
  min: 0
  max: 15
  step: 1
  icon: mdi:camera-timer
repeat_front_shrubs:
  name: "Set Repeat"
  initial: 48
  min: 0
  max: 48
  icon: mdi:repeat

And the new input_datetime components.

input_datetime/front_shrubs.yaml

next_run_front_shrubs:
  name: Next Run
  has_date: true
  has_time: true
last_run_front_shrubs:
  name: Last Run
  has_date: true
  has_time: true

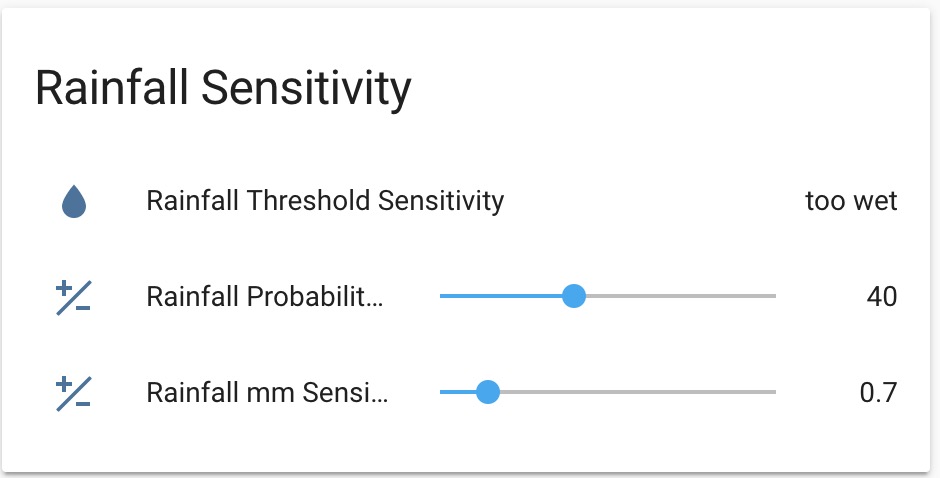
There’s one more sensor that I use to modify wet or dry condition that will show later in automation. It takes rain probability and rain intensity from DarkSky and allows me to override it. Setting hard values has not worked for me, as sun intensity after a brief shower dried up the ground quickly, yet my sensor was still in “too wet” condition. So I can manually tweak it, so on the next scheduled irrigation, that can be on the same day the irrigation does kick in.

The view is:

UI code in ui-lovelace.yaml

- type: entities
  title: Rainfall Sensitivity
  show_header_toggle: false
  entities:
    - sensor.rain_sensor
    - input_number.dark_sky_precip_probability_sensitivity
    - input_number.dark_sky_precip_intensity_sensitivity

The code for the logic (I’m not showing the darksky component)

input_number:    
  dark_sky_precip_intensity_sensitivity:
    name: "Rainfall mm Sensitivity"
    initial: 0.1
    min: 0
    max: 5
    step: 0.1
    icon: mdi:contrast
  dark_sky_precip_probability_sensitivity:
    name: "Rainfall Probability Sensitivity"
    initial: 40
    min: 0
    max: 100
    step: 10
    icon: mdi:contrast

sensor:
  - platform: template
      sensors:
        rain_sensor:
          friendly_name: "Rainfall Threshold Sensitivity"
          value_template: >-
            {% if (states.sensor.dark_sky_precip_probability.state | float) <= (states.input_number.dark_sky_precip_probability_sensitivity.state | float) and (states.sensor.dark_sky_precip_intensity_0.state | float) <= (states.input_number.dark_sky_precip_intensity_sensitivity.state | float) %}
              dry
            {% else %}
              too wet
            {% endif %}

Automations and scripts.
In automation we are converting all values to timestamps, so we can calculate future, past or equality conditions. This part is quite tricky, as there’s very strict requirement for the values to be in a particular format. Please see https://www.home-assistant.io/components/input_datetime/ for details. Also very good article that covers datetime calculations is at The EPIC Time Conversion and Manipulation Thread!

automation:
  - alias: "Activate Front Shrubs Timer"
    trigger:
      - platform: time_pattern
        minutes: '/1'
    condition:
      condition: and
      conditions:
      - condition: template
        value_template: '{{as_timestamp(now().strftime("%Y-%m-%d %H:%M")) == as_timestamp(states.input_datetime.next_run_front_shrubs.state)}}'
      - condition: state
        entity_id: sensor.rain_sensor
        state: 'dry'
    action:
      - service: script.turn_on
        entity_id: script.activate_irrigation_front_shrubs


  - alias: "Extend Front Shrubs Timer When Wet"
    trigger:
      - platform: time_pattern
        minutes: '/1'
    condition:
      condition: or
      conditions:
        - condition: template
          value_template: '{{as_timestamp(now().strftime("%Y-%m-%d %H:%M")) > as_timestamp(states.input_datetime.next_run_front_shrubs.state)}}'
        - condition: and
          conditions:
            - condition: template
              value_template: '{{as_timestamp(now().strftime("%Y-%m-%d %H:%M")) == as_timestamp(states.input_datetime.next_run_front_shrubs.state)}}'
            - condition: state
              entity_id: sensor.rain_sensor
              state: 'too wet'
    action:
      - service: script.turn_on
        entity_id: script.update_front_shrubs_next_run_timer

And lastly my script part.

script:
  activate_irrigation_front_shrubs:
    alias: "Activate Irrigation Front Shrubs"
    sequence:
      - service: script.turn_on
        entity_id: script.update_front_shrubs_next_run_timer
      - service: script.turn_on
        entity_id: script.update_front_shrubs_last_run_timer
      - service: switch.turn_on
        entity_id: switch.front_shrubs_switch
      - delay: 
          minutes: "{{ (states.input_number.duration_front_shrubs.state | int) }}"
      - service: switch.turn_off
        entity_id: switch.front_shrubs_switch

  update_front_shrubs_next_run_timer:
    alias: "Update Front Shrubs Next Run Timer"
    sequence:
    - service: input_datetime.set_datetime
      entity_id: input_datetime.next_run_front_shrubs
      data_template:
        date: >
          {{(as_timestamp(now())+(states.sensor.time_delta_front_shrubs.state)|int) | timestamp_custom("%Y-%m-%d", true)}}
        time: >
          {{(as_timestamp(now())+(states.sensor.time_delta_front_shrubs.state)|int) | timestamp_custom("%H:%M:%S", true)}}

  update_front_shrubs_last_run_timer:
    alias: "Update Front Shrubs Last Run Timer"
    sequence:
    - service: input_datetime.set_datetime
      entity_id: input_datetime.last_run_front_shrubs
      data_template:
        date: >
          {{(as_timestamp(now())) | timestamp_custom("%Y-%m-%d", true)}}
        time: >
          {{(as_timestamp(now())) | timestamp_custom("%H:%M:%S", true)}}

That should be about all that’s to it. As it stands it should work for you.
I’m still hoping to work on the scripts to pass variables programatically, as I have about eight irrigation timers and don’t wish to have eight copies of near duplicate code.

If you copy and paste, please make sure you have your indentations right depending how you keep your components separated or not. Indentations tend to be the most common problem when the logs are full of errors.

Any questions, please ask.

8 Likes