Have a look at this …

Have a look at this …
@Ciwyn - you wouldn’t have to measure weight - You can use a digital pressure gauge and hook that up…
I’m going to hook one up to my pool filter to measure when the filter needs a backwash - or to know when the pool pump is cavitating…

This is the DAC I used for this project.
HiLetgo MCP4725 12 Bit I2C IIC DAC Development Board Breakout Board Internal EEPROM Store Settings for Arduino https://www.amazon.com/dp/B01DLHKNTG/ref=cm_sw_r_cp_api_7wOcAb973ZVP6
He’s one of my fav hardware hacker vloggers… 
Clwyn: On that note, a TODO for myself… I’m just waiting for the wife (read: the Queen of Interruptions…lol) to go on a short business trip so I can focus on working on breaking out my 10K line configuration file in HA into separate files and sanitize it properly and I’ll then start posting more code I’m using on here. Sorry that’s taken longer than I originally expected.
I think I’ve come full circle back to the DAC path now. I’d be curious to see a write up on your implementation and photos, if you have the time. 
I’m thinking I’d need at least 3-4 MCP4725’s as I have Six DC controllable Tunze pumps now (I bought two more second hand for 50 euros recently) and am thinking about getting more, esp if I can make this all work well.
Agreed that it seems much more attractive to build this than to buy it from Apex. I actually thought about just buying RA’s SPI based solution on the basis at least their hardware / software is all opensource, but 100+ euros was just too much to justify. Perhaps if it was only 60 or so Euros, it might have been worth the time save, but 100 is like…uhhhh. No.
Is your pump controller controlled directly (hardware link) by HA or are you passing MQTT commands to an Arduino / ESP like controller for the pumps?
BTW, that’s a good idea bout using weight / preassure sensors to detect when MG / ALK / CA and other solutions being dosed by an Auto doser are running low & easy enough to do for me, esp since my CoralPi controller is sitting just 1 meter above all my additive jugs. Thanks for stimulating my grey matter!
Further…just bookmarking a further thought and future possible addition to my Aqua Assistant setup…
1.) The addition of a “Harvesting Mode” function.
Normally, when the Main Circulation pump has been switched off, HA is currently set to monitor Sump water levels and ensure that even while the circulation system is sitting idle, not to allow the sump to “overflow”. If I were to say go to the main tank while the circulation pump is off, and add a large 25 kilogram live rock… my sump would surely overflow without HA watching it. But with HA watching it, if it detects water levels in the sump rising due to displacement from one of the other tanks while the circulation system is off, it will pump the necessary amount of water down the waste drain until water levels are back to “safe levels”.
However, I’ve come to realize during harvesting of clownfish fry in the middle of the night (which can take up to 3+ hours) from my display tanks after they’ve hatched… I’ll end up with multiple barrels of water which I need to pour back into the system, rather than down the drain, which is where it currently will go to if I don’t walk back into the living room with all that extra water and put it back into the tank I took it from.
“Harvest mode” will turn this around … so that instead of pumping the water down the drain, it’ll just fire up the circulation pump just enough to push the displaced water back to the tanks it came from, and shut back down.
2.) Salt hopper / feed silo thoughts…
One of the biggest challenges to this would be humidity / moisture absorption properties of the salt itself, and any mechanical surfaces exposed to this are going to take a serious beating. On the flip side, most of these salt buckets have well sealing lids, but none of them are truly hermetically sealed. And some of these buckets have had salt in them for more than a year in my fishroom and never had any real problems with those. So that tells me, the container needs to be tightly sealed, but we’re not looking at strict sealing of atmospheres.
One idea for a solution would be a perm attached screw valve that might be enclosed itself, until the exit tip, which has a rubber flap that could be pushed out of the way when salt comes out, and lays flat over the port when nothing comes out.
But part of me wondered if the Big Ben feed dispensers type of gate valve used on those, would be plenty enough for controlling the flow / pour of salt? This might avoid complications and maintenance issues that might be required with a screw valve feed mechanism & salt abuse, wear and tear.
Regarding the measurement of the correct amount of weight - I’m wondering if a simpler solution might be order. What if the pour wasn’t measured at all by a computer, but rather just a swing-arm counter weighted system? This swing arm would hold steady until a certain weight was achieved, and then it would fall away into the salt mixing container & at the same time mechanically trigger (or more realistically, release) a micro-switch or two that would ensure the pouring of salt would stop. Once the majority of dead/measured weight had slid off into the container, the swing arm would retract to it’s default position and remain ready there until the next pour.
Which leads me to ask the next question… Any experts watchmakers, clock makers or gearing experts in this group? lol 
What about the rain water measure for weather stations, I think they perform a similar function, probably could be modified for this application.
I’ll do a write up tonight. I didn’t think anyone would want to go with the DAC option seems like most people on RC use PWM with a LPF.
I might be wrong but I think with the MCP4725 you might be limited to two since they only have two I2C addresses available, so I’d go with your board.
Basically I just did a mqtt sketch in arduino and flashed it to a nodemcu. Then HA controls the two outputs with a MQTT light configuration (even though they aren’t lights obviously, it worked the same) This also allows me to easily add on/off down the road if I get some sonoff outlets but for now I just wanted to be able to ‘dim’ the pump.
That’s a pretty cool idea too which I may eventually implement as well. The issue with pressure on a CO2 cylinder is that most of the CO2 is actually in a liquid state, so the pressure stays fairly consistent until the end when you only have the gas left and then the pressure will drop. So if I’m measuring weight I can tare an empty cylinder then hopefully express the capacity of the tank in a percentage as the tank gets lighter as it uses up the gas.
Controlling the DC pumps is quite interesting. Would love to be able to program my crossflow pumps to slowly ramp up and down and make flow a bit more random.
I was thinking the RC low pass filter might be the quick and easy solution, but what I could not establish was that it would give me the level of granular speed control that I wanted. I wanted at least something equal to maybe 7-8 bits of level of control (8 is plenty enough), but I couldn’t be sure I could get that with the RC low pass filter.
And then there’s the issue that I’d have to buy a PWM breakout board for either Pi or Ardunio to support 6 or more pump channels… so the 8 channel DAC at 15 euros makes more sense, I think.
Ok so here is the quick and dirty for the 0-10v output for controllable DC pumps OR 0-10v Led dimmable drivers (such as many Meanwells)
The Home Assistant side is extremely easy since I already have MQTT up and running:
light:
  - platform: mqtt
    name: VarioS Pump
    state_topic: "pumps/variospump/pump/status"
    command_topic: "pumps/variospump/pump/switch"
    brightness_state_topic: "pumps/variospump/brightness/status"
    brightness_command_topic: "pumps/variospump/brightness/set"
    brightness_scale: 4095
    retain: true
The sketch was more difficult since I wasn’t able to copy someone else’s project I had to come up with something that worked. (which I have never done before)
#include <ESP8266WiFi.h>
#include <PubSubClient.h>
#include <Wire.h>
#include <Adafruit_MCP4725.h>
#Adafruit_MCP4725 dac1; // constructor
#Adafruit_MCP4725 dac2; // constructor

// Wifi: SSID and password
const char* WIFI_SSID = "redacted";
const char* WIFI_PASSWORD = "redacted";

// MQTT: ID, server IP, port, username and password
const PROGMEM char* MQTT_CLIENT_ID = "Aquarium Controller";
const PROGMEM char* MQTT_SERVER_IP = "redacted";
const PROGMEM uint16_t MQTT_SERVER_PORT = 1883;
const PROGMEM char* MQTT_USER = "redacted";
const PROGMEM char* MQTT_PASSWORD = "redacted";

// MQTT: topics
// brightness
const PROGMEM char* MQTT_LIGHT_BRIGHTNESS1_STATE_TOPIC = "pumps/variospump/brightness/status";
const PROGMEM char* MQTT_LIGHT_BRIGHTNESS1_COMMAND_TOPIC = "pumps/variospump/brightness/set";
const PROGMEM char* MQTT_LIGHT_BRIGHTNESS2_STATE_TOPIC = "pumps/gyrepump/brightness/status";
const PROGMEM char* MQTT_LIGHT_BRIGHTNESS2_COMMAND_TOPIC = "pumps/gyrepump/brightness/set";

WiFiClient wifiClient;
PubSubClient client(wifiClient);

// function called when a MQTT message arrived
void callback(char* topic, byte* payload, unsigned int length) {
  Serial.print("Message topic [");
  Serial.print(topic);
  Serial.print("] ");
  payload[length] = '\0';
  String strPayload = String((char*)payload);
  int intPayload= strPayload.toInt();
  Serial.println(strPayload);   //serial output of HA input slider (mqtt light brightness)

  if (String(MQTT_LIGHT_BRIGHTNESS1_COMMAND_TOPIC).equals(topic)) {
  dac1.setVoltage(intPayload, false); // set DAC to payload value
  }
  if (String(MQTT_LIGHT_BRIGHTNESS2_COMMAND_TOPIC).equals(topic)) {
  dac2.setVoltage(intPayload, false); // set DAC to payload value
  }
  else {
  Serial.print("Error");
  }
}

void reconnect() {
  // Loop until we're reconnected
  while (!client.connected()) {
    Serial.print("INFO: Attempting MQTT connection...");
    // Attempt to connect
    if (client.connect(MQTT_CLIENT_ID, MQTT_USER, MQTT_PASSWORD)) {
      Serial.println("INFO: connected");

      // ... and resubscribe
      client.subscribe(MQTT_LIGHT_BRIGHTNESS1_STATE_TOPIC);
      client.subscribe(MQTT_LIGHT_BRIGHTNESS1_COMMAND_TOPIC);
      client.subscribe(MQTT_LIGHT_BRIGHTNESS1_STATE_TOPIC);
      client.subscribe(MQTT_LIGHT_BRIGHTNESS2_COMMAND_TOPIC);
    } else {
      Serial.print("ERROR: failed, rc=");
      Serial.print(client.state());
      Serial.println("DEBUG: try again in 5 seconds");
      // Wait 5 seconds before retrying
      delay(5000);
    }
  }
}

void setup() {
  // init the serial
  Serial.begin(115200);

  // init the DAC
  uint32_t dac_value; // Converts the hexadecimal to 0-4096
  dac1.begin(0x62); // The I2C Address: Run the I2C Scanner if you're not sure
  dac2.begin(0x63); // The I2C Address: Run the I2C Scanner if you're not sure
  dac1.setVoltage(4095, false); // 4095 is max, 0 is min; 0-5v range
  dac2.setVoltage(4095, false); // 4095 is max, 0 is min; 0-5v range

  // init the WiFi connection
  Serial.println();
  Serial.println();
  Serial.print("INFO: Connecting to ");
  WiFi.mode(WIFI_STA);
  Serial.println(WIFI_SSID);
  WiFi.begin(WIFI_SSID, WIFI_PASSWORD);

  while (WiFi.status() != WL_CONNECTED) {
    delay(500);
    Serial.print(".");
  }

  Serial.println("");
  Serial.println("INFO: WiFi connected");
  Serial.print("INFO: IP address: ");
  Serial.println(WiFi.localIP());

  // init the MQTT connection
  client.setServer(MQTT_SERVER_IP, MQTT_SERVER_PORT);
  client.setCallback(callback);
}

void loop() {
  if (!client.connected()) {
    reconnect();
  }
  client.loop();
}
Lastly for wiring I relied heavily on this nice writeup.
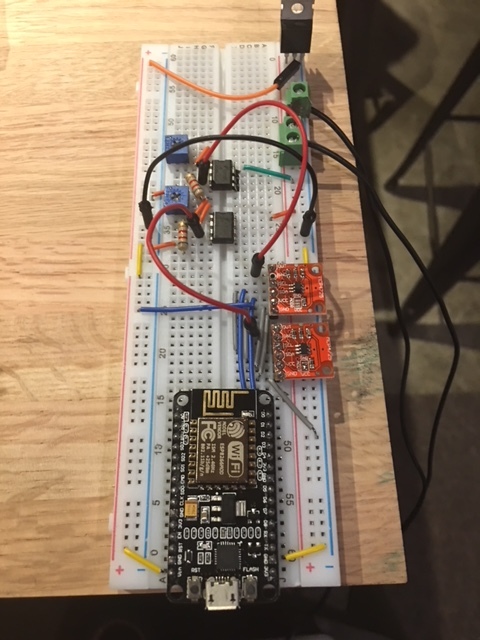
Came out on the breadboard as such:
Just wiring a NodeMCU in I2C to two DAC chips, then using an opamp to double the voltage so that it is 0-10 rather than 0-5.
And that’s about it. Under $20 total as I had some of the items laying around, but I do like the 8-channels your ‘Maxim’ option provides.
I am in no way saying this is the best, easiest, or cheapest option but I found very little on the topic and this is what I came up with…it works well but I am sure there are ways to do it with little to no extra hardware.
Do the 4 channels also read electricty usage or just the POW model? Sorry new to Sonoff but I think the energy monitoring would be handy on some items like pumps to make sure they are working (similar to the Apex energy bar) and if they become clogged, you could set an alert.
If they have a 4 channel POW model, please direct me too it. I’m about to order multiple POW units this weekend.
I dont think they do after looking into it further.
I think I’ll order one POW and see how well it works.
Well dang… I guess this means I’m gonna have to change all my Seneye slides out for new ones finally. Thanks for making more work for me @jnvd3b. lol
Heads up tho… this is not via the SUDdriver yet. I had a good look at what you sent me, and I still see some problems blocking the long term use of that (particularly “filling up” until the Seneye has talked to the cloud).
I’ve also got to update my Seneye units from their current firmware… it’s too out of date to be using the SUDdriver method, but updating looked like it might require more time than I had planned for today. Once I get that done I’m going to look at it the SUDdriver method more and see if I can help figure out what / how to over come that.
In the meantime today, I sat down and made a temp work around… sort of an alternative way to get the same data through the Seneye API server.
I’ll go setup a proper Git space for myself before too long… until now, copy and paste will have to work if you want this functionality.
If anyone uses it, please let me know how it works for you. And please share a Screenshot of your final solution on HA.
#!/bin/sh
# Seneye API Simple Sensor Parser - Copyright 2017 Kevin McPeake
# A simple web API request function and parser for retrieving Seneye Device Data readings from the Seneye API Server, and parsing them to static file locations for reading
# and processing of data by Home Assistant's Command Line Sensor function.  Just a quickly hacked up workaround for starting to get Seneye Data into Home Assistant.
#
# Instructions for installing and using.
# 1) Save this script to a file named 'seneye' for a single seneye device, or if multiple seneye devices are used, make individual copies of this file based on a naming convention
#    like "seneye-1, seneye-2, seneye-3" or "Seneye-reef, Seneye-Pond, Seneye-Fresh" or something similiar like that.
# 2) Save / copy this file to a directory where you'll be sure to include it in your backups of Home Assistant and Home Assistant's user has access rights to read and execute.  This
#    could be in /usr/bin or /usr/local/bin or ~/bin ... whatever works best for you.  It should only be writeable by root. And it's probably BEST if it's only readable and executable by
#    Home Assistant user account and nothing else, since it will be storing your Seneye Password details.
# 3) modify the 'sensor=' variable declaration to reflect the name of your Seneye.  I recommend if you have multiple sensors and copies of this executable script, each named
#    as described / suggested above (i.e.- Seneye-Reef, Seneye-Pond, etc) that you set this to reflect the suffix of that file name for consistancy. (i.e.- sensor=Reef ).
# 4) Change the [DEVICEID], the [USER-LOGIN] and [USER-PASSWORD] to reflect your true Seneye settings;
#     a) [DEVICEID] can be discovered using the Seneye Web Server or the Seneye Connect Application (Windows).  Go to "Device Info" and you can find the nummerical
#        DeviceID number listed there.
#     b) [USER-LOGIN] and [USER-PASSWORD] also should be changed to reflect the login details provided when you login to the Seneye Cloud Portal.
# 5) Run the script (or scripts) as the Home Assistent user that HA runs under to ensure it is working properly.  Check within the directory of ~homeassistant/seneye/[SENSOR-NAME]
#    You should see a listing of files all reflecting the filename for the values they contain.  If you configured multiple sensors correctly, you should have a different folder
#    within the 'seneye' folder, each reflecting the name you gave that sensor in the script, each folder containing the respective values for that sensor.
# 6) Add all the seneye scripts you created to a crontab entry that is set to execute every 10-15 minutes.
# 7) The files within the folder structure will update at the specified crontab intervals. Now all you have to do is create the appropriate 'Command Line Sensors' in Home Assistant
#    that reads the contents of the files.  An example follows:
#
#    sensor:
#      - platform: command_line
#        command: "cat /home/homeassistant/seneye/reef/temperature_curr"
#        name: Reef Temp
#        unit_of_measurement: C
#      - platform: command_line
#        command: "cat /home/homeassistant/seneye/reef/ph_curr"
#        name: Reef PH
#        unit_of_measurement: Ph
#      - platform: command_line
#        command: "cat /home/homeassistant/seneye/reef/nh3_curr"
#        name: Reef NH3
#        unit_of_measurement: ppm
#      - platform: command_line
#        command: "cat /home/homeassistant/seneye/reef/nh4_curr"
#        name: Reef NH4
#        unit_of_measurement: ppm
#      - platform: command_line
#        command: "cat /home/homeassistant/seneye/reef/o2_curr"
#        name: Reef O2
#        unit_of_measurement: ppm
#      - platform: command_line
#        command: "cat /home/homeassistant/seneye/reef/slide_expires"
#        name: Reef Slide Expires
#      - platform: command_line
#        command: "cat /home/homeassistant/seneye/reef/slide_serial"
#        name: Reef Serial
#      - platform: command_line
#        command: "cat /home/homeassistant/seneye/reef/last_experiment"
#        name: Reef Last Test
#
# 8) And away you go.
#
# Additional notes:  Seneye claims their API server calls are Rate Limited.  What this Rate Limit is, I don't know (yet) and I didn't want Home Assistant to end up blacklisting
# my account because Home Assistant's restAPI Sensor function was calling (read: pounding) the Seneye API server relentlessly.   Further to that, Seneye's SCA and SWS solutions for
# uploading the Seneye data to the Seneye webservers only does this once every 30 minutes anyways.  So HA's relentlessly pounding on their webserver asking for updates every 30-60 seconds
# probably wouldn't be appreciated on either ends of the links - mine or theirs.
# As a temp solution, I decided to quickly jot out this simple bash script. I wrote it in Bourne shell because I could actually do that faster than in Python, however, I may go back and re-write a
# python implementation.  If someone else feels up to the job, please be my guest. :D
# For now, this was a quick workaround and wasn't my final stopping point.  My next real goal is to completely replace the SCA / SWS requirement & try to get a working USB based implementation
# of reading the Seneye data right off the Seneye. Someone else has already begun this, but it's not stable or long term reliable just yet.  Hopefully we can fix that in the coming weeks and months.
# But until then, this is a good workaround if one already has a SWS or SCA and would like to have a copy of the Seneye data imported into HA, without having to run another local isntall
# of NodeJS for Seneye Data Exchange.
#
###################

# Change the name of individual sensor here.  This can be whatever you want. (Be sure to remove the "[" and "]" brackets from your entry.)
sensor=[SENSOR NAME]
mkdir -p ~/seneye/$sensor

# change [DEVICEID] and [userlogin] / [password] and be sure to remove the "[" and "]" from the URL string (they aren't needed) in the line below
#
wget --header='Accept:application/xml' "https://api.seneye.com/v1/devices/[DEVICEID]?IncludeState=1&user=[USER-LOGIN]&pwd=[USER-PASSWORD]" -O - > ~/seneye/$sensor/$sensor.xml


# Leave the rest of this alone, modification shouldn't be needed here.


grep description ~/seneye/$sensor/$sensor.xml | sed 's/^<response><id>....<\/id><description>//g' | sed 's/<\/description>.*$//g' > ~/seneye/$sensor/description
grep description ~/seneye/$sensor/$sensor.xml | sed 's/^<response><id>.*<disconnected>//g' | sed 's/<\/disconnected>.*$//g' > ~/seneye/$sensor/disconnected
grep description ~/seneye/$sensor/$sensor.xml | sed 's/^<response><id>.*<slide_serial>//g' | sed 's/<\/slide_serial>.*$//g' > ~/seneye/$sensor/slide_serial
date -d @`grep description ~/seneye/$sensor/$sensor.xml | sed 's/^<response><id>.*<slide_expires>//g' | sed 's/<\/slide_expires>.*$//g'` > ~/seneye/$sensor/slide_expires
grep description ~/seneye/$sensor/$sensor.xml | sed 's/^<response><id>.*<out_of_water>//g' | sed 's/<\/out_of_water>.*$//g' > ~/seneye/$sensor/out_of_water
grep description ~/seneye/$sensor/$sensor.xml | sed 's/^<response><id>.*<wrong_slide>//g' | sed 's/<\/wrong_slide>.*$//g' > ~/seneye/$sensor/wrong_slide
date -d @`grep description ~/seneye/$sensor/$sensor.xml | sed 's/^<response><id>.*<last_experiment>//g' | sed 's/<\/last_experiment>.*$//g'` > ~/seneye/$sensor/last_experiment

grep description ~/seneye/$sensor/$sensor.xml | sed 's/^<response><id>.*<temperature>//g' | sed 's/<\/temperature>.*$//g' | sed 's/^<trend>//g' | sed 's/<\/trend>.*$//g' > ~/seneye/$sensor/temperature_trend
grep description ~/seneye/$sensor/$sensor.xml | sed 's/^<response><id>.*<temperature>//g' | sed 's/<\/temperature>.*$//g' | sed 's/^.*<critical_in>//g' | sed 's/<\/critical_in>.*$//g' > ~/seneye/$sensor/temperature_critical_in
grep description ~/seneye/$sensor/$sensor.xml | sed 's/^<response><id>.*<temperature>//g' | sed 's/<\/temperature>.*$//g' | sed 's/^.*<avg>//g' | sed 's/<\/avg>.*$//g' > ~/seneye/$sensor/temperature_avg
grep description ~/seneye/$sensor/$sensor.xml | sed 's/^<response><id>.*<temperature>//g' | sed 's/<\/temperature>.*$//g' | sed 's/^.*<status>//g' | sed 's/<\/status>.*$//g' > ~/seneye/$sensor/temperature_status
grep description ~/seneye/$sensor/$sensor.xml | sed 's/^<response><id>.*<temperature>//g' | sed 's/<\/temperature>.*$//g' | sed 's/^.*<curr>//g' | sed 's/<\/curr>.*$//g' > ~/seneye/$sensor/temperature_curr

grep description ~/seneye/$sensor/$sensor.xml | sed 's/^<response><id>.*<ph>//g' | sed 's/<\/ph>.*$//g' | sed 's/^<trend>//g' | sed 's/<\/trend>.*$//g' > ~/seneye/$sensor/ph_trend
grep description ~/seneye/$sensor/$sensor.xml | sed 's/^<response><id>.*<ph>//g' | sed 's/<\/ph>.*$//g' | sed 's/^.*<critical_in>//g' | sed 's/<\/critical_in>.*$//g' > ~/seneye/$sensor/ph_critical_in
grep description ~/seneye/$sensor/$sensor.xml | sed 's/^<response><id>.*<ph>//g' | sed 's/<\/ph>.*$//g' | sed 's/^.*<avg>//g' | sed 's/<\/avg>.*$//g' > ~/seneye/$sensor/ph_avg
grep description ~/seneye/$sensor/$sensor.xml | sed 's/^<response><id>.*<ph>//g' | sed 's/<\/ph>.*$//g' | sed 's/^.*<status>//g' | sed 's/<\/status>.*$//g' > ~/seneye/$sensor/ph_status
grep description ~/seneye/$sensor/$sensor.xml | sed 's/^<response><id>.*<ph>//g' | sed 's/<\/ph>.*$//g' | sed 's/^.*<curr>//g' | sed 's/<\/curr>.*$//g' > ~/seneye/$sensor/ph_curr

grep description ~/seneye/$sensor/$sensor.xml | sed 's/^<response><id>.*<nh3>//g' | sed 's/<\/nh3>.*$//g' | sed 's/^<trend>//g' | sed 's/<\/trend>.*$//g' > ~/seneye/$sensor/nh3_trend
grep description ~/seneye/$sensor/$sensor.xml | sed 's/^<response><id>.*<nh3>//g' | sed 's/<\/nh3>.*$//g' | sed 's/^.*<critical_in>//g' | sed 's/<\/critical_in>.*$//g' > ~/seneye/$sensor/nh3_critical_in
grep description ~/seneye/$sensor/$sensor.xml | sed 's/^<response><id>.*<nh3>//g' | sed 's/<\/nh3>.*$//g' | sed 's/^.*<avg>//g' | sed 's/<\/avg>.*$//g' > ~/seneye/$sensor/nh3_avg
grep description ~/seneye/$sensor/$sensor.xml | sed 's/^<response><id>.*<nh3>//g' | sed 's/<\/nh3>.*$//g' | sed 's/^.*<status>//g' | sed 's/<\/status>.*$//g' > ~/seneye/$sensor/nh3_status
grep description ~/seneye/$sensor/$sensor.xml | sed 's/^<response><id>.*<nh3>//g' | sed 's/<\/nh3>.*$//g' | sed 's/^.*<curr>//g' | sed 's/<\/curr>.*$//g' > ~/seneye/$sensor/nh3_curr

grep description ~/seneye/$sensor/$sensor.xml | sed 's/^<response><id>.*<nh4>//g' | sed 's/<\/nh4>.*$//g' | sed 's/^<trend>//g' | sed 's/<\/trend>.*$//g' > ~/seneye/$sensor/nh4_trend
grep description ~/seneye/$sensor/$sensor.xml | sed 's/^<response><id>.*<nh4>//g' | sed 's/<\/nh4>.*$//g' | sed 's/^.*<critical_in>//g' | sed 's/<\/critical_in>.*$//g' > ~/seneye/$sensor/nh4_critical_in
grep description ~/seneye/$sensor/$sensor.xml | sed 's/^<response><id>.*<nh4>//g' | sed 's/<\/nh4>.*$//g' | sed 's/^.*<avg>//g' | sed 's/<\/avg>.*$//g' > ~/seneye/$sensor/nh4_avg
grep description ~/seneye/$sensor/$sensor.xml | sed 's/^<response><id>.*<nh4>//g' | sed 's/<\/nh4>.*$//g' | sed 's/^.*<status>//g' | sed 's/<\/status>.*$//g' > ~/seneye/$sensor/nh4_status
grep description ~/seneye/$sensor/$sensor.xml | sed 's/^<response><id>.*<nh4>//g' | sed 's/<\/nh4>.*$//g' | sed 's/^.*<curr>//g' | sed 's/<\/curr>.*$//g' > ~/seneye/$sensor/nh4_curr

grep description ~/seneye/$sensor/$sensor.xml | sed 's/^<response><id>.*<o2>//g' | sed 's/<\/o2>.*$//g' | sed 's/^<trend>//g' | sed 's/<\/trend>.*$//g' > ~/seneye/$sensor/o2_trend
grep description ~/seneye/$sensor/$sensor.xml | sed 's/^<response><id>.*<o2>//g' | sed 's/<\/o2>.*$//g' | sed 's/^.*<critical_in>//g' | sed 's/<\/critical_in>.*$//g' > ~/seneye/$sensor/o2_critical_in
grep description ~/seneye/$sensor/$sensor.xml | sed 's/^<response><id>.*<o2>//g' | sed 's/<\/o2>.*$//g' | sed 's/^.*<avg>//g' | sed 's/<\/avg>.*$//g' > ~/seneye/$sensor/o2_avg
grep description ~/seneye/$sensor/$sensor.xml | sed 's/^<response><id>.*<o2>//g' | sed 's/<\/o2>.*$//g' | sed 's/^.*<status>//g' | sed 's/<\/status>.*$//g' > ~/seneye/$sensor/o2_status
grep description ~/seneye/$sensor/$sensor.xml | sed 's/^<response><id>.*<o2>//g' | sed 's/<\/o2>.*$//g' | sed 's/^.*<curr>//g' | sed 's/<\/curr>.*$//g' > ~/seneye/$sensor/o2_curr

grep description ~/seneye/$sensor/$sensor.xml | sed 's/^<response><id>.*<lux>//g' | sed 's/<\/lux>.*$//g' | sed 's/^.*<curr>//g' | sed 's/<\/curr>.*$//g' > ~/seneye/$sensor/lux_curr

grep description ~/seneye/$sensor/$sensor.xml | sed 's/^<response><id>.*<par>//g' | sed 's/<\/par>.*$//g' | sed 's/^<curr>//g' | sed 's/<\/curr>.*$//g' > ~/seneye/$sensor/par_curr

grep description ~/seneye/$sensor/$sensor.xml | sed 's/^<response><id>.*<kelvin>//g' | sed 's/<\/kelvin>.*$//g' | sed 's/^<curr>//g' | sed 's/<\/curr>.*$//g' > ~/seneye/$sensor/kelvin_currThey do not monitor power. That would be a handy feature though for sure.
Also with the SPI interface the Reef Angel uses would I be able to control everything via HA if I were able to connect it to a Pi? That would be a much more economical way to do this than buying the Reef Angel Star or a cloud wifi attachment.