It still seems like a Ph, ORP, salinity setup will run over $500 with a tentacle/atlas chips/cheaper probes, so I am kind of stalling at the moment to see if any Apex deals happen this month that would bring a Neptune Apex close to that total and take all the work out of it.
No worries.
I’m actually leaning towards the idea of an ESP32 for resiliency anyways, particularly for delicate operations like monitoring / dosing chemical into the water column. Then, in the event a primary HA instance falls over / crashes and burns, a secondary can step in and assume control of the semi-autonomous Ph/ORP/DO/Salinity monitors.
It’s a little pricey, but on the flip side, they put it out there under open source hardware / Creative Commons license, and I might just decide to respect them for that with my hard earn euros for the first one, and build the later ones myself from scratch. This would give me a good baseline reference to compare the second and all future ones I build myself, of which I realize now I can make “drop-in” support for an ESP32 chip. 
You are also right - I had a bit of a look and there appears to be some code out there - even for arduino auto-dosers.
Apex gear is incredibly sexy. I must confess, I drooled a little bit at their latest product announcements. But ‘eco-system lock-in’ gives me the willies. 
I’ll further confess I had personally expected the PH / ORP / DO / Conductivity Probe component of this HA based controller would be the more if not most expensive component of all the components of this build. Doing just PH appears easy, but doing multiple is more complicated and adds to the overall cost. I believe that’s the same for even the commercial ones as well.
Most won’t need that. But I already do, and will need more. And I want the openness to be able to use off-brand / 3rd party power bars with my controller. Or the ability to add another temperature probe for only 4 euros. And that’s where I expect to make the real savings on this in comparison to a standard APEX or competing aquarium controller.
To date, my total build out costs for the ability to measure temperature from more than 20 points (only 10 of my probes are deployed), 15 float sensors (only 7 are deployed so far), manage 28 x switched 220V AC sockets, while offering fail-over like redundancy in-case a Pi controller borks / crashes without relying on the cloud totals in under 300 Euros so far.
If I just compare those features which are comparable (temp monitoring points, float sensors, and switching so many AC ports… I think by Apex features, I’d be at well over 1000+ euros already?
That’s where at 247 euros for a complete “board” solution, I’m probably okay with that for getting the first monitor implementation built and kicked down the road, also in part due to external pressure - I need to get the first new tanks in the garden shed conversion up and running before too long, and I’d really like to have have the first build of the water “monitoring” solution completed and tested out for a period before that. 
.

and here I was all proud that I made this… It uses a sonoff 4ch flashed with tasmota so it’s basically a small cheap relay box. I’m controlling my refugium light for reverse daylight and my saltwater mixing pump comes on for 2 hours a day. I would really like to implement a more aesthetic solution but I’m not quite sure how to do that. I probably need to get small server box or something like that. For my fish room I’m figuring I’d need at least 5 of these for about 20 outlets.
I’d love to copy your temperature sensing unit you built cowboy, but I have no idea where to start. I’m enthused though because there really are some impressive options to control aquariums through home assistant. I think I’m going to ask over on the reef angel forum if there may be any way to integrate the reef angel with home assistant since its an arduino based controller.
After searching a little bit I’m wondering if I could modify these relatively easily:
https://www.amazon.com/ADJ-Products-PC-100A-POWER-STRIP/dp/B00KFZ98YO/ref=sr_1_1?ie=UTF8&qid=1510244317&sr=8-1&keywords=american+dj+pc-100a
Hey Congrats on the Sonoff 4chan setup. I have a couple of the Sonoff POW’s which I’m using to measure power on my aquariums. I’ll be curious how you get on with yours.
Where are you with the temp sensing unit … shall I say… getting stuck? Let me know what you need help with.
In a nutshell, I just took a first gen pi and made it a MQTT client by running some Python scripts that just check the temp every few seconds and report over MQTT. It can be done with also a Pi Zero (ensure you have a USB Ethernet adapter or the Zero W model with built in WiFi) or an ESP32 / Arduino.
I used DS18B20 Waterproof shielded temp probes. For further protection against saltwater, I bought a pack of marine grade water proofing heat shrink insulation and applied over the metal tip, and repeated this process a few times on each probe to ensure a solid durable seal.
The DS18B20 uses the One Wire protocol (there’s actually 2 power wires and a single Data wire, hence the reference to ‘one wire’ for the data). Interfacing to this is pretty easy - you can either go command line / script method - or you could install another HA on there and use the native support in HA for one wire protocol (although I think there is still some manual config)
My initial prototype for my remote unit … didn’t have a whole lot of time invested into it. Originally I just wired some extension leads onto the probes (in one case, up to 5 meters and worked great!) and I just tied off the ends of the wires close to the GPIO’s with some zip times so they didn’t yank out of the GPIO pins. But if I had to do over again… and I will redo my little CoralPi creation… I’ll go full bore with a proper enclosure and with proper connection jacks for all the float sensors and temp probes.
For the remote unit in the Living room NemoPi - I ended up going with RJ11 two wires jacks for the float sensors. Electrically they function just like a button switch, so you can’t stack these connections like you can with the one-wire protocol temp sensors.
But for the one wire temp sensors, I went with RJ11 4 wire connectors, but you could go with other things, like a 3 wire headphone jack wire. Cool thing about that would be - if you need 2 probes where you’ve only got a single headphone jack, you could just stick in a Y headphone jack adapter and plug in two probes and that should work with the one wire protocol.
Combine temp probes with this or your own implementation (the later was my choice) and you’ve got an extremely scalable heater controller without any dedicated single purpose equipment bought.
The temperature monitoring is basically an idea in my head right now because i saw yours and like the system.
My skill level with electronics is basic but increasing with every project. Almost no experience with coding. So I’m thinking a simple unit that uses the home assistant generic thermostat might be the way to go. I love the look and lighting of yours though. Would love to build something similar. I love flashy over the top lighting as well.
What do you think of modifying those dj power strips to be controlled by the 4ch? I found a diagram of them opened up and it may not be to difficult. My relay box is working just fine but not an elegant solution to say the least.
Let’s see…
Here’s what you’d need to get started reading Temp info from a DS18B20 in Cel and converting to Fahr…from the command line. You could run this locally on HA or on a remote linux system.
Just replace SERIALNUM with your Temp probe’s ID number and you run this.
If you’re on a remote system, just parse (or pipe or cat) the resulting data to an MQTT client command and you’re in business.
#!/usr/bin/python
import os
import glob
import time

#os.system('modprobe w1-gpio')
#os.system('modprobe w1-therm')

base_dir = '/sys/bus/w1/devices/'
device_folder = glob.glob(base_dir + '28-SERIALNUM')[0]
device_file = device_folder + '/w1_slave'

def read_temp_raw():
    f = open(device_file, 'r')
    lines = f.readlines()
    f.close()
    return lines

def read_temp():
    lines = read_temp_raw()
    while lines[0].strip()[-3:] != 'YES':
        time.sleep(0.2)
        lines = read_temp_raw()
    equals_pos = lines[1].find('t=')
    if equals_pos != -1:
        temp_string = lines[1][equals_pos+2:]
        temp_c = float(temp_string) / 1000.0
        temp_f = temp_c * 9.0 / 5.0 + 32.0
        temp_f = round(temp_f, 2)
        return temp_f

#while True:
#       print(read_temp())
#       time.sleep(5)

print(read_temp())

#print("Temp: " + read_temp() + unichr(223) + "C")Actually, what you’ve got now is fine, I would think. Mount the Electrical sockets and the Sonoff on some Pegboard and you’ve got a lot of flexibility in future reconfigurations.
Also, for a really nice looking enclosure without much work, shop around for a Pelican case that meets your size needs. I actually have a lot of other RaspberryPi projects and anything I need a really durable and weatherproof case for a Pi project, I usually grab one of the Pelican cases that suits my size requirements and I’ve been usually always pleased.
I particularly like the ones around the size that let me stack 3-6 raspberrypi’s in there & which are clear. Just a slightly larger size than that should suit your needs well perhaps.
You could modify the DJ switch, but I’m curious how you’d actually do that? What’s your wiring plan for that?
Here’s some examples of RaspberryPi builds using Pelican cases I’ve done. You could do something very similar with your power junctions & Sonoffs’ to give them splashproof enclosures, but still very accessible.
The first (black) one is Gizmo. It’s a RaspberryPi2, featuring inbuilt GPS and amplified antenna, a 12Amp hour battery back and two Alfa Network Interfaces and a 3rd (small) WiFi dongle & a USB IR module & USB Power meter.
The second one is Gremlin. Again, a RaspberryPi3, battery and four Alfa Network Interfaces, USB IR module, and USB hub, inbuilt GPS and amplified antenna. I called this “The Four WiFi of the Apocalypse.” lol
I’ll probably do something like this for my HomeAssistant Hardware around wet areas.


Lots of interesting things to think about.

So here is what the inside of that looks like. My thought process was you could run 4 live lines from 2 sonoff 4ch. The switches on the front would be normally on unless I needed to isolate something. If my rudimentary understanding of wiring is correct you would only need to run one neutral and one ground from each sonoff to tie into the neutral and ground wires in the box respectively. (That is one part I’m not certain about) That would allow each plug to be controlled via MQTT by HA.
The sonoff 4chs would be mounted to a DIN rail and mounted with the box in some kind of electronics cabinet (like houses use for networking equipment now). Would make a sleek and clean presentation. Add some RGB strips and its good to go!
Most of this is daydreaming and some brainstorming. The 4ch relay box is mounted to a wall stud well above the sump and is serving its purpose well right now.
Also I have an extra ds18b20 probe because those are the same probes reef angel uses. So I have that at least to start the temp project. Maybe I can dig the float switches I’m not using out of storage to and find some uses.
1 Like
Daydreaming and Brainstorming are good. That’s where life goals come from for me. ![]()
I just had a look at the reef angel website (changed since I last looked at it) and saw that the Humidity sensor upgrade kit is the same that I use as well to measure humidity where my tanks are. The DS18B20 probes look identical to mine, except theirs come with a little connector already. And the best I can tell from the photos, is those connectors aren’t stackable (or are they?)
But this is what does my head in… they give you only 3 Temp probe ports on the controller itself. Seems kinda sad when the Arduino inside has dozens of GPIO pins and on top of that… the One Wire Protocol is “stackable”. In otherwords, you don’t have to allocate more GPIO pins to add more sensors. Rather, you just connect all one-wire probes to the same set of three GPIO pins (VCC, Ground, Data).
From a protocol point of view, you can stack 2 temp probes on the same set of wires or stack 20 probes on the same set of 3 wires. The only real technical restriction on the Reef Angel and other like controllers that use One Wire protocol is really down to the choices of “connector” and case design.
I guess you could run the switches so they control the 220V to the sonoff, but I think it might be more interesting to wire the switches to the soft-switch function of the Sonoff & configure the Sonoff button to act as a Toggle. To do that, you’d probably need to replace those illuminated switches with low voltage illuminated rocker switches.
SuperhouseTV has a good video on how to wire the Sonoff for toggle / rocker switches. This could be very valuable to you and your project. Check this video out:

Just got back from the electronics store to pick up 10 more of those stackable plugs for One Wire connections. This is what I was talking about.
I use RJ11 4 wire to run leads to a few wall mountable sockets for these. Then I connect the One Wire probes to this stackable plugs (where they have an RJ11 connector). This let’s me create an infinitely expandable one-wire hub featuring RJ11 connectors wherever a 4 pronged socket is.
Unfortunately, these are the old style of Dutch Telephone plugs, so I doubt you could buy these locally in the USA. But you might be able to source them on-line. Alternatively, there may be a smaller different type of stackable plug that could achieve the same result.
This is a “break-out box” on steroids you’ll never see on most commercial controllers. lol

2 Likes
Individual Temp patterns from different tanks during an automated water change sequence yesterday evening.
It wasn’t until that I had the benefit of correlated temp measurement between tanks when I realized I had a small problem in my smallest tanks with momentarily ‘chilling’ them with unheated fresh salt water from a water change. Having this allowed me to scale back the flow to still enough for proper filtration, but not enough to cause any harmful short term dip in temp.
Further, I just modified the water change sequence to turn on the sump heaters after it starts to fill, so it can get busy heating the water already. And while I realize I don’t have a variable speed circulation pump (yet) - rather than restart the circulation pump I have and leave it on, I had the thought to let it cycle on and off for the next 10 minutes - spaced by a 60 second pause, then run another minute, pausing again for a minute, etc, etc… to help further spread out the temp differential & reduce the temp dip in individual tanks.
Volumes of each tank are:
Larvael Fry 1 = 10 liters
Sump = 90 liters
Clownfish Tank = 200 liters
Reef Tank = 750 liters


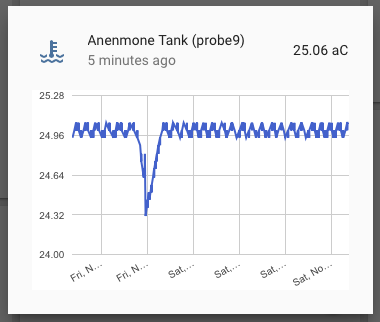
Anemone Tank = 160 liters
Not featured = 2 other growout tanks of 120 liters and 28 liters, and a refuge of 90 liters - which I have to make new probes for, because theirs got confiscated for my live food culture stocks.
And here is that code I"m using to drive the “90 liter” option of a automatic water change sequence.
# Water Change Sequence
#
  water_change_90:
    sequence:
    - service: script.turn_off
      entity_id: script.water_change_180
    - delay: '00:00:30'
# In case we're mixing and filling the Salt Barrel we should wait until finished
    - wait_template: "{{ states.input_boolean.fill_n_mix_saltwater_barrel.state == 'off' }}"
      timeout: '01:15:00'
# Turn off Saltwater Transfer Pump just in case
    - service: homeassistant.turn_off
      entity_id: switch.masterswitch3_p7
    - delay: '00:00:01'

# Turn off Salt Water Mixing Pump
    - service: homeassistant.turn_off
      entity_id: switch.masterswitch3_p6
    - delay: '00:00:01'

# Turn on Water Change Input Boolean
    - service: input_boolean.turn_on
      entity_id: input_boolean.water_change_status

# Turn off Heater Regulation
    - service: input_boolean.turn_off
      entity_id: input_boolean.heater_main_system
    - service: switch.turn_off
      entity_id: switch.masterswitch3_p1

# Turn off Kalkwasser Doser
    - service: homeassistant.turn_off
      entity_id: switch.masterswitch1_p7
    - delay: '00:00:01'

# Turn off Protein Skimmer
    - service: homeassistant.turn_off
      entity_id: switch.masterswitch1_p2
    - delay: '00:00:01'

# Turn off Main Pumps and let sump back-fill for 10min
    - service: homeassistant.turn_off
      entity_id: switch.masterswitch1_p1
    - wait_template: "{{ states.binary_sensor.waterlevel_float_3.state == 'off' }}"
      timeout: '00:15:00'

# Purge the Sump for 20 minutes
    - service: homeassistant.turn_on
      entity_id: switch.masterswitch3_p5
    - delay: '00:20:00'
    - service: homeassistant.turn_off
      entity_id: switch.masterswitch3_p5
    - delay: '00:00:01'

# Fill the Sump
# Double check that Mixing Salt is off
    - service: homeassistant.turn_off
      entity_id: switch.masterswitch3_p6
    - delay: '00:00:01'
    - service: homeassistant.turn_on
      entity_id: switch.masterswitch3_p7
    - delay: '00:02:00'

# Turn on Heater Regulation
    - service: input_boolean.turn_on
      entity_id: input_boolean.heater_main_system

# Turn on Protein Skimmer just for half a minute to fill it with water
    - service: homeassistant.turn_on
      entity_id: switch.masterswitch1_p2
    - delay: '00:00:10'
    - service: homeassistant.turn_off
      entity_id: switch.masterswitch1_p2
    - wait_template: "{{ states.binary_sensor.waterlevel_float_3.state == 'off' }}"
      timeout: '00:08:30'
# This small delay is a 'correction' because the float senor doesn't let water up to the top (not adjustable)
#    - delay: '00:00:25'

#Turn off transfer pump after sump full
    - service: homeassistant.turn_off
      entity_id: switch.masterswitch3_p7
    - delay: '00:00:01'

# Fire up the Main Pumps in series of one minute starts
# startup 1
    - service: homeassistant.turn_on
      entity_id: switch.masterswitch1_p1
    - delay: '00:01:00'
    - service: homeassistant.turn_off
      entity_id: switch.masterswitch1_p1
    - delay: '00:01:00'
# startup 2
    - service: homeassistant.turn_on
      entity_id: switch.masterswitch1_p1
    - delay: '00:01:00'
    - service: homeassistant.turn_off
      entity_id: switch.masterswitch1_p1
    - delay: '00:01:00'
# startup 3
    - service: homeassistant.turn_on
      entity_id: switch.masterswitch1_p1
    - delay: '00:01:00'
    - service: homeassistant.turn_off
      entity_id: switch.masterswitch1_p1
    - delay: '00:01:00'
# startup 4
    - service: homeassistant.turn_on
      entity_id: switch.masterswitch1_p1
    - delay: '00:01:00'
    - service: homeassistant.turn_off
      entity_id: switch.masterswitch1_p1
    - delay: '00:01:00'
# startup 5
    - service: homeassistant.turn_on
      entity_id: switch.masterswitch1_p1
    - delay: '00:01:00'
    - service: homeassistant.turn_off
      entity_id: switch.masterswitch1_p1
    - delay: '00:01:00'
# startup 6
    - service: homeassistant.turn_on
      entity_id: switch.masterswitch1_p1
    - delay: '00:01:00'
    - service: homeassistant.turn_off
      entity_id: switch.masterswitch1_p1
    - delay: '00:01:00'
# startup 7
    - service: homeassistant.turn_on
      entity_id: switch.masterswitch1_p1
    - delay: '00:01:00'
    - service: homeassistant.turn_off
      entity_id: switch.masterswitch1_p1
    - delay: '00:01:00'
# startup 8
    - service: homeassistant.turn_on
      entity_id: switch.masterswitch1_p1
    - delay: '00:01:00'
    - service: homeassistant.turn_off
      entity_id: switch.masterswitch1_p1
    - delay: '00:01:00'
# startup 9
    - service: homeassistant.turn_on
      entity_id: switch.masterswitch1_p1
    - delay: '00:01:00'
    - service: homeassistant.turn_off
      entity_id: switch.masterswitch1_p1
    - delay: '00:01:00'
# startup 10
    - service: homeassistant.turn_on
      entity_id: switch.masterswitch1_p1
    - delay: '00:05:00'

# Make final fresh water auto-top up
# With the main pumps running, this should automatically cut off thx to another automation elsewhere
    - service: homeassistant.turn_on
      entity_id: switch.masterswitch3_p7

# Fireup Kalkwasser doser
    - service: homeassistant.turn_on
      entity_id: switch.masterswitch1_p7
# Fire up Protein Skimmer after one hour
    - delay: '01:00:00'
    - service: homeassistant.turn_on
      entity_id: switch.masterswitch1_p2
# Turn off Water Change Input Boolean
    - service: input_boolean.turn_off
entity_id: input_boolean.water_change_statusWhere are you storing your new saltwater outside? lol That is quite a dip in temp on some of those. I’ve noticed a dip in temp when I do water changes as well, but only about 3* F or 2* C
So I think the Pi zero is probably the way to go for my temp probe project. I like the idea of running a separate home assistant instance for it (just to verify hass.io will run just fine on that correct? Like I said I’m fairly new to all this) I’m also thinking stereo jacks are probably going to be the easiest method for running the one wires as searching for old dutch phone jacks sounds a bit more complicated.
I’m still thinking of trying to wire the dj power strip. They’re only about $30 and I could certainly find a use for it if it didn’t work as planned. I’ll probably leave the switches separate though maybe change that down the road.
Also I did find out that the reef angel controllers can report to HA using MQTT, but I would need to update some of my hardware. Still that would be great to have them all in one.
1 Like
You can also have the HA Pi Zero watch the HA for the rest of your house “watchdog” each other. Setup each HA Pi on a Sonoff or relay switched power circuit and configure each to “reboot” the other if they either one go offline for say more than 60 seconds and not come back.
Dunno if Hass.IO works on the Pi Zero, but I don’t see why not.
BTW, only my Sump dropped more than 1C. It sits right next to the Sump and usually has an ambient temp of around 20-22C due to the fact our fishroom floor has underfloor heating. Still…that’s not 25C.
I ran the modified waterchange script again just now, and the impacts in each tank were negligible as a result. The 10 liter larval fry tank actually heated up because of the powerhead that continued to run inside the tank (and is a little oversized).
Conveniently, yesterday’s graph of the water change temp dips are still present for differential comparison.
The Rotifer’s were included, because I don’t have a Temp probe at the moment in the Salt mix - it got snatched several months back for the Rotifer cultures, that sit just about a meter away from the Salt Mixing Barrel and temps between the two should be pretty much similar, me thinks. But new probe is planned to be re-installed there eventually.


You should make an owners manual for your system. I’d love to read it.
Are you just breeding ocellaris? How difficult is the process in breeding clowns? I thimk I’ve read culturing rotifers is probably the most difficult part.
I probably should do that one day. Was trying to make it easy enough one could figure out how to operate everything if they came across it without any manual at all. At least that was my hope for the wife. My assumption was, if she could operate an interface based on HA for the rest of the house, the Aquarium’s interface should be just as easy to understand as well.
Re: clownfish breding -> Getting them to breed is pretty easy as long as you are patient. Raising the fry is another matter. Of all the marine fish to start with, I’d recommend clownfish tho. They are the easiest to breed and raise. From there on, the rabbit hole gets huge and deep. I’ve also done Seahorses that’s a whole other ball of wax. Looking forward to Mandarin Dragonets and Cardinals but need some extra tanks for that I still need to setup.
If you want to try your hand at clownfish, you really need at a minimum live supply of rotifers and artermia, but what I really recommend is to skip the artemia and go with amphipods and copepod cultures with rotifers. Keeping cultures of all that usually is pretty prohibitive for most tho.
If you can maintain the diligence required to keep all that & a few different fry / grow out tanks running, it’s not that hard actually. Being a bit obsessive compulsive, borderline autistic, and lots of patience goes a long way tho.
On the flip side, I’ve been breeding clownfish babies since around 2006, so maybe that says too much about me. But it probably helps that my wife is glad I have a hobby that keeps me at home, not running around and/or in bars. She enjoys the hobby and gets to watch me do all the work. lol
BTW, just FYI … I certainly didn’t realize it… but I just learned today the Reef Angels devices are using SPI to communicate. That means you can use the SPI port of a raspberry pi to talk directly to the reef angel accessories. Just thought that was interesting in regards to even the Probe solution investigation.
Also FWIW (and too document the data for myself or others)… I spent the afternoon investigating what it will take hardware wise for me to interface directly with my Tunze 6055 pumps (and maybe future Tunze pumps), and I think I found everything I need.
Here’s what I know now:
Tunze 6055 pumps use a variable analogue DC 0-8vdc voltage signal to their driver (I believe analogue pwm).
All other Tunze pumps use a analogue 0-10vdc pwm signal to the driver.
Also, because of the voltage differences, the signal and gnd are different wires on the DIN5 plug.
For the Tunze 6055, they are pins 1 & 2.
For all other 0-10vdc pumps, they are pins 4 & 5.
So for any given pump, only two actual wires are required from controller to pump driver.
Looking into a female DIN5 socket where the center edge tab is topside, the PIN’s are numbered in a clockwise direction as follows, beginning first at the 1 oclock position - Pin #1, Pin #4, Pin #5 and Pin #3 wrapping up at the 10 o’clock position of a clockface.
I just have to create a Digital to Analogue PWM interface at 8vdc on the high end and I should be good to go, I hope.
Last but not least, I took the water change activity to a whole new level today. Literally, the first floor level. Instead of hanging out in the next room or hawking over the sump … I sat behind my computer upstairs today & fired up one last water change task to be executed, while I hung out upstairs being productive on other things. Was a bit nerve wrecking, but an hour later, it was over and everything went without a hitch. I just checked on everything, poured 5 cups of salt into my now empty 180 liter barrel and went back upstairs and selected the “Fill and Mix Salt Water Barrel”. After hitting that button though, I realized I’m missing something I thought I didn’t want as part of this solution originally, but now I do. I need to build an automated Salt Hopper over my mixing barrel now.
Spent the last several hours trying to find good solid documentation of someone creating an interface for a RaspberryPi to interface with a Tunze DC variable speed pump driver, and came up empty.
Did manage to find a few references to stand alone creations based on a 555 timer IC circuit explained by a guy on ReefCentral by the nick ‘xtm’, using nothing more than the following parts:
1uF electrolytic cap (polarized… but it wouldn’t matter)
555 timer IC + socket (easier to solder)
1KΩ resistor
.1 uF ceramic cap
20KΩ resistor
.47uF capacitor
500kΩ pot

I’m guessing I might could also use a low pass rc filter as well like the example above, and just replace a few components like the POT and the 555 IC with the raspberrypi, but what I don’t know if using this solution can be successfully adapted to allow me to control the full range of variable speed control from 30% to 100% from the raspberry-pi in software, or do I need to go to a proper DAC circuit to get that level of control from the Tunze pumps.
Questions, questions and more questions. To be answered soon, hopefully.
Okay, after playing in a deserted wasteland and spotting some mirages on the horizon (which included a low pass rc filter construction), I think I’ve finally spotted a solution that’s easy on the hardware challenge and cheap to implement for direct DC control of my Tunze pumps.
A single all in one DAC chip from Maxim that supports 8 independently controllable channels of analogue output beyond 10.8volts (17vdc, it appears, but all I need is 8vdc for 6055’s and 10vdc for other Tunze pumps.
If I’m reading this correctly, I can just wire an SPI connection from my Pi, to a MAX528CP and wire two wire leads from each DAC output to the appropriate points on the Tunze Pump driver, and I should be in biz, I think.
Really all I’m going to have to do is copy everything you do! Hopefully a few others are following this thread as well.
Your salt hopper comment actually brings up an interesting idea I’ve had for a while. I would say weight is probably the most accurate way to get the same amount of salt consistently. Is there a way to make a digital scale monitor through arduino or a raspberry pi? Ideally I would like to use it to measure the weight of my CO2 cylinder on my CA Rx so I know when its getting empty. This could also be used for dosing containers and other such things.