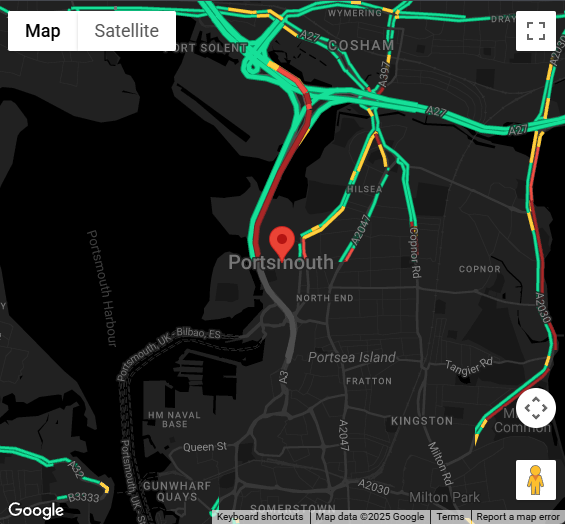
I have a “good morning” Lovelace view that displays on my bedroom TV when I wake up.
Wife drives to different places every day throughout the city (and can’t get those addresses into HA due to healthcare provider/privacy restrictions).
Would love to get a relatively live view of the city with color-coded traffic conditions from a source like Google Maps. Doesn’t have to update every second; could just update once on the wakeup automation/routine that calls the cast service.
I haven’t been able to turn up much info on this type of thing (from the last few years at least). Curious if anyone has done something similar or has a starting point.
Not sure if you already figured this out but what I did below. Map update every 10 seconds
Open a web browser and type traffic in Google search. There will be a Google map for traffic.
Right click and copy the image URL link to that image.
On HA, install generic camera integration and use the URL for the image to create the generic camera device.
In the dashboard, I use picture entity card for the map.
Hello, I just made an account to try and help with this post!
I was just looking to try and copy this and I think I found a way of getting the image to display. If you copy the image address you can paste that into a picture card. You can see the image but I am not sure if this updates so I’ll check later to see if this works.
Looking around, I found this other solution. It’s a little more information as there is a search box and some links at the bottom but it is another way of getting the job done. Here is a brief explanation to get a live traffic map of a set area based on that post:
Search for the center location in Waze.
Hit the share button.
Go to the embed tab.
Copy and paste only the link part of the embed into the Webpage card.
Edit the size of the map with the size var in the link.
There you go!
You could do something similar with Google Maps but their links are a bit harder to edit.
Looks like you enter the wrong or incomplete url. did you right click and copy the “copy image address” ?
you can test the image by paste it on a new browser tab. If it didn’t show the image then it’s wrong.
@NavNav Thanks for this! Your method was the first one I found that uses Google map data instead of the Waze iframe method. When I right click and copy the image link, the generic camera integration gives me a warning about relative paths not being allowed.
It seems the link I am generating by copying the image link is different than the one showed in your screenshot. Do you have any idea what I’m doing wrong?
I used my Android phone to get the url, as the browser of my laptop gave the same result, using the browser of your mobile phone works. Well at least for me.
For anyone interested I managed to get the google maps with driving times embed using the standard Webpage card. The issue is the URL used from google maps. On maps.google.com there is a share button, using that gives you a Diaglog with a tab option to embed a map. Use the URL in iframe code, it works within the iframe on the webpage card . The url looks like https://www.google.com/maps/embed?…
I found an alternative approach with support from Google Gemini AI.
Prerequisites:
Google Cloud Account & API Key: You need a Google Cloud project with the Maps JavaScript API enabled. You’ll need to create an API key within that project. Make sure to restrict your API key (e.g., using HTTP referrers) to prevent unauthorized use. You can usually restrict it to your Home Assistant’s domain/IP address. See Google’s Get API key documentation for details.
File Access to Home Assistant: You need a way to create and edit files within your Home Assistant configuration directory, specifically to create a www folder and place an HTML file inside it. Common methods include the “File editor” add-on, the “Samba share” add-on, or SSH access.
Detailed Steps:
Step 1: Create the HTML File (map_traffic.html)
Using your chosen file access method, navigate to your main Home Assistant configuration directory (the one containing configuration.yaml).
If it doesn’t already exist, create a folder named www.
Inside the www folder, create a new file named map_traffic.html.
Paste the following HTML/JavaScript code into map_traffic.html.
Step 2: Add Code to map_traffic.html
Modify the code below:
Replace YOUR_Maps_API_KEY with the actual API key you obtained.
Adjust the center latitude/longitude (lat, lng) to the location you want the map centered on.
Adjust the zoom level (higher numbers zoom in more).
<!DOCTYPE html>
<html>
<head>
<title>HA Traffic Map</title>
<style>
/* Basic styling to make the map fill the page */
html, body, #map {
height: 100%;
margin: 0;
padding: 0;
}
</style>
</head>
<body>
<div id="map"></div>
<script>
function initMap() {
// --- Configuration ---
const mapOptions = {
// Set the center coordinates (e.g., Portsmouth, UK)
center: { lat: 50.8197, lng: -1.0879 },
// Set the initial zoom level (adjust as needed)
zoom: 12,
};
// --- End Configuration ---
// Create the map instance and attach it to the 'map' div
const map = new google.maps.Map(document.getElementById("map"), mapOptions);
// Create the TrafficLayer object
const trafficLayer = new google.maps.TrafficLayer();
// Add the traffic layer to the map
trafficLayer.setMap(map);
}
// Load the Google Maps JavaScript API asynchronously
// Replace YOUR_Maps_API_KEY with your actual key
const apiKey = 'YOUR_Maps_API_KEY;
const script = document.createElement('script');
script.src = `https://maps.googleapis.com/maps/api/js?key=${apiKey}&callback=initMap`;
script.async = true;
script.defer = true; // Defer execution until HTML is parsed
document.head.appendChild(script);
// Handle potential API loading errors (optional but recommended)
window.gm_authFailure = () => {
console.error("Google Maps API Authentication Failure. Check API key and restrictions.");
document.getElementById('map').innerHTML = '<p style="color: red; text-align: center; padding-top: 20px;">Error loading map. Check API key setup.</p>';
};
</script>
<script> window.initMap = initMap; </script>
</body>
</html>
Step 3: Save the File
Save the changes to map_traffic.html inside the /config/www/ directory.
Step 4: Add the iframe Card to Home Assistant
Navigate to the Home Assistant dashboard (Overview) where you want to add the map.
Click the three dots menu (⋮) in the top right and select “Edit Dashboard”.
Click the “+ ADD CARD” button.
Scroll down and select the “Webpage” or “iframe” card type (they function similarly for this purpose; Webpage might be slightly newer).
In the card configuration:
URL: Enter /local/map_traffic.html (This path points to the file you created in the www directory).
Aspect Ratio (Optional): You can set an aspect ratio (e.g., 75% or 100%) to control the height relative to the width. Adjust this to fit your layout. You might need to experiment. Leaving it blank often works fine too.
Title (Optional): Give the card a title like “Live Traffic Map”.
Click “SAVE”.
Click “DONE” in the top right to exit the dashboard editor.
Step 5: Verify
You should now see a card on your dashboard displaying the Google Map centered on your chosen location, with the live traffic layer enabled.
Important Considerations:
Security: As noted in the search results ([3.3]), files served from the www directory via the /local/ path are publicly accessible if someone knows the URL (http://<your-ha-address>/local/map_traffic.html). They are not protected by Home Assistant login. While the risk might be low for just a map display, be aware of this. Restricting your API key via HTTP referrers in the Google Cloud Console is crucial.
API Costs: Google Maps Platform usage is not free beyond a certain monthly credit. Displaying a map, especially one that might be refreshed often (if the iframe reloads), will count towards your usage quota. Monitor your usage in the Google Cloud Console.
Restart: While often not necessary for changes in the www directory, if the map doesn’t load initially, try restarting Home Assistant just in case.