I’ve just finished configuring the Gosund KS1/SW5, Model KS-602S, Date Code 12/2020 (motherboard identifier SW5-V1.2).
It is this item on Amazon, “Smart Light Switch, Gosund 2.4Ghz Wifi Light Switch Works with Alexa, Google Assistant, Remote Control/Voice Control and Schedule, Neutral Wire Required, Single-Pole, No Hub Required” currently: https://www.amazon.com/gp/product/B07DQDNBZ2
There was very little information about this latest version (date code 12/2020) that I could find so I’m posting to help others in case you’ve bought one of these and want to use it with ESPHome/HomeAssistant.
First: Tuya-Convert does not work with this. It has a newer ROM which requires serial flashing.
** be sure this is not connected to AC when working on it **
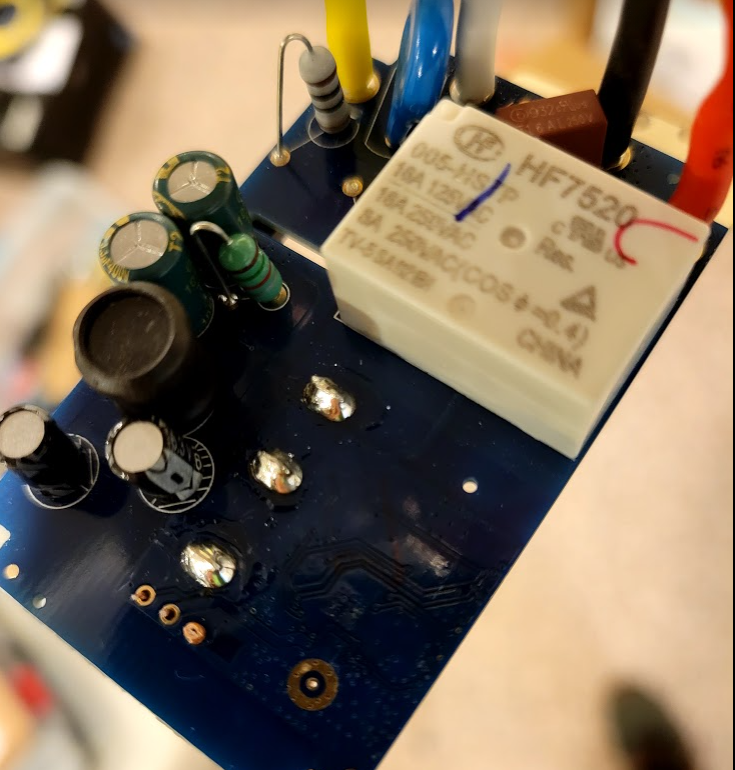
Open the case by removing the four T6 screws. The board will come out easily. Detach the WiFi antenna.
The serial pads are VERY TINY and along the side of the board. I found probe grabbers worked best for this connection. Set the serial port to 115200 bps and be sure you are providing 3.3V of power from your USB TTL.
You must connect ground from the TTL to both the “GND” pad and the “IO0” pad, the GPIO0 must be low to put it in flash mode. Connect the power only once you have your flash tool connected to the serial port and ready to go. Remove the connection from the “IO0” pad in order to get the device to boot normally.
Note that the red and green LED are in exactly the same place, so if you turn them both on at the same time you get a sort of yellow color, although it’s mostly green.
The ESPHome config below will expose to HomeAssistant:
I have the exact same switch except the date code is: 01/2021. I was able to use Tuya-Conver over the air to flash it directly from-stock-firmware-to-ESPHome. The switch works with a physical touch of the button, however, cannot get the relay to respond in home-assistant. I tried your epshome code but still no luck. Any advise?
I accidentally discovered the problem. You were correct, it will not flash OTA. However, at the time I was attempting to flash the switch, I had a Gosund WP9 Power Strip plugged in on a different floor and it got flashed instead. By accident I was just happened to be in that room while trying to toggle the light switch. I kept hearing the relay of the power strip and discovered what had happened.
Thanks again for your quick reply. Now I have to get some hook clips probe and flash it over serial.
Thank you brillb for posting this! I needed a decora device to control my home water recirculating pump with an LED that I could control when the pump was running using Home Assistant. I took a chance on these from Amazon (4 for $43) and I successfully flashed 4 switches with ESP Web Tools. This allowed me to connect to the switch and then enter my wireless credentials. Once I had the switches on my home wi-fi network I was able to use ESP Home to update the configs after I edited the device name in the sample config that brillb posted. I found that my cheap Amazon test probes kept popping off so I just soldered some leads to the pads which worked fine. One nice thing about brillb’s config is that you can control the switch and both the green and red LED’s separately. For the USB to serial adapter I used the HiLetgo FT232RL FTDI Mini USB to TTL Serial Converter Adapter Module 3.3V 5.5V from Amazon ($6). Just be sure to set it for 3.3V with included jumper, it comes configured for 5V.
Years later I made this work, but I had a good amount of trouble flashing this thing so I’m adding some notes here.
Step 1) Connect Ground to Ground & IO0, Connect TX to RX, Connect RX to TX
Step 2) Connect Programmer to USB
Step 3) Start Install
Step 4) Select Port and click Connect
Step 5) Connect VCC to 3.3
Also, the modern install of ESPHome doesn’t like some of Brillb’s deprecated code, so an update is here with a feature that makes the green led come and and go off with the light switch:
esphome:
  name: front-door-light

esp8266:
  board: esp01_1m

wifi:
  ssid: "ssid"
  password: "password"
  domain: ".local"

  # Enable fallback hotspot (captive portal) in case wifi connection fails
  ap:
    ssid: "KS-602S Recovery"
    password: "password"

captive_portal:

prometheus:

# Disable logging
logger:
  # ESP8266 only - disable serial port logging, as the HeatPump component
  # needs the sole hardware UART on the ESP8266
  baud_rate: 0
  # level: VERBOSE

# Enable Home Assistant API
api:
  encryption:
    key: "encryption key"
  reboot_timeout:
    hours: 1

ota:
  - platform: esphome
    password: "password"

#https://templates.blakadder.com/gosund_KS-602S.html
#status_led:
#  pin:
#    number: GPIO16

web_server:
  port: 80


time:
  - platform: homeassistant
    id: homeassistant_time
    timezone: America/Los_Angeles

# Text sensors with general information.
text_sensor:
  # Expose ESPHome version as sensor.
  - platform: version
    name: "Front Door Light ESPHome Version"
  # Expose WiFi information as sensors.
  - platform: wifi_info
    ip_address:
      name: "Front Door Light IP"
    ssid:
      name: "Front Door Light SSID"
    bssid:
      name: "Front Door Light BSSID"

# Sensors with general information.
sensor:
  # Uptime sensor.
  - platform: uptime
    name: "Front Door Light Uptime"
    internal: true

  # WiFi Signal sensor.
  - platform: wifi_signal
    name: "Front Door Light WiFi Signal Strength"
    update_interval: 60s


# GPIO00 Button1
# GPIO02 Led2i (On/Off state?)
# GPIO14 Relay1
# GPIO16 LedLinki (Device status, e.g. wifi broke)
# Source: https://templates.blakadder.com/gosund_KS-602S.html


binary_sensor:
  - platform: gpio
    name: "Sensor for Button Presses"
    internal: True
    pin:
      number: GPIO0
      mode: INPUT_PULLUP
      inverted: True
    id: switch_button_1
    on_press:
      then:
      - switch.toggle: relay_14


output:
  - platform: esp8266_pwm
    id: green_led2_pwm
    pin:
      number: GPIO2
      inverted: True

light:
  - platform: monochromatic
    output: green_led2_pwm
    id: led2
    name: "Front Door Green LED"
    restore_mode: RESTORE_DEFAULT_OFF

switch:
  - platform: restart
    name: "Front Door Lights ESP Restart"

#LED 16 is Red, inverted output
  - platform: gpio
    name: "Front Door Red LED"
    id: "led16"
    pin:
      number: GPIO16
      inverted: True
    icon: "mdi:led-on"
    restore_mode: RESTORE_DEFAULT_OFF


  - platform: gpio
    name: "Relay controlling the actual lights"
    pin: GPIO14
    id: relay_14
    restore_mode: RESTORE_DEFAULT_OFF
    internal: True

  - platform: template
    name: "Front Door Light"
    internal: False
    id: front_door_light
    icon: "mdi:light-switch"
    lambda: |-
      if (id(relay_14).state) {
        return true;
      } else {
        return false;
      }
    turn_on_action:
    - if:
        condition:
          - switch.is_off: relay_14
        then:
          - switch.toggle: relay_14
    turn_off_action:
    - if:
        condition:
          - switch.is_on: relay_14
        then:
          - switch.toggle: relay_14
    on_turn_on:
      - light.turn_on: led2
    on_turn_off:
      - light.turn_off: led2