I recently went to visit my parents who have one of my old Pi 3’s running OMV 5 for a local Plex server to allow them to stream music around the house. I thought this would be a good opportunity to entice them into the world of home automation.
This is by no means a comprehensive guide but it aims to outline the process for getting up and running (potentially on existing hardware). If possible, rather run Home Assistant (I think it was called Hass.io).
Part 1: Setting up Home Assistant Core and ESPHome in docker
Assuming that Docker is installed. SSH into the Raspberry Pi and run the following command to pull and run the latest container, the only thing you need to change is the path to your config directory.
Head over to a web browser on your local machine and enter <your Pi’s IP>:8123 to setup Home Assistant.
I couldn’t find documentation on which version of ESPHome to run on a Pi without using the Python installer but this one worked for me. Follow the same approach as step 1:
As you did in step 2, head over to <your Pi’s IP>:6052 in your web browser to setup and configure devices in ESPHome. NOTE: You do not need to setup the ESPHome integration in Home Assistant, devices will pop up in HA auto-magically - thanks HA team
Setup your device in ESPHome and download the .bin file. Save this for later.
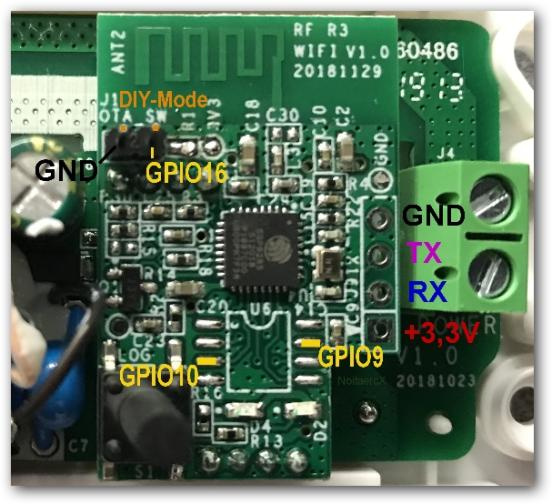
Part 2: Time for the hardware, I bought a Sonoff R3 to give the DIY mode a try
Download and install the eWeLink app on your phone/tablet. I used a 10 minute mail account to sign up and login - them Chinese don’t need any more of my info.
Connect the Sonoff to AC power and add it to your eWeLink app
In the eWeLink app, go to Device Settings and update the Sonoff’s to the latest firmware (this should be v3.5). My Sonoff came with firmware v3.0.0 which resulted me pulling my hair our for about an hour. Please learn from my mistakes
Delete/reset the Sonoff from the eWeLink app
Disconnect the Sonoff from AC power (once again, learn from my mistakes), pop the cover off and connect the supplied jumper onto the J1 header, labelled “OTA_SW”.
Put the case back onto the Sonoff and connect it to AC power. Once it has booted, press and hold the button on the Sonoff until the blue light starts to blink rapidly
Connect to the Sonoff’s Access Point (named ITEAD-XXXXXXXX) with the password 12345678`
In your browser, go to http://10.10.7.1/ to enter your 2.4ghz WiFi network name and password. Your Sonoff will reboot and connect to your AP once this is complete.
Time to boot into Windows . Download the tool for flashing custom firmware from Sonoff’s github repo – https://github.com/itead/Sonoff_Devices_DIY_Tools/tree/master/tool. The tool is tool_01DIY85(3.3.0).exe which implies that it works with Sonoff firmware v3.3 but I had no problems getting it to work on v3.5.
Run the flashing tool, it should find your Sonoff. Click on the “Firmware Flash” button and select the .bin file that you created in ESPHome earlier. Select your Sonoff device, click “Flash Device List” and then hit “OK”. This will upload the firmware onto your Sonoff and reboot it once complete.
Head over to Home-Assistant where you should see you a notification for your new device. Follow the prompts to setup the device and you’re good to go!
Thanks. I have gone through the steps. I have an Ikea floor lamp I want to make smart. Since the sonoff is meant to act as a switch, I found this post where you can convert it to a light rather a switch in HA. I can just use this config file for my setup? Also, the black button on the sonoff is an on/off button? That is I can use it to turn on/off the lamp manually?
I wanted to share my experiences of getting Tasmota on my recently purchased Sonoff Basic R3. It is maybe a bit off topic for this post, because this topic is about esphome, but anyway this page popped up when searching for Tasmota (and only difference is that you use the Tasmota .bin instead of the esphome .bin in step 10), so I thought it would be best to describe my Tasmota experience over here.
I have been working my way through all the different options of getting Tasmota on my Sonoff Basic R3 (via RESTer, DIY tool, and even up to soldering pins and flashing via usb with esptools). In the end the steps described on this page is the easiest way to do it I think. Only trouble with the Tamota v 10.0.0 .bin files on this page http://ota.tasmota.com/tasmota/release/ is that the v10.0.0 .bin file is too big for DIY tool (lite version is also too big and basic version didnt work for me). A way to get around this is to first flash the lite v9.5.0 on the Sonoff Basic R3 and after you have connected to Tasmota on the Sonoff Basic R3 (connect to Tasmota wifi Access Point, browse to 192.168.4.1, fill in Wifi, wait for R3 restarting and connect to the IP that was assigned to the R3), upgrade to the latest v10.0.0 firmware (can even be the full version then, just accept the default). The lite v9.5.0 firmware can be downloaded from this page: http://sonoff-ota.aelius.com/ (‘latest’ is the v9.5.0 at this time of writing, although v10.0.0 is also on the page)
I didnt have to do the jumper in my recently bought R3 btw, just keeping the black button pressed for 5 sec just after power up was enough. The Sonoff firmware was already 3.6.0., so I could actually skip step 1-6 of Part 2.
For anyone who might cross this path, I flashed my Sonoff Basic R3 today, from tasmota minimal to esp home.
Since the R3 has more LED than the sonoff basic, I used the R2 as starter point instead of the basic (r1?). everyting works: relay, both LEDs. Here’s my config:


 . Download the tool for flashing custom firmware from Sonoff’s github repo – https://github.com/itead/Sonoff_Devices_DIY_Tools/tree/master/tool. The tool is tool_01DIY85(3.3.0).exe which implies that it works with Sonoff firmware v3.3 but I had no problems getting it to work on v3.5.