No, he is updating his project for esphome in beta, you can find it here
The error is here:
‘class esphome::mapping::Mapping<std::__cxx11::basic_string, int>’ has no member named ‘find’
‘class esphome::mapping::Mapping<std::__cxx11::basic_string, int>’ has no member named ‘end’
That means:
In ESPHome, a mapping is not the same as a C++ std::map.
So you cannot use .find() or .end() on it — those methods simply don’t exist.
Instead, ESPHome’s mapping only supports:
id(my_mapping).at(key, default)→ get value forkey, ordefaultif it doesn’t exist.id(my_mapping)[key]→ get value, but this will fail if the key is missing.
If you defined your mapping like this:
mapping:
  id: flag_icon_mapping_index
  map:
    "it": 1
    "en": 2
    "fr": 3
In a lambda: you cannot do:
auto it = id(flag_icon_mapping_index).find(lang_code);
if (it != id(flag_icon_mapping_index).end()) {
  // ...
}
That causes the error you saw.
Correct way:
int val = id(flag_icon_mapping_index).at(lang_code, -1);
if (val != -1) {
  // key exists, do something with val
}
Here -1 is just a fallback if the key doesn’t exist.
1 Like
Hi! The answer has already been given above, but yes, that’s right, a widget that will hook your entity by entity_id and get all its settings automatically, here’s a small prototype. It remains to be done:
- Finish LVGL for beauty
- Now the step is hardcoded to 0.1 (I will add automation so that there are also options 0.5 and 1, if by some miracle the step is 0.2 or 0.25, the default value will automatically be 0.5)
- Completely rewrite the code (now it’s 4000+ lines of code),
 because now it needs to be optimized, since the HA API does not have time to process the main loop on a real device in the allotted time.
 - In any case, those who have real devices will have to test it, I created a demo entity in HA for this widget.
5 Likes
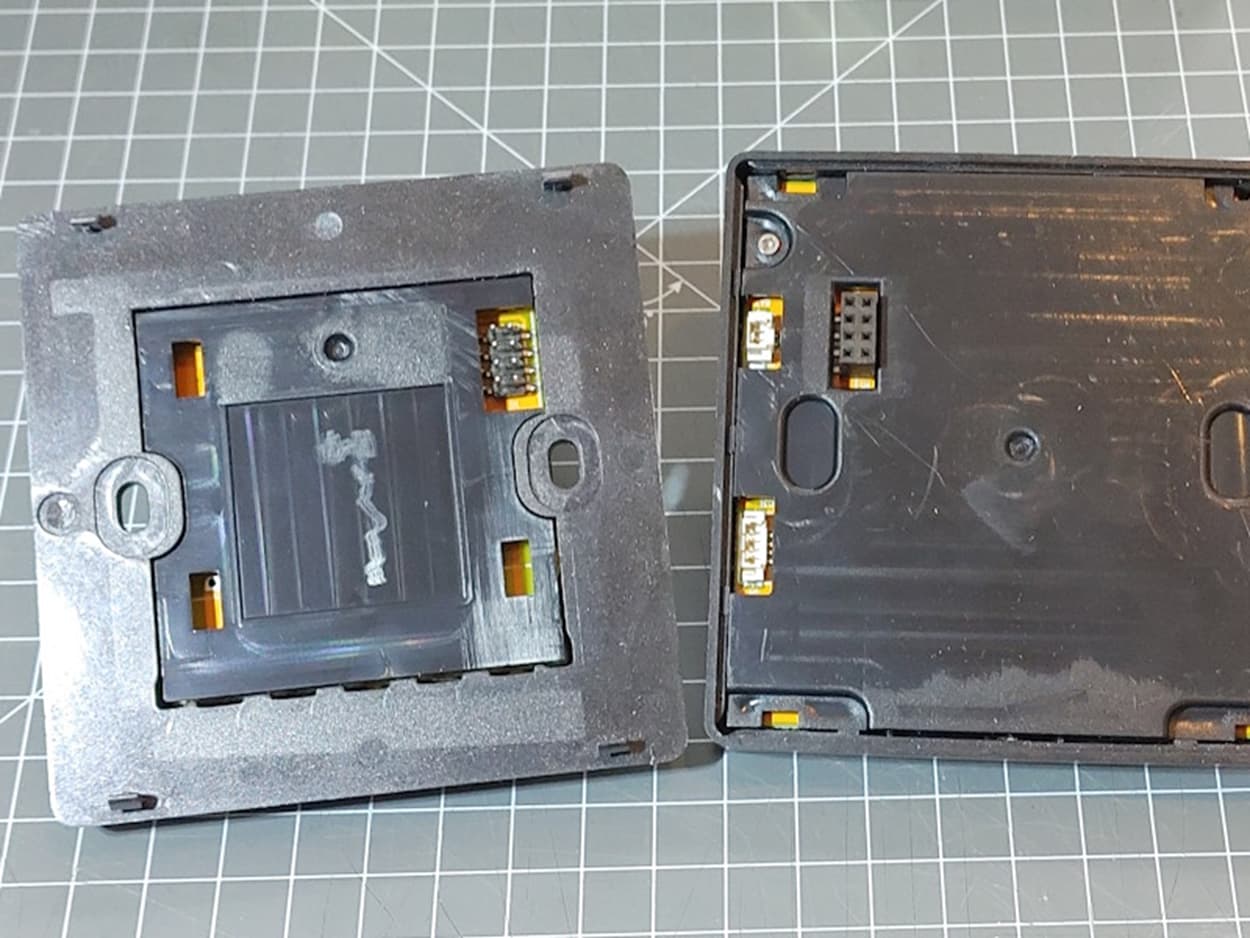
small question here: can this be wall -mounted on EU 86x86 wall box screws ? It looks like the back plate is connected with 2 little screws to the display front. So how can you wall mount it then ? (since the the mounting holes are covered then and can not be accessed ? Does the front part “click” on the backplate maybe ? With plastic clips ? Also there is a 8 pins female header on the back, doesn’t it stick in the wall ?
yes
Yes!, you figured it out!
it does a bit.
I’m in the USA here and I purchased an Chinese 86x86 wall box for it. Works great!
I draw and printed box for in-wall-mount myself: Link
1 Like
so this aliexpress example (21 euro):
https://nl.aliexpress.com/item/1005008214679682.html
can be wall mounted ?
it says in the header description (without a base plate ?)
other examples include 1 or 3 relays: (30 euro)
https://nl.aliexpress.com/item/1005006622746590.html
Probably these have a base plate which is mounted in the wall box ?
But the first link looks different (has usb-c and TFT slot, battery plug, 8 pin female header plug, speaker plug) the second link does not have all that. So are these two compatible and if not where is then the baseplate of the first link ?
If the first link example (21 euro) also clicks into each other, i wonder why there are 2 little screws then on the back which are inaccessible once against the wall. I thought these 2 little screws hold the back side to the display of the first link example. Also doesn’t the 8 pin female header sticks out in the back “in the wall” ?
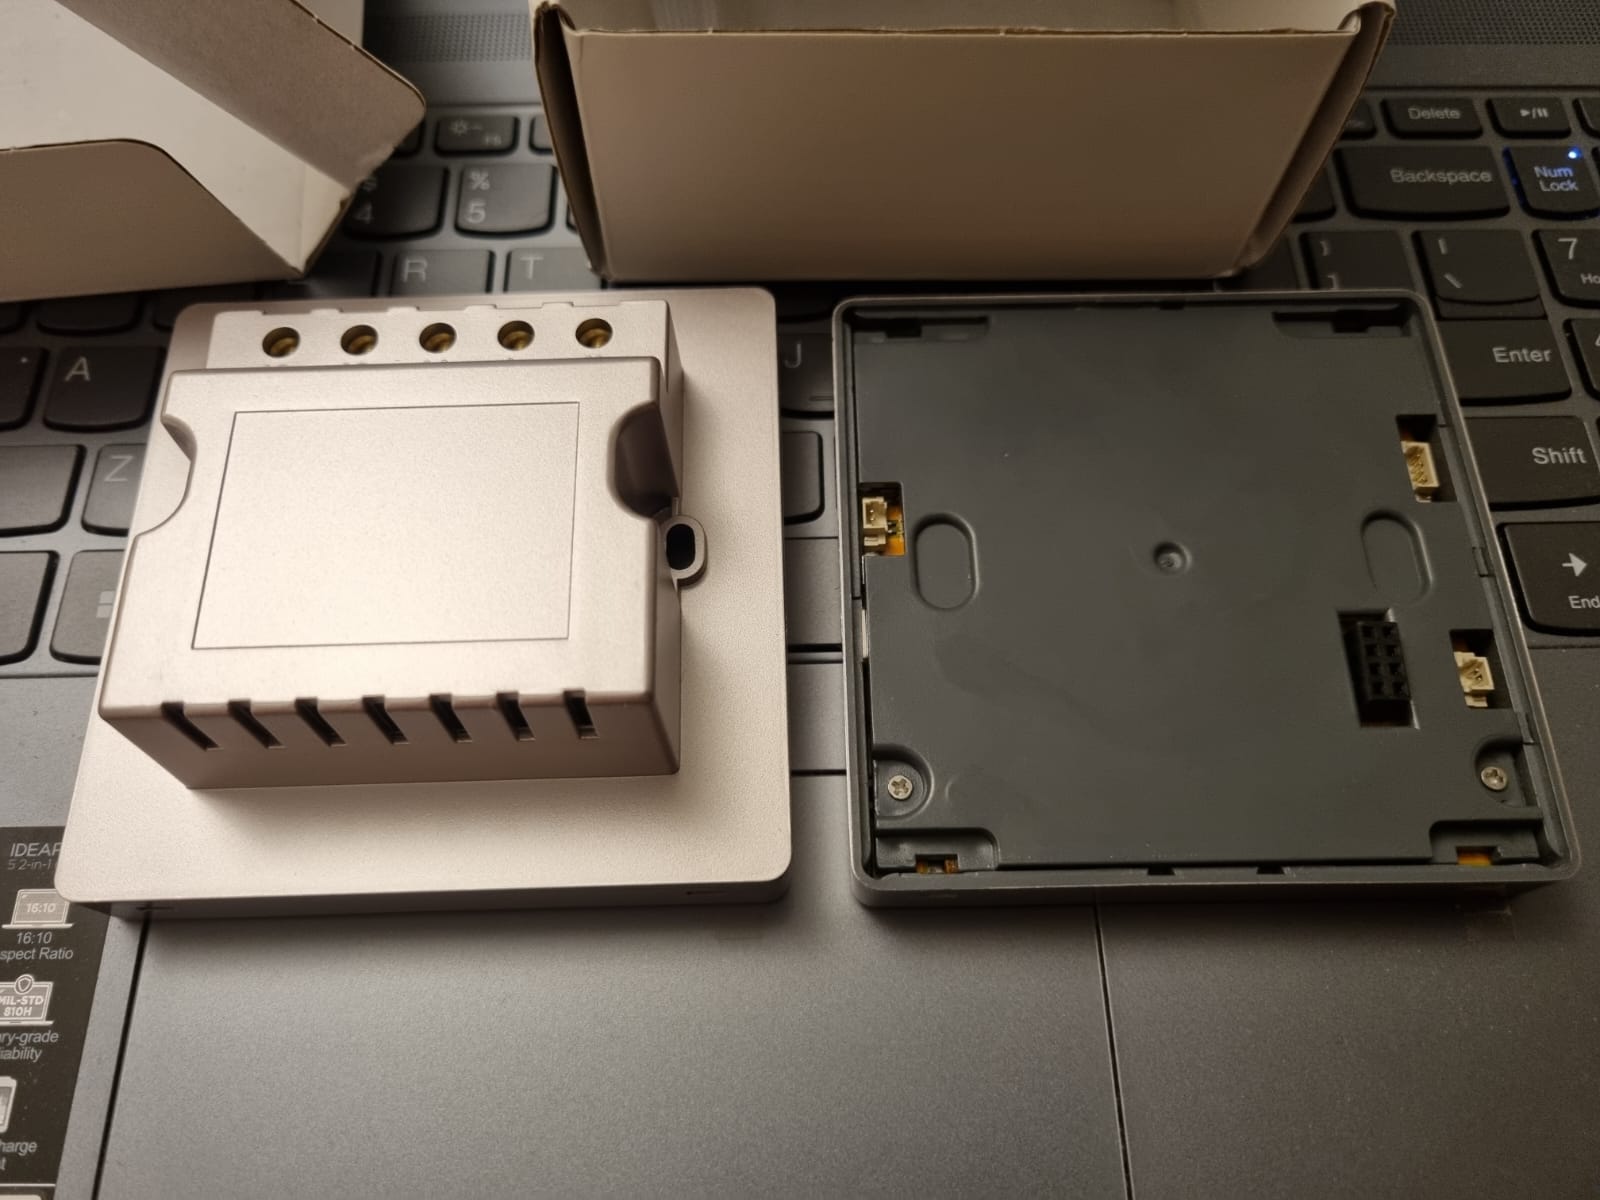
I suspect in my 21 euro ali link, the left backplate (with relays) is missing.
so for 21 euro you only get the right module which has no mounts directly on the wall possible. Since I don’t need these relays and 230VAC => 5VDC powersupply, I have to buy the complete set (30 euro) and break out the back print (relays, power supply); to only leave the plastic wall casing. I then can connect my 5VDC power to the 8pins header for supply.
9 euro’s wasted for a back only to be able to mount it to the wall.
Other option is to 3D print a “back plate” like this: Guition 4" ESP32-S3 LVGL with Command Adhesive strip holes by scottbez1 | Download free STL model | Printables.com
just to have the plastic hooks
I just went the same full story on a T3E from Global Security (also for OpenHASP). There i could also remove the whole back and leave the plastic back just to be able to wall mount it.
Hi @monty_burns_007
you can see both versions in the pictures below. The only difference is the base plate. Yes, you are right, in the 21 euro version the base plate is missing!
Inside the base plate are the AC100-230V to DC5V converter and the three relays including their circuits. It is attached to the display only by 4 click pins and 8 pin connector.

1 Like
The first Guition doesn’t attach to the 86x86 board; it doesn’t have the holes for the mounting screws. The second one, the one with the relay, does. I’m trying to create a plate to insert into the model without the relay and attach it to the box. As soon as I’ve finished it, printed it, and verified that everything is correct, I’ll post it here!
1 Like
OK thx. Can the interiour of the back plate be removed ? So that the back plate box is empty and not connection made ? I my setup I just want to connect then dupont cables or a pin header with 5V DC I supply to the back of the front display. But you have to be able then to remove the middle black part and PCB print behind it. (just to allow my 5VDC cables in).
thx, would be great ![]() here I found a similar design with those plastic hooks that the front panel needs :
here I found a similar design with those plastic hooks that the front panel needs :
looks like this:

so you’ll probably make something similar, but then with mounting holes into it.
3 Likes
Yes, there are basically the holes for the 2 screws and those for the connectors, it’s practically ready, I just have to have it printed to check if everything is ok or if something needs to be moved, if everything is ok I’ll post it here, to allow those who, like me, who bought the version without relay, to be able to attach it to the box.
1 Like
Yes, the black cover of the base plate can be removed, there are only 3 click-fastening pins, and then the circuit board, which is attached to back-cover with 4 small screws. So, the box inside the base plate will remain empty.
1 Like
I just found here something that could be it :
But i’m also interested in your model ![]()
2 Likes
Thanks for the link
This is not yet the final one, I chose not to put it on a flat surface to make it more resistant, so the slicer will have to create the bridges
1 Like
Hello everyone! Can anyone tell me, since I don’t have any real devices, who has dual mode climate control devices (heat_cool), what modes are there, and is there a temperature attribute besides target_temp_high/target_temp_low?
I’ve almost finished the version with NO CODE (only climate for now), there are still some small touches to clean up the frontend code and visual component, so I think I’ll upload it for testing by the end of the week. In the meantime, you can see how it works here
2 Likes
Hi! Non-standard values in fan_modes. Could you make a screenshot in the frontend with a list of fan_modes so that I can see what icons they have and process such variants? And also a screenshot with preset_modes also from the frontend (just a list in the thermostat) I wonder if there is a separate button for None or it works behind the scenes. Thanks)
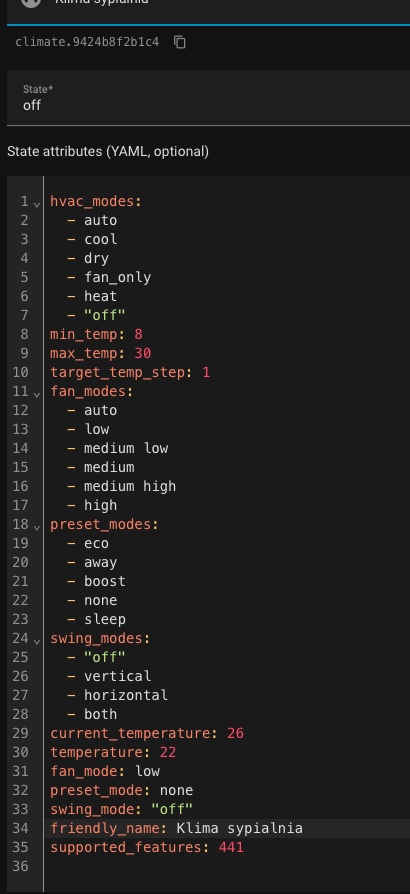
Hi Alex, not sure if this is what you’re looking for, but I control my Daikin Airco with a Faikin board, and it shows the following attributes for the climate.XXXX entity:
hvac_modes: heat_cool, off, cool, heat, dry, fan_only
min_temp: 16
max_temp: 32
target_temp_step: 0.5
fan_modes: auto, low, lowMedium, medium, mediumHigh, high, night
preset_modes: none, eco, boost, home
swing_modes: off, H, V, H+V, C
current_temperature: 25.4
temperature: 23
fan_mode: auto
preset_mode: home
swing_mode: off
icon: phu:daikin
friendly_name: Airco zolder
supported_features: 441
Let me know if you need to see more/other info? I can already control the airco now with your code, but obvioulsy not all parameters.