Need to install HACS on your Docker Home Assistant setup? This guide covers 4 different methods depending on your platform.
I’ve also created a video walkthrough for visual learners:

Prerequisites: Home Assistant running on Docker + GitHub account
Method 1: Terminal/Command Line
Step 1: Connect to Container
docker ps
![]()
docker exec -it [YOUR_CONTAINER_NAME] bash
# Example: docker exec -it homeassistant bash
Step 2: Install HACS
wget -O - https://get.hacs.xyz | bash -
Step 3: Exit and Restart
exit
docker restart [YOUR_CONTAINER_NAME]
Method 2: Portainer
Step 1: Access Portainer Console
- Go to Containers in Portainer
- Find your Home Assistant container
- Click the “Exec Console” button (>_)

Step 2: Connect to Terminal
- Ensure
/bin/bashis selected in Command field - Click “Connect”

Step 3: Install HACS
wget -O - https://get.hacs.xyz | bash -
Step 4: Restart Container
- Exit console → Return to Containers view
- Select Home Assistant container → Click “Restart”

Method 3: Synology Container Manager
Step 1: Access Container Manager
- Log in to Synology DSM
- Open Container Manager from main menu

Step 2: Open Container Terminal
- Click Container tab
- Find Home Assistant container
- Right-click → Open Terminal
Step 3: Install HACS
- Click Create → Choose bash
- Run installation command:
wget -O - https://get.hacs.xyz | bash -
Step 4: Restart Container
- Close terminal window
- Right-click Home Assistant container
- Select “Action” → “Restart”
Notes:
- DSM 7.x: Use Container Manager (recommended)
- DSM 6.x: Use Docker package instead
Method 4: QNAP Container Station
Step 1: Access Container Station
- Log in to QNAP web interface
- Open Container Station
Step 2: Open Console
- Find Home Assistant container in list
- Click container → View details
- Navigate to Actions → Execute
- Select
/bin/bash→ Click Execute
Step 3: Install HACS
wget -O - https://get.hacs.xyz | bash -
Step 4: Restart Container
- Close terminal window
- Select Home Assistant container
- Click “Restart” button
Setting Up HACS Integration (All Methods)
After installation and container restart:
Step 1: Open Integrations
- Go to Settings → Devices & Services
![]()
Step 2: Add HACS Integration
- Click Add Integration (bottom right)
- Search for “HACS” and select it
![]()
Step 3: Accept Terms
Review and accept HACS terms by checking all boxes → Click Submit

Step 4: GitHub Authentication
- Copy the device code shown
- Click link to open GitHub authorization
- Log in to GitHub if needed

Step 5: Authorize HACS
- Paste code into GitHub device activation page
- Click Authorize HACS


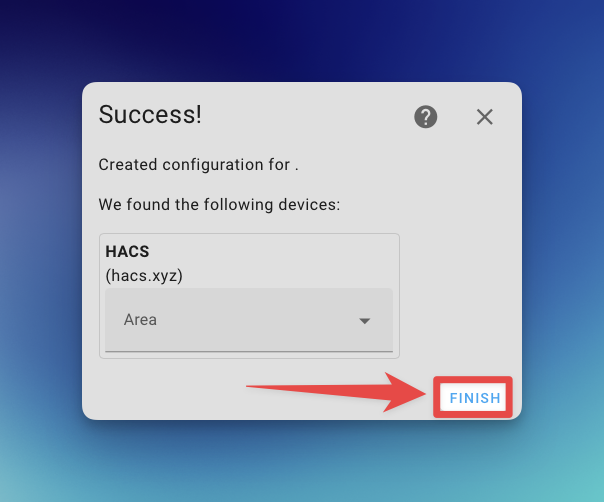
Step 6: Complete Setup
- Choose area for HACS integration (optional)
- Click Finish
Step 7: Access HACS
You should see the HACS icon in your sidebar

Troubleshooting
Can’t see HACS icon?
- Hard refresh browser:
CTRL+F5(Windows/Linux) orCMD+SHIFT+R(Mac) - Clear browser cache