HDL Smartbus via NodeRed and MQTT

Hi.

Update 24.03.24 - Changed the yaml code in the examples to reflect what is working for me now as there was some breaking changes on one of the updates on the old code.

Currently no integration for HDL Smartbus so i tought i would share in detail an easy way to get HDL integrated with HA for new users as i did not find a complete guide when i started.

Currently supports:

  • Relays
  • Dimmers
  • Universal Switches
  • Sensors (Lux, Temperature and Humidity)
  • Temprature Sensors
  • Floorheat Thermostat on DLP
  • Floorheat Thermostat on Heatingmodule MFH06
  • Air Conditioner.

Once Home assistant is installed you need to install the “Mosquitto broker” and “Node-RED” from the add-on store. I also installed “Visual Studio Code” for easy editing of the configuration.yaml file.

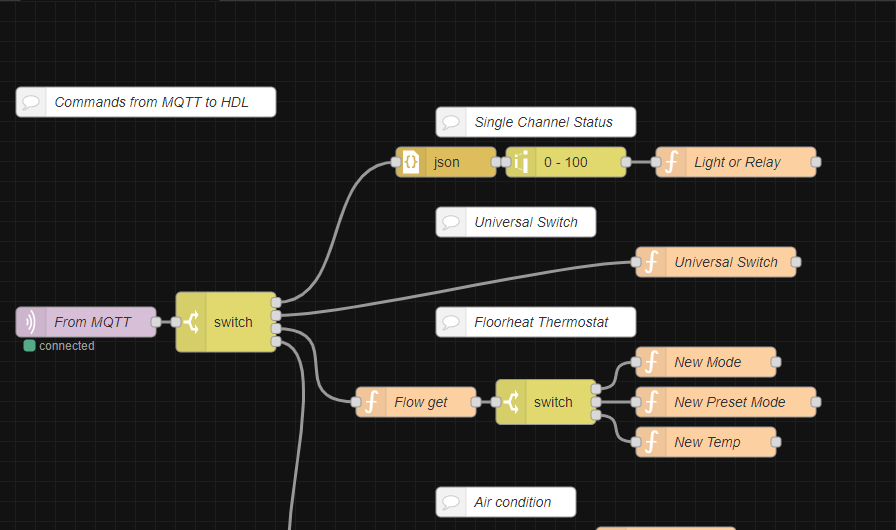
In Node-Red you need to install palette “node-red-contrib-hdlbus” witch you can find under manage palette menu.

Next you need to import the following flow into Node-RED: (Copy the code from here and paste it in to the import menu in Node-Red) Change the HDL controller host ip address to the ip for your HDL network module. Remember to Press Deploy in the top right corner.

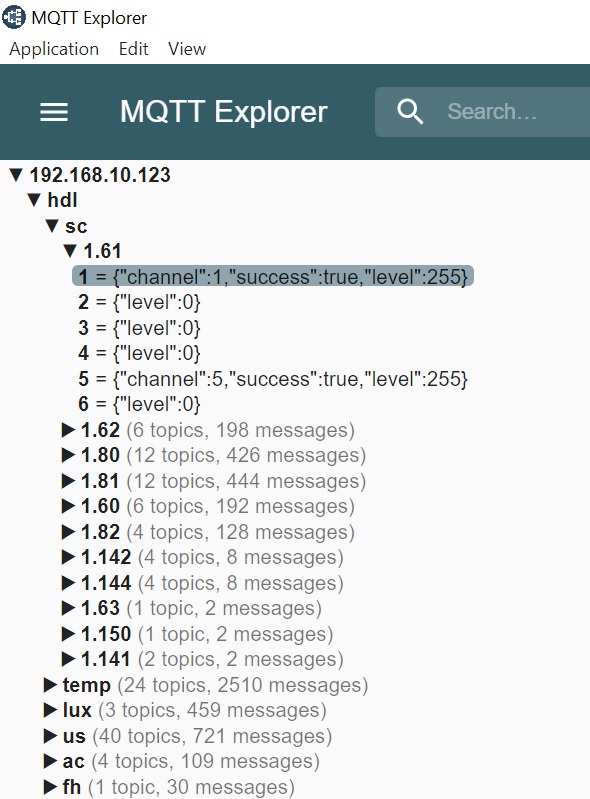
To make sure it works i use the windows program “MQTT Explorer”. Once you change a light or relay it should show up under “sc” as on this photo:

Now to add an light to HA you need to open the configuration.yaml file and add the following:

# MQTT
mqtt: !include mqtt.yaml

Create a new file in the folder with name mqtt.yaml and add the following: (Here is also relays, temperature, dry contacts and climate if you do not have any of those you need to remove it from this file)

#Lights
light: !include mqtt_lights.yaml
# Relays and Universal Switches
switch: !include mqtt_switch.yaml
# Tempratures
sensor: !include mqtt_sensor.yaml
#Dry contacts / Binary sensors
binary_sensor: !include mqtt_binarysensor.yaml
# Climate
climate: !include mqtt_climate.yaml

Create a new file mqtt_lights.yaml and add:

#2 - TV Spots
- schema: template
  name: "TV Light"
  state_topic: "hdl/sc/1.61/2"
  command_topic: "hdl/sc/1.61/2/set"
  command_on_template: >
    {"state": "on"
    {%- if brightness is defined -%}
    , "level": {{ brightness }}
    {%- else -%}
    , "level": 255
    {%- endif -%}
    }
  command_off_template: '{"state": "off", "level": 0}'
  state_template: "{{ 'on' if value_json.level | int > 0 else 'off' }}"
  brightness_template: "{{ value_json.level }}"

Change the name from “TV Light” to your name and change the state and command topic for your address. In the example “1.61” is the subnet and device id for my dimmer and “/2” is for the channel nr. 2 on that dimmer.

Save the file and go to “Developer tools → YAML” press the “Check configuration” button to verify the file. And then click the “Manually configured MQTT entites” under " YAML configuration reloading" on the same page.

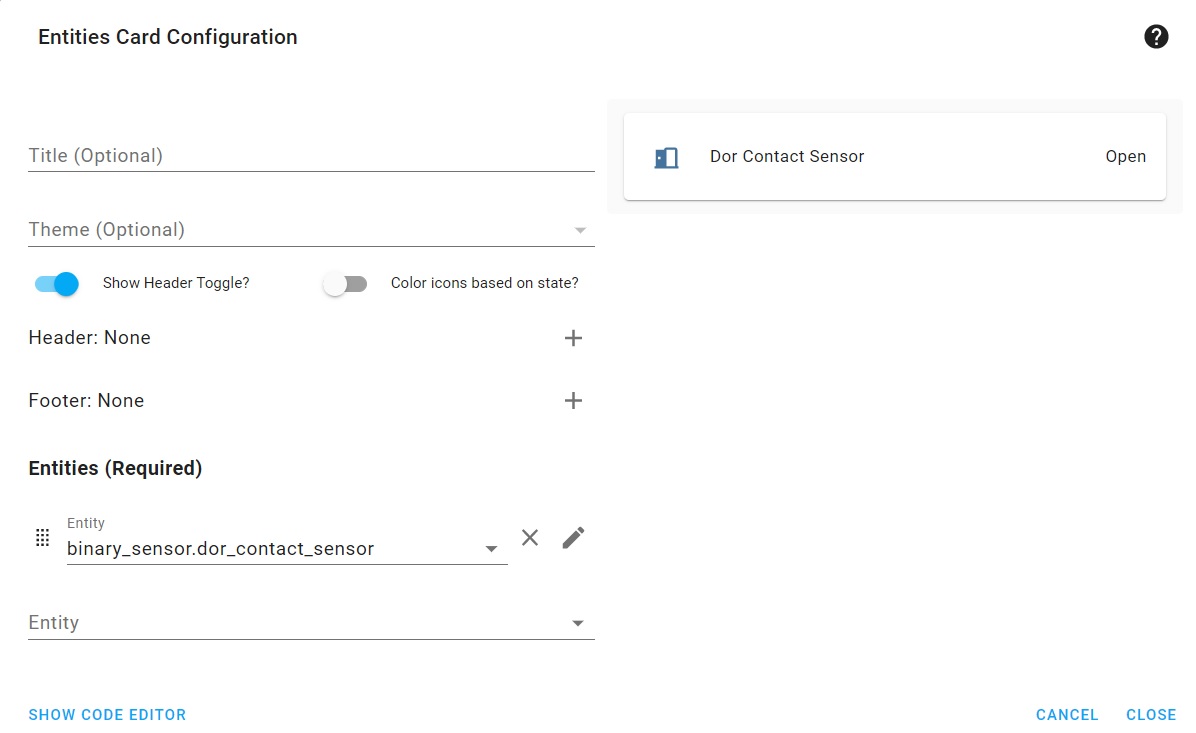
Now the light should work and you can add a light card under Overview menu. and it should be something like this:

Once closed it should be able to control the light and also the state should change when the light is switched from your manual house switches.

For relays use the following example to a new file mqtt_switch.yaml:

# Relays
switch:
#5 - Fan
- name: "Fan"
  state_topic: "hdl/sc/1.80/5"
  command_topic: "hdl/sc/1.80/5/set"
  payload_on: '{"level": 255}'
  payload_off: '{"level": 0}'
  value_template: "{{value_json.level}}"
  state_on: "255"
  state_off: "0"

For Universal Switches use the following example: (Note that it should also be in mqtt_switch.yaml)

#18 - Fan Auto
- name: "Fan Auto"
  state_topic: "hdl/us/1.22/18"
  command_topic: "hdl/us/1.22/18/set"

For Temperature sensor use the following example in mqtt_sensor.yaml

#4 - Outdoor Temperature
- name: "Outdoor Temperature"
  state_topic: "hdl/temp/1.56/4"
  unit_of_measurement: "°C"

For dry contacts note that in my example i have programed my “dry inputs” to change an Universal switch. As the dry inputs does not brodcast their status when changed.

in file mqtt_binarysensor.yaml:

#220 - Dor contact Sensor
- name: "Dor contact Sensor"
  state_topic: "hdl/us/1.142/220"
  payload_on: "ON"
  device_class: door

Floorheat / Thermostat example: (mqtt_climate.yaml)

- name: "Floorheat"
  modes:
    - "off"
    - "heat"
  mode_state_topic: "hdl/fh/1.100/01"
  mode_state_template: "{{value_json.status}}"
  mode_command_topic: "hdl/fh/1.100/mode/set"
  current_temperature_topic: "hdl/temp/1.100/1"
  temperature_state_topic: "hdl/fh/1.100/01"
  temperature_state_template: "{{value_json.temperature.now}}"
  temperature_command_topic: "hdl/fh/1.100/temperature/set"
  preset_modes:
    - "Normal"
    - "Day"
    - "Night"
    - "Away"
    - "Timer"
  preset_mode_state_topic: "hdl/fh/1.100/01"
  preset_mode_value_template: "{{value_json.textmode}}"
  preset_mode_command_topic: "hdl/fh/1.100/textmode/set"
  min_temp: 5
  max_temp: 35
  precision: 0.1

Air condition or heatpump example:

#Heatpump
- name: Heatpump
  modes:
    - "off"
    - "cool"
    - "heat"
    - "fan_only"
    - "auto"
    - "dry"
  swing_modes:
    - "on"
    - "off"
  fan_modes:
    - "auto"
    - "high"
    - "medium"
    - "low"
  mode_state_topic: "hdl/ac/1.106/01"
  mode_command_topic: "hdl/ac/1.106/mode/set"
  mode_state_template: "{{value_json.setupmode}}"
  temperature_state_topic: "hdl/ac/1.106/01"
  temperature_command_topic: "hdl/ac/1.106/temperature/set"
  temperature_state_template: "{{value_json.currentmode}}"
  fan_mode_state_topic: "hdl/ac/1.106/01"
  fan_mode_command_topic: "hdl/ac/1.106/fan/set"
  fan_mode_state_template: "{{value_json.setupspeed}}"
  swing_mode_state_topic: "hdl/ac/1.106/01"
  current_temperature_topic: "hdl/temp/1.106/1"
  precision: 0.1
  min_temp: 16
  max_temp: 30

Note that the air conditioner code for Node-RED have not been tested fully as i do not have a AC module but run a virtual AC in Node-RED(and forward the command to IR via an arduino) to be able to control my Heatpump from the DLP`s and Home Assistant.

3 Likes

If you want the current status for lights, relays, US etc. when starting up HA you can “read” the status of devices using the following examples in Node-RED
You will have to edit it with addresses to your dimmers, relays etc. in the function nodes and change it for your setup.

1 Like

@Linax - A big thank you! I’ve been trying to interface our HDL system to HA for years. However, existing solutions have been too technical for me to accomplish. Your excellent guide here for this really made this a breeze. Now everything is integrated and working perfectly. Highly appreciate your effort in doing this. Thank you!

1 Like

This looks great, but I have manage to mess it up I am afraid. I got as far as making buttons and sliders, and using MQTT Explorer shows the dimmers and relays, but Node-RED does not respond on the buttons in the overview panel. Any Idea where what might have happened? I have placed a debug on the “from MQTT” component, but it is not receiving anything.

My config code:

# Lights
light:
  - platform: mqtt
    schema: template
    name: "Kontor"
    state_topic: "hdl/sc/1.101/1"
    command_topic: "hdl/sc/1.101/1/set"
    command_on_template: >
      {"state": "on"
      {%- if brightness is defined -%}
      , "level": {{ brightness }}
      {%- else -%}
      , "level": 255
      {%- endif -%}
      }
    command_off_template: '{"state": "off", "level": 0}'
    state_template: "{{ 'on' if value_json.level | int > 0 else 'off' }}"
    brightness_template: "{{ value_json.level }}"

Have you added the hassio mqtt user and password to the mqtt settings in nodered?

I want to say no. I never set a password for it yet. Node red reports that it is connected: image

Adding a username and password helped, but some outputs where missing when i copied the the string from you. Added some HDL raw strings and it now works :slight_smile:

I can now control lights and relays. I had a little problem with the floor heating. It works, but for some reason the text is really small.
image

When editing the panel I can see this text,

Heat - {"Success":True,"Status":"Heat","Mode":4,"Temperature":{"Type":0,"Normal":21,"Day":18,"Night":21,"Away":8,"Now":8},"Textmode":"Away"} 8 °C
Target temperature
8 °C
 
Operation
Heat
 
Preset

I believe is what it is trying to put with the temperature and scaling is making it so small.
Do you have any tips on how to correct this?

Strange. I have never seen it like that. Have you tredje with a different browser or a Phone? Any error messages in the home assistant log?

Hi.

It is the same on the android app and in my browser. I started going thru the logs, but I do not really know what I am looking for?

# Floorheat Thermostat
climate:
  - platform: mqtt
    name: Varmekabel bad
    send_if_off: true
    modes:
      - "off"
      - "heat"
    mode_state_topic: "hdl/fh/1.41/01"
    mode_state_template: "{{value_json.status}}"
    mode_command_topic: "hdl/fh/1.41/mode/set"
    #current_temperature_topic: "hdl/fh/1.41/01"
    #current_temperature_template: "{{value_json.temperature.current}}"
    current_temperature_topic: "hdl/temp/1.41/1"
    temperature_state_topic: "hdl/fh/1.41/01"
    temperature_state_template: "{{value_json.temperature.now}}"
    temperature_command_topic: "hdl/fh/1.41/temperature/set"
    hold_modes:
      - "Normal"
      - "Day"
      - "Night"
      - "Away"
      - "Timer"
    hold_state_topic: "hdl/fh/1.41/01"

Can the problem be that i added “bad” on the first part?

Edit:
Apparently I manage to not copy every thing and where missing the last part of the code. It works now :slight_smile:

Hello

I have tried to set it up with my HDL wireless system. It looks like I get feedback from the gateway into HA , the light shows in history when it was turned on, but I can`t send any commands back to hdl. Do you have any solution to this? Is it used with a wireless hdl-bus before?

I dont have any wireless equipment so have not tested but i belive the commands are the same.

If you get feedback to HA when turning on a light it sound like a config error. Do you mind uploading a screenshot from mqtt Explorer and also copy out the code for a light?


Hope it worked. All units is visible in MQTT explorer, when I use my I3 app to switch the light I can see the response immediately in MQTT explorer. When I dim the light in HA It is not responding.


This is when i dimmed the ligth from I3 app

This is from Node Red:


Is there something missing here?

The nodered is missing the hdl raw out node after the function nodes to the right in that picture.

I am not home right now but will try to take a picture later of my setup.

If you try to add a hdl raw out to your right and make a line from the function nodes to it that should fix it.

Here is my nodered setup. See the hdl raw out to the right.

Perfect! now it is working. Is there a way to get motion detection from sensors also?

My wireless system doesn’t always receive the signal. Is it possible with code to resend the signal multiple times when the signal is sent?

The simplest way is to tell the sensor to send an us command to the logic unit if you have one. if not you can send it to another sensor. In my original setup the logic unit was the one to turn on and off the lights to have better control over the timing. I have not been able to get humidity from the sensors, but you can get temperature from them by telling them to broadcast.

Yes it is possible but the way the sensors work is they dont brodcast when there is motion. There is also a few different sensor message protocols and in my experience they also act different depending on the firmware.

Some of the sensors brodcast their status once per minute, this will not be great for motion as you can come and go without it registering but for temperature it is plenty good enough.

I think the best way to register motion and the dry inputs on the sensors is to program the sensor to turn on and off a us switch. This will be instantly updated to HA. But you will have to do some programing in hdl. I have already done this for dry contacts as on the door sensor example on my first post.

The 2nd way it can be done is to ask the sensor constantly (ca 1 per second) what the status is and it will respond. This will hoever create a lot of data on the bus if you have lots of sensors and might not be the best way if the wireless sensors are battery power. If i remember correct this is the way I3 detects motion so you only need to convert the messages already beeing spamed on your bus to mqtt if your plan is to keep having an i3 server running?

What sensors do you have now?

Yes should be possible in nodered. What is your adress for the sensor and what type of sensor is it? I can try yo make a setup for you but am not home at the moment so will need a week or two.

This is what i would recomend also. Can also send it to nodered and build the answeerback message in nodered if you do not have a logic unit.

Have you checked that the sensor is sending the multistatus update every minute? On my outdoor sensor and some of my 12/1 i have to ask for update every minute from nodered as it does not send auto updates for some reason.