Hi.
Update 24.03.24 - Changed the yaml code in the examples to reflect what is working for me now as there was some breaking changes on one of the updates on the old code.
Currently no integration for HDL Smartbus so i tought i would share in detail an easy way to get HDL integrated with HA for new users as i did not find a complete guide when i started.
Currently supports:
- Relays
- Dimmers
- Universal Switches
- Sensors (Lux, Temperature and Humidity)
- Temprature Sensors
- Floorheat Thermostat on DLP
- Floorheat Thermostat on Heatingmodule MFH06
- Air Conditioner.
Once Home assistant is installed you need to install the “Mosquitto broker” and “Node-RED” from the add-on store. I also installed “Visual Studio Code” for easy editing of the configuration.yaml file.
In Node-Red you need to install palette “node-red-contrib-hdlbus” witch you can find under manage palette menu.
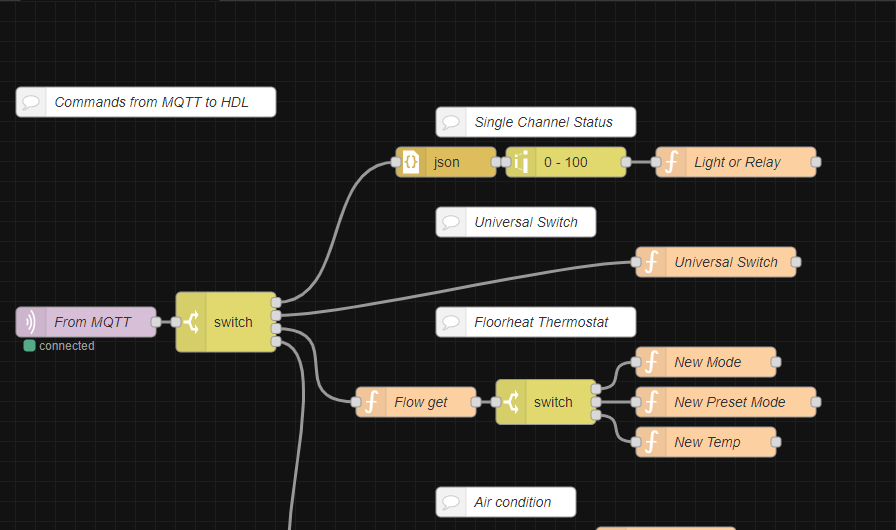
Next you need to import the following flow into Node-RED: (Copy the code from here and paste it in to the import menu in Node-Red) Change the HDL controller host ip address to the ip for your HDL network module. Remember to Press Deploy in the top right corner.
To make sure it works i use the windows program “MQTT Explorer”. Once you change a light or relay it should show up under “sc” as on this photo:
Now to add an light to HA you need to open the configuration.yaml file and add the following:
# MQTT
mqtt: !include mqtt.yaml
Create a new file in the folder with name mqtt.yaml and add the following: (Here is also relays, temperature, dry contacts and climate if you do not have any of those you need to remove it from this file)
#Lights
light: !include mqtt_lights.yaml
# Relays and Universal Switches
switch: !include mqtt_switch.yaml
# Tempratures
sensor: !include mqtt_sensor.yaml
#Dry contacts / Binary sensors
binary_sensor: !include mqtt_binarysensor.yaml
# Climate
climate: !include mqtt_climate.yaml
Create a new file mqtt_lights.yaml and add:
#2 - TV Spots
- schema: template
  name: "TV Light"
  state_topic: "hdl/sc/1.61/2"
  command_topic: "hdl/sc/1.61/2/set"
  command_on_template: >
    {"state": "on"
    {%- if brightness is defined -%}
    , "level": {{ brightness }}
    {%- else -%}
    , "level": 255
    {%- endif -%}
    }
  command_off_template: '{"state": "off", "level": 0}'
  state_template: "{{ 'on' if value_json.level | int > 0 else 'off' }}"
  brightness_template: "{{ value_json.level }}"
Change the name from “TV Light” to your name and change the state and command topic for your address. In the example “1.61” is the subnet and device id for my dimmer and “/2” is for the channel nr. 2 on that dimmer.
Save the file and go to “Developer tools → YAML” press the “Check configuration” button to verify the file. And then click the “Manually configured MQTT entites” under " YAML configuration reloading" on the same page.
Now the light should work and you can add a light card under Overview menu. and it should be something like this:
Once closed it should be able to control the light and also the state should change when the light is switched from your manual house switches.
For relays use the following example to a new file mqtt_switch.yaml:
# Relays
switch:
#5 - Fan
- name: "Fan"
  state_topic: "hdl/sc/1.80/5"
  command_topic: "hdl/sc/1.80/5/set"
  payload_on: '{"level": 255}'
  payload_off: '{"level": 0}'
  value_template: "{{value_json.level}}"
  state_on: "255"
  state_off: "0"
For Universal Switches use the following example: (Note that it should also be in mqtt_switch.yaml)
#18 - Fan Auto
- name: "Fan Auto"
  state_topic: "hdl/us/1.22/18"
  command_topic: "hdl/us/1.22/18/set"
For Temperature sensor use the following example in mqtt_sensor.yaml
#4 - Outdoor Temperature
- name: "Outdoor Temperature"
  state_topic: "hdl/temp/1.56/4"
  unit_of_measurement: "°C"
For dry contacts note that in my example i have programed my “dry inputs” to change an Universal switch. As the dry inputs does not brodcast their status when changed.
in file mqtt_binarysensor.yaml:
#220 - Dor contact Sensor
- name: "Dor contact Sensor"
  state_topic: "hdl/us/1.142/220"
  payload_on: "ON"
  device_class: door
Floorheat / Thermostat example: (mqtt_climate.yaml)
- name: "Floorheat"
  modes:
    - "off"
    - "heat"
  mode_state_topic: "hdl/fh/1.100/01"
  mode_state_template: "{{value_json.status}}"
  mode_command_topic: "hdl/fh/1.100/mode/set"
  current_temperature_topic: "hdl/temp/1.100/1"
  temperature_state_topic: "hdl/fh/1.100/01"
  temperature_state_template: "{{value_json.temperature.now}}"
  temperature_command_topic: "hdl/fh/1.100/temperature/set"
  preset_modes:
    - "Normal"
    - "Day"
    - "Night"
    - "Away"
    - "Timer"
  preset_mode_state_topic: "hdl/fh/1.100/01"
  preset_mode_value_template: "{{value_json.textmode}}"
  preset_mode_command_topic: "hdl/fh/1.100/textmode/set"
  min_temp: 5
  max_temp: 35
  precision: 0.1
Air condition or heatpump example:
#Heatpump
- name: Heatpump
  modes:
    - "off"
    - "cool"
    - "heat"
    - "fan_only"
    - "auto"
    - "dry"
  swing_modes:
    - "on"
    - "off"
  fan_modes:
    - "auto"
    - "high"
    - "medium"
    - "low"
  mode_state_topic: "hdl/ac/1.106/01"
  mode_command_topic: "hdl/ac/1.106/mode/set"
  mode_state_template: "{{value_json.setupmode}}"
  temperature_state_topic: "hdl/ac/1.106/01"
  temperature_command_topic: "hdl/ac/1.106/temperature/set"
  temperature_state_template: "{{value_json.currentmode}}"
  fan_mode_state_topic: "hdl/ac/1.106/01"
  fan_mode_command_topic: "hdl/ac/1.106/fan/set"
  fan_mode_state_template: "{{value_json.setupspeed}}"
  swing_mode_state_topic: "hdl/ac/1.106/01"
  current_temperature_topic: "hdl/temp/1.106/1"
  precision: 0.1
  min_temp: 16
  max_temp: 30
Note that the air conditioner code for Node-RED have not been tested fully as i do not have a AC module but run a virtual AC in Node-RED(and forward the command to IR via an arduino) to be able to control my Heatpump from the DLP`s and Home Assistant.


