Home Assistant App through Cloudflare Tunnel with Auth (Android)

This is how I configured the Cloudflare App to work securely though a Cloudflare Tunnel while still maintaining access though the web interface.

At the end of this process we will be able to

  • Access the HA web interface though a normal browser, with auth enabled.
  • Access HA by using the Android app by using a client certificate.
  • This will be done by setting up two applications in Cloudflare and pointing them to the same tunnel.

Assumptions made

  • You have a Cloudflare account set up.
  • You know how to set up Cloudflare application policies and authentication providers
  • You know how to set up a Cloudflare tunnel
  • You are running HA OS.
  • You know how to install HA addons
  • You have OpenSSL installed

Why is the necessary?
The HA Android app does not appear to support token auth (used by the Cloudflare tunnel) at this time. When auth is turned on, the HA app will open a browser, but after sign in the token never makes it back to the app. This is why auth works in a browser, but not in the app. We can however use mTLS to get around this.

I recommend that you remove the Cloudflare addon from HA and delete and associated Cloudflare applications and tunnels before beginning this process. This will allow the addon to do some of the work and creating the tunnels and DNS entries for you.

Generate public and private keys.
Step 1.
In your Cloudflare account, go to SSL/TLS -> Client Certificates. Then click on the Create Certificate button.

Step 2.
Then select Generate private key and CSR with Cloudflare, use key type RSA (2048), and leave the validity period set to 10 years (unless you want to be doing this process again soon), and click the Create. button.

Step 3.
On the Client Certificate and Key Generation page, copy both the Certificate and the Private Key to text files. Name them cert.pem and private.key


It is important that you don’t allow any persons or devices access to your private key who you do not trust. They can use it to bypass tunnel authentication.

Step 4.
Back on the Client Certificates page, you should see your new certificate

Step 5.
Using those text files we need to create a .pfx file and move it over to the phones and devices we plan on using with the HA App. This can be done by using OpenSLL. If you don’t have OpenSSL on Windows, the easiest way to get it is to install Git and used the Git Bash shell. If you are on Linux, then it comes already installed.

Issue the following command at a command prompt after changing to the directory where your certificate files from above are located.
openssl pkcs12 -export -out cfcert.pfx -inkey private.key -in cert.pem

This should produce a file named cfcert.pfx, which we need to copy to our mobile device. On Android the easiest way to do this is via Google Drive.

Step 6.
On your Android device, go to the Settings app and search for “Install a cert”. Click on Install a certificate → VPN & app user certificate. Your phone may use a different process.

image

image

From here, access your Google drive, find the .pfx file and install the cert.

Set up the Cloudflare Tunnel Addon

Step 1.
Install the HA Cloudflared addon and establish a tunnel using the authors instructions.
One the tunnel is established, continue with the rest of this guide.

Step 2.
We will be setting up two URLs. One for the HA App and one for the web UI.
In the Cloudflare addon Configuration tab, enter the address you wish to use for the HA Companion App in the External Home Assistant Hostname and enter the URL you wish to use for web access as a hostname in the Additional Hosts field. You will also need to map the service to your local HA web HA GUI URL and port number. Typically this is http://homeassistant.local:8123.

Note:
If you have changed the http port number by setting server_port in your configuration.yaml, then the port number entered in Additional Hosts must match whatever you have changed it to. By default the port number is 8123.

Step 3
Confirm that the values entered into the Cloudflared options match the settings in Home Assistant → Settings → System → Network → Home Assistant URL

The HA Internet URL should match the External Home Assistant Hostname in the Cloudflared configuration, and the local network URL should match the service URL in the Cloudflared configuration. Do not confuse this with the hostname. If you are using the default local URL of http://homeassistant.local then you can simply turn on the automatic option.

image

For clarification

Set up Cloudflare access for the HA Companion App and HA Web GUI.
Step 1
Create an mTLS rule to allow the client certificate installed on your phone to access HA via the app URL. The easiest way to do this is to use a template. In Cloudflare go to SSL/TLS -> Client Certificates then click Create mTLS Rule

Step 2
Not much to do here. Accept the defaults and click Deploy.

Step 3
On the WAF page you will see the new rule which will not allow clients without a verified certificate to access your applications.

Step 4
Create an application for the HA Companion App
In Cloudflare go to Access → Launch Zero Trust → Access → Applications

Step 5
Create Cloudflare application for Web GUI

Click Add an application

Select “Self-hosted”

Give the app a name and enter the internet URL for the Web GUI.
This should match the hostname configured in the HA Cloudflared addon
Accept the defaults for for all the other settings, and click “Next”

Set up application policies as required.
For a full guide on Cloudflare application policies see Access policies

Turn on HTTP Only

Click Add Application
This will take care of Web GUI access.

Step 6
Set up HA Companion App access
Create a new Cloudflare application for the HA Companion app.

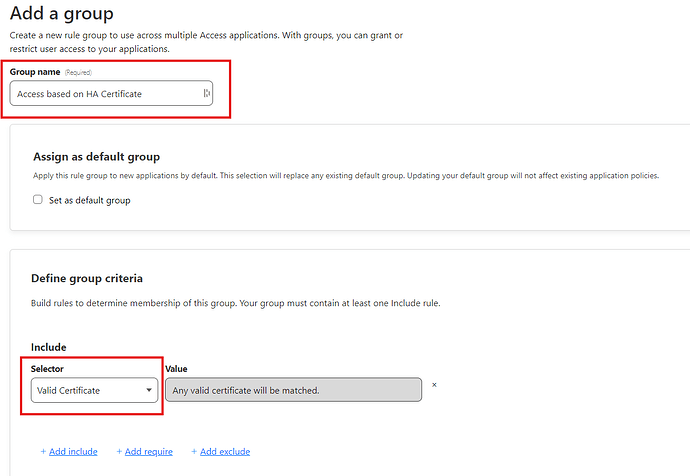
Create an access group named “Access based on HA Certificate” with a selector of “Valid Certificate”

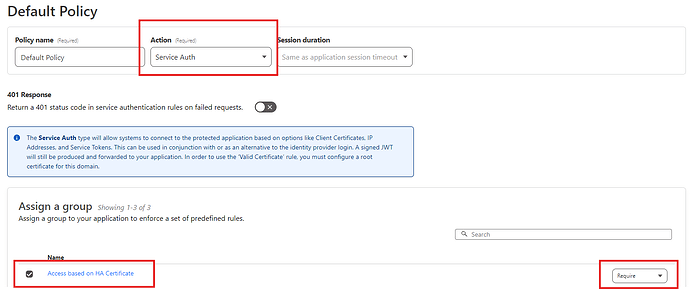
Select the service auth action when setting up the policy for the HA App.
This will allow the HA Companion App to skip the user authentication portion of the login and use its certificate instead.
Don’t worry, the mTLS rule we set up earlier will secure the connection with the certificate.
Assign the policy to the Access based on HA Certificate group


If you don’t see the “Access Based on Certificate” policy in the list, go back to the previous step and verify you set up the group correctly.

Step 7
Set up all other Cloudflare options the same as you did for the Web GUI.

Step 8
Confirm that you have CNAME entries in Cloudflare DNS which point to your Tunnel ID, and that Proxy is enabled (orange cloud) The application set up should have created these for you, but sometimes it doesn’t, so double check.

That’s it! Your should now be able to log in from the HA Companion App over the internet. If you have couple, try clearing the app cache first.

10 Likes

Great how-to… but where is the rest? I see your posts in other forums about setting up a WAF rule, but it’s not here?

I got busy with other things. I just added the remaining steps. Try it out and see if it works for you.

Thank you for the detailed explanation!!! You are my life saver. I managed to access HA from outside of the local network. For me, I had to set my domain as “External URL” in HA App. :wink:

1 Like

Did you test this? Open an incognito window and try to hit ha-app.your-domain.com.

you can still access your home assistant instance, without having an mTLS cert.

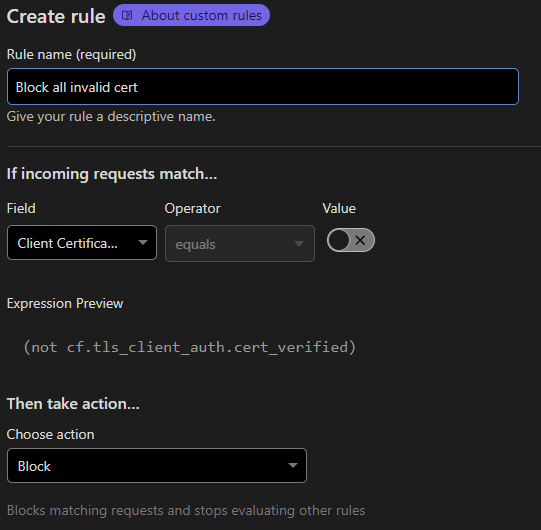
I do not believe the default WAF rule is acceptable - I think you need to delete the second condition trying to match the path. You want to block ANY request without a valid mTLS cert, not ones where the path is “” (which won’t match anything, therefore the AND condtion fails - true AND false - and every request goes through). In other words, make your rule this: BLOCK (not cf.tls_client_auth.cert_verified)

You should probably add another rule as well: BLOCK cf.tls_client_auth.cert_revoked

Someone please correct me if I’m wrong.

Yea I see what you are saying. It would appear that Cloudflare does not support the (not cf.tls_client_auth.cert_verified) option. I tried to add a rule for that and it would not save. I’m looking to see what else can be done. Any suggestions you have are welcome.

I get 400: Bad Request when I try to access the home assistant via webbrowser,
and 404 when I try it via the app.

The error 400 comes after I enter the code that is sent via cloudlfare to my email. If I disable the mtls rule - then home assistant app also gets the cloudflare code window.

The cloudlared app shows nothing in the log that looks like an erorr (and shows the tunnel conntected). Copying in the link that comes up in the cloudflared addon log to create the tunnel is missing in the tutorial btw.

Well - missing in this tutorial is - add the following to configuration.yaml:
http:
use_x_forwarded_for: true
trusted_proxies:
- 172.30.33.0/24

and then REBOOT Home assistant. I had read about this at a couple places but often it failed to mention to reboot, other times the /24 was missing and without it no luck.

1 Like

The rule works fine. You can use the editor (Field: Client Certificate Verified equals [unchecked]) or manually put that string in. Maybe you already have 5 rules defined and can’t save another?

I would suggest you edit the first post to either make it correct/safe or make it clear that it is not doing what it says it’s doing as-is :slight_smile:

Is this correct?
When I deploy this rule everything stops working.

Followed your guide and it all looks good, thanks for taking the time to put it together - very nice detailed instructions!

Still puzzled on the mTLS verification rule though - if I use

(not cf.tls_client_auth.cert_verified)

Everything is blocked

If i use

(not cf.tls_client_auth.cert_verified and http.request.uri.path in {“”})

as shown in your guide I can access, but then that looks like the certificate part would be ignored…

Did you end up with a solution?

Thanks for this guide. I managed to follow this and wanted to add a few comments on how I got this working.

I set a condition on the mTLS rule that this only applies when the hostname is equal to the subdomain for HA app access.

When creating the certificate and private key files I accidentally pasted them in to a rich text document. This led to the openssl call not working. Saving it as a plain text file made it work fine.

When setting up access on the app I could only get the prompt to choose a certificate when prefixing the hostname with https:// . Using http:// didn’t bring up the prompt for the certificate.

This guide is amazing.

For the mTLS part i used this:

(not cf.tls_client_auth.cert_verified or cf.tls_client_auth.cert_revoked)

Is this right?

I fail somehow to follow the guide during Step 6 with this error:

Error configuring your application: access.api.error.invalid_request: invalid ‘include’ configuration

These are the settings in the application policies:

This is the Access Group:

(with only the policy “homeassistant for guests” it works)

EDIT: I FIGURED IT OUT!!!
Set the Action of the cert acces to “Service Auth”
image

maybe it allows now all certificates…?
I Even deactivated the mTLS rule entirely

Edit 2: i now block all invalic mTLS Certs

Then something else is going on if that doesn’t work - like your certs are not correct on your HA app or something. This rule works correctly.

Great instructions. As of 30-06 I needed to modify a few things to get it working. As I am using multiple services via Cloudflare Access the WAF is to strict for me

(not cf.tls_client_auth.cert_verified and http.host eq “ha-app.yourdomain.coml”)

In addition I specifically mentioned my host where mTLS should be activated:

In Cloudflare Access I needed to use “Service Auth” (Require)

2 Likes

Thank you @sincze . This was the missing link from the original. Bypass was just passing right through it. I’ve tested it using the Service Auth from various access methods and it denies all except the one with the cert when accessed via the ha-app url. I can still access the HA url and be challenged for my pin.

Great post and appreciate you ironing out the last point.

Thanks everyone!

Thank you this is very cool. My advice. Read step 2 very carefully and notice the ha.mydomain and ha-app.mydomain differences.

Second I also agree the Bypass section in step 6 didn’t work with this error

Changing it to Service Auth and adding an access group based on certificate worked.

I am glad someone wrote this it was annoying me to the point I had turned off Cloudflare tunnelling for the HA. but this is back and working now…

Hello! Thank you for the detailed write-up!

My situation is this.

I just setup cloudflared in the same machine running my HA.
All works well, and then I got intrigued with a post asking us to secure further with Zero Trust.

While the added “OTP” login challenge page was reassuring (and shields a possible attacker from seeing straightaway the HA or other service login page), it caused issues for:

  1. RestAPI calls from my iOS to my hosted server (e.g. owntracks server, etc.)
  2. HA Companion App

The Companion App was routed to the OTP challenge page, but it threw some error after entering the HA username/pwd + 2FA token.

From your tutorial, would it mean that my laptop or other endpoint/client devices would also need to install the certs to bypass? E.g. if I wanted to share the URL with other family members using their own mobile devices or laptops?

Managed to get it working with changes. I had to use service auth action instead of bypass, and for some reason my Samsung S23 FE and OPPO A72 didn’t like the certificate, so needed to run the openssl command with the “-legacy” flag.

Very nice write-up and I think I understand it, u are basically splitting up the Zero trust to have 2 hostnames, the ha.mydomain.com would be the default one for browser access and u can put the identity provider like github and google auth in front I assume.

And the mobile apps/phones u want to use it on, would instead go to the other hostname ha-app.mydomain.com, and would need the cert only to get in making the apps work.

Quick few questions before I spend the time to do it, and I will most likely try to do this without the addon, I have existing CF zero trust tunnels and dont want to rely on the addon -

  1. Does it work for ios I assume the cert should install just fine, just checking if anyone tried it?
  2. Which hostname do u give to Google Assistant and Smartthings config, I assume the ha.mydomain.com, as they wouldnt be able to do the cert route. If that is the case has anyone tested if it works?

P.S @skykingjwc please update the original post to show the service auth, this will help future ppl, maybe generations to make it idiot proof and not have to read the comments