This is how I configured the Cloudflare App to work securely though a Cloudflare Tunnel while still maintaining access though the web interface.
At the end of this process we will be able to
- Access the HA web interface though a normal browser, with auth enabled.
- Access HA by using the Android app by using a client certificate.
- This will be done by setting up two applications in Cloudflare and pointing them to the same tunnel.
Assumptions made
- You have a Cloudflare account set up.
- You know how to set up Cloudflare application policies and authentication providers
- You know how to set up a Cloudflare tunnel
- You are running HA OS.
- You know how to install HA addons
- You have OpenSSL installed
Why is the necessary?
The HA Android app does not appear to support token auth (used by the Cloudflare tunnel) at this time. When auth is turned on, the HA app will open a browser, but after sign in the token never makes it back to the app. This is why auth works in a browser, but not in the app. We can however use mTLS to get around this.
I recommend that you remove the Cloudflare addon from HA and delete and associated Cloudflare applications and tunnels before beginning this process. This will allow the addon to do some of the work and creating the tunnels and DNS entries for you.
Generate public and private keys.
Step 1.
In your Cloudflare account, go to SSL/TLS -> Client Certificates. Then click on the Create Certificate button.

Step 2.
Then select Generate private key and CSR with Cloudflare, use key type RSA (2048), and leave the validity period set to 10 years (unless you want to be doing this process again soon), and click the Create. button.

Step 3.
On the Client Certificate and Key Generation page, copy both the Certificate and the Private Key to text files. Name them cert.pem and private.key

It is important that you don’t allow any persons or devices access to your private key who you do not trust. They can use it to bypass tunnel authentication.
Step 4.
Back on the Client Certificates page, you should see your new certificate

Step 5.
Using those text files we need to create a .pfx file and move it over to the phones and devices we plan on using with the HA App. This can be done by using OpenSLL. If you don’t have OpenSSL on Windows, the easiest way to get it is to install Git and used the Git Bash shell. If you are on Linux, then it comes already installed.
Issue the following command at a command prompt after changing to the directory where your certificate files from above are located.
openssl pkcs12 -export -out cfcert.pfx -inkey private.key -in cert.pem
This should produce a file named cfcert.pfx, which we need to copy to our mobile device. On Android the easiest way to do this is via Google Drive.
Step 6.
On your Android device, go to the Settings app and search for “Install a cert”. Click on Install a certificate → VPN & app user certificate. Your phone may use a different process.


From here, access your Google drive, find the .pfx file and install the cert.
Set up the Cloudflare Tunnel Addon
Step 1.
Install the HA Cloudflared addon and establish a tunnel using the authors instructions.
One the tunnel is established, continue with the rest of this guide.
Step 2.
We will be setting up two URLs. One for the HA App and one for the web UI.
In the Cloudflare addon Configuration tab, enter the address you wish to use for the HA Companion App in the External Home Assistant Hostname and enter the URL you wish to use for web access as a hostname in the Additional Hosts field. You will also need to map the service to your local HA web HA GUI URL and port number. Typically this is http://homeassistant.local:8123.
Note:
If you have changed the http port number by setting server_port in your configuration.yaml, then the port number entered in Additional Hosts must match whatever you have changed it to. By default the port number is 8123.

Step 3
Confirm that the values entered into the Cloudflared options match the settings in Home Assistant → Settings → System → Network → Home Assistant URL
The HA Internet URL should match the External Home Assistant Hostname in the Cloudflared configuration, and the local network URL should match the service URL in the Cloudflared configuration. Do not confuse this with the hostname. If you are using the default local URL of http://homeassistant.local then you can simply turn on the automatic option.

For clarification

Set up Cloudflare access for the HA Companion App and HA Web GUI.
Step 1
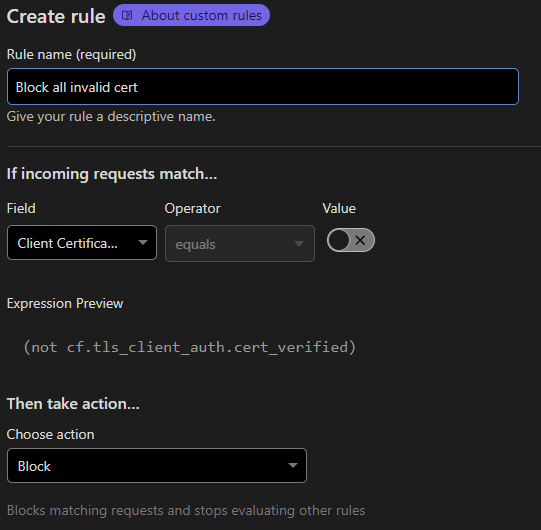
Create an mTLS rule to allow the client certificate installed on your phone to access HA via the app URL. The easiest way to do this is to use a template. In Cloudflare go to SSL/TLS -> Client Certificates then click Create mTLS Rule

Step 2
Not much to do here. Accept the defaults and click Deploy.

Step 3
On the WAF page you will see the new rule which will not allow clients without a verified certificate to access your applications.

Step 4
Create an application for the HA Companion App
In Cloudflare go to Access → Launch Zero Trust → Access → Applications
Step 5
Create Cloudflare application for Web GUI
Click Add an application

Select “Self-hosted”

Give the app a name and enter the internet URL for the Web GUI.
This should match the hostname configured in the HA Cloudflared addon
Accept the defaults for for all the other settings, and click “Next”

Set up application policies as required.
For a full guide on Cloudflare application policies see Access policies

Turn on HTTP Only

Click Add Application
This will take care of Web GUI access.
Step 6
Set up HA Companion App access
Create a new Cloudflare application for the HA Companion app.

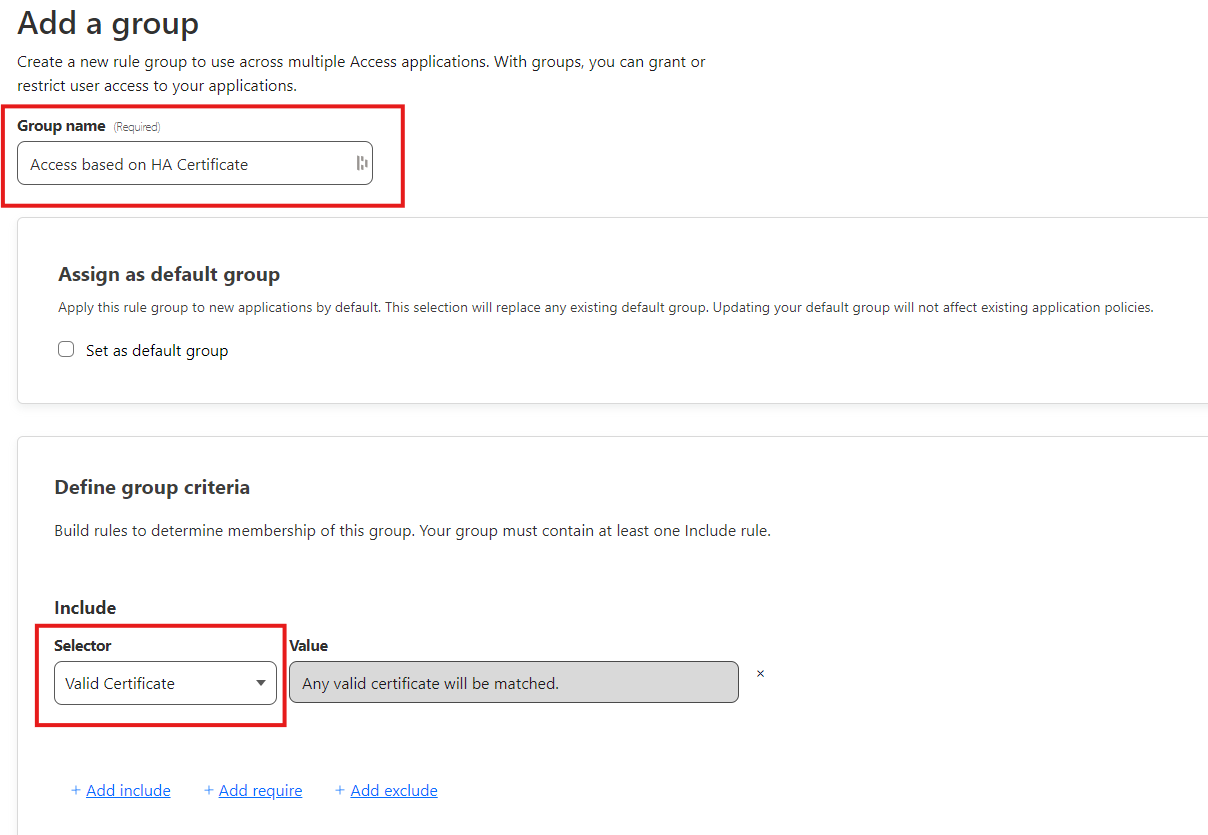
Create an access group named “Access based on HA Certificate” with a selector of “Valid Certificate”
Select the service auth action when setting up the policy for the HA App.
This will allow the HA Companion App to skip the user authentication portion of the login and use its certificate instead.
Don’t worry, the mTLS rule we set up earlier will secure the connection with the certificate.
Assign the policy to the Access based on HA Certificate group
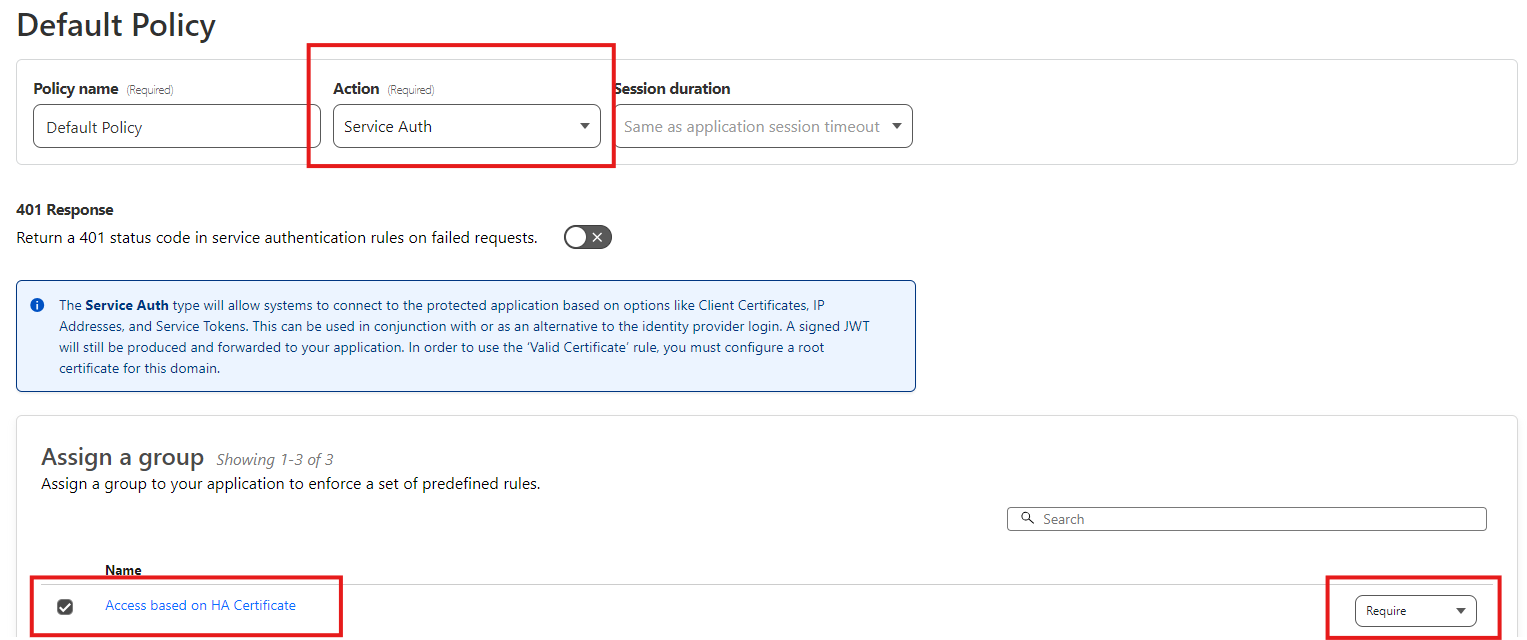
If you don’t see the “Access Based on Certificate” policy in the list, go back to the previous step and verify you set up the group correctly.
Step 7
Set up all other Cloudflare options the same as you did for the Web GUI.
Step 8
Confirm that you have CNAME entries in Cloudflare DNS which point to your Tunnel ID, and that Proxy is enabled (orange cloud) The application set up should have created these for you, but sometimes it doesn’t, so double check.
That’s it! Your should now be able to log in from the HA Companion App over the internet. If you have couple, try clearing the app cache first.