How to add MQTT sensors to Home Assistant?

Hi All,

I am using SeeedStudio Xiao ESP32C3 with a door sensor to detect an event of door open or close.

I have installed the mqtt broker on hassio, and configured the same in esp32c3 firmware.

I am successfully able to observe the sensor data in Serial Monitor, as well as when listening to the topic on hassio.

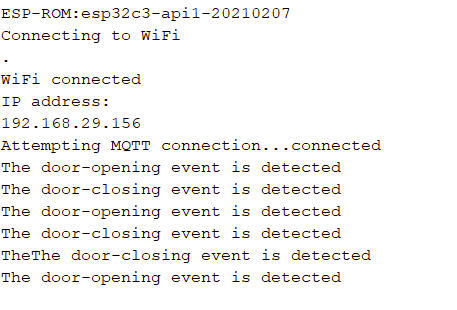
Arduino Serial Monitor Log:
image

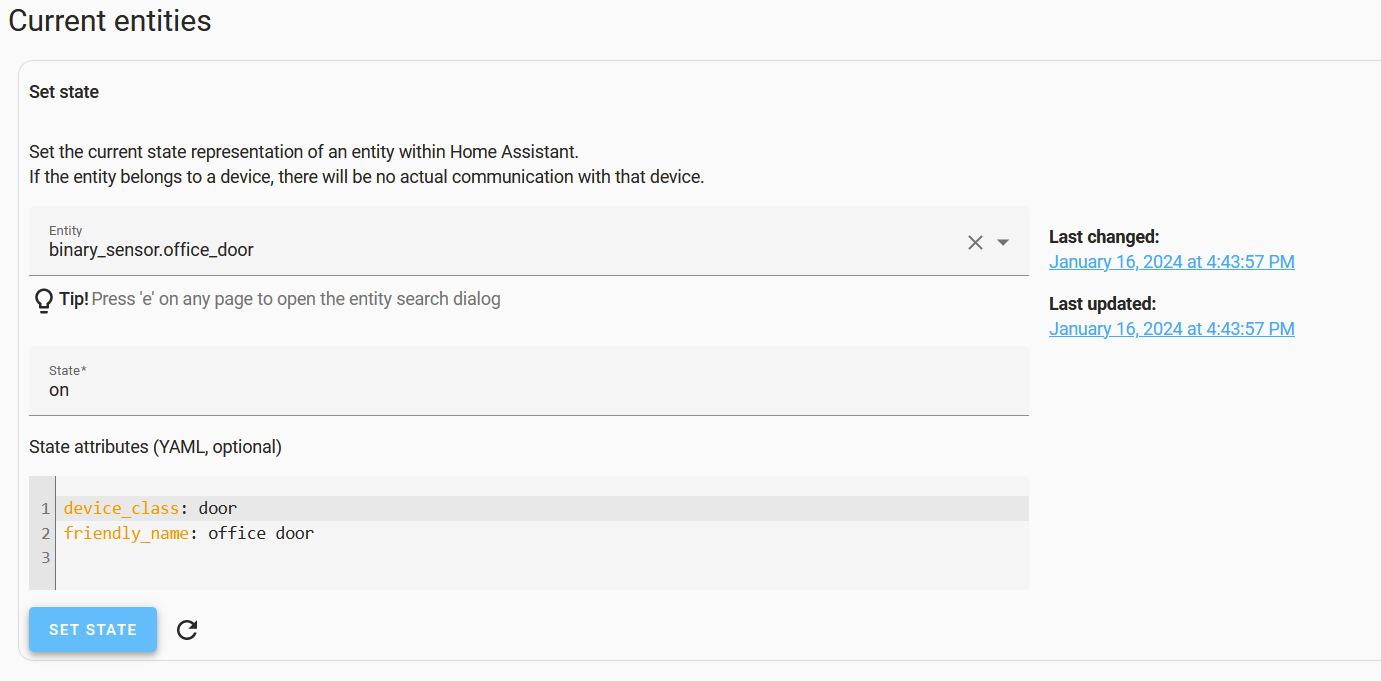
Hassio listeing to topic:

Now, how do I display the sensor status on my dashboard?

I tried some attempts on modifying the configurations.yaml file, but no luck till now.

Screensnap of configurations.yaml file for hassio:

image

Any suggestions to achieve the same?

For reference, here is my esp32c3 firmware:

#include <PubSubClient.h>
#include <WiFi.h>

#define DOOR_SENSOR_PIN  D1  // ESP32 pin GPIO19 connected to door sensor's pin

#define MQTT_SERVER "192.168.29.159"  // Enter your MQTT broker address
#define MQTT_PORT 1883                      // Enter your MQTT broker port
#define MQTT_USER "mqtt-user"           // Enter your MQTT username
#define MQTT_PASSWORD "mqtt-passkey"       // Enter your MQTT password
#define MQTT_CLIENT_ID "door_sensor"        // Unique client ID for the door sensor

WiFiClient espClient;
PubSubClient client(espClient);

int currentDoorState; // current state of door sensor
int lastDoorState;    // previous state of door sensor

void setup() {
  Serial.begin(115200);                     // initialize serial
  pinMode(DOOR_SENSOR_PIN, INPUT_PULLUP); // set ESP32 pin to input pull-up mode

  currentDoorState = digitalRead(DOOR_SENSOR_PIN); // read state

  setup_wifi();
  client.setServer(MQTT_SERVER, MQTT_PORT);
}

void setup_wifi() {
  delay(10);
  Serial.println("Connecting to WiFi");
  WiFi.begin("Potato", "passkey");

  while (WiFi.status() != WL_CONNECTED) {
    delay(500);
    Serial.print(".");
  }

  Serial.println("");
  Serial.println("WiFi connected");
  Serial.println("IP address: ");
  Serial.println(WiFi.localIP());
}

void reconnect() {
  while (!client.connected()) {
    Serial.print("Attempting MQTT connection...");
    if (client.connect(MQTT_CLIENT_ID, MQTT_USER, MQTT_PASSWORD)) {
      Serial.println("connected");
    } else {
      Serial.print("failed, rc=");
      Serial.print(client.state());
      Serial.println(" try again in 5 seconds");
      delay(5000);
    }
  }
}

void loop() {
  if (!client.connected()) {
    reconnect();
  }
  client.loop();

  lastDoorState = currentDoorState;
  currentDoorState = digitalRead(DOOR_SENSOR_PIN);

  if (lastDoorState == LOW && currentDoorState == HIGH) {
    Serial.println("The door-opening event is detected");
    client.publish("office/balcony/door", "OPEN");  // Publish MQTT message for door open
    // TODO: turn on alarm, light or send notification ...
  } else if (lastDoorState == HIGH && currentDoorState == LOW) {
    Serial.println("The door-closing event is detected");
    client.publish("office/balcony/door", "CLOSED");  // Publish MQTT message for door closed
    // TODO: turn off alarm, light or send notification ...
  }
}

FYI: I am already trying in parallel to integrate it with esphome, but no luck in waking up from deepsleep, so thought will give a try where I have more control to my firmware, and I can decide what I wanna do.

Thanks and regards,
Martian

Please post your yaml correctly - i.e. post the text rather than an image using preformatted text tags.

Based on your image it looks like your indentation is incorrect. This is an example of a working sensor:

mqtt:
  binary_sensor:
    - name: "Lounge Door"
      state_topic: "433mhz/sensor_lounge_door"
      payload_on: "ON"
      payload_off: "OFF"
      device_class: door

Also - you will need to restart core (or a least reload config) after adding these. If your indentation is as per the image you can’t have done that as it would have failed to restart because of config errors.

You’re missing a colon after “binary_sensor”, aren’t you?

Well spotted - and fixed. Copy paste error :slight_smile:

1 Like

Here is my sensor part from yaml:

mqtt:

binary_sensor:
  - platform: mqtt
    name: "Office Door"
    state_topic: "office/balcony/door"
    payload_on: "OPEN"
    payload_off: "CLOSED"
    device_class: door

What am I missing here?

binary_sensor: needs to be indented…

And of course then indent the next lines by the same additional amount.

Trying now…

Also just FYI “hassio” has not existed for three years.

1 Like

I should have said - thinking maybe this is your first delve into yaml:

In yaml, indentation is of the same level of importance as syntax. Not only do you need to have the words right, but they must also be indented correctly and consistently.

People coming from more freeform languages sometimes have trouble coming to grips with that… :smiley:

Hi,

Thanks, tried what you suggested:

Currently my yaml looks like this:

mqtt:
  binary_sensor:
    - name: "Office Door"
      state_topic: "office/balcony/door"
      payload_on: "OPEN"
      payload_off: "CLOSED"
      device_class: door

Still able to listen to the topic in homeassistant.

But, I can not find, where to add the device to the dashboard? No discoveries found either.

And you restarted HA?

Yes, I did.

If it’s worked, you should have binary_sensor.office_door available under Developer Tools / States.

If it hasn’t, there should be an error message in the logs.

2 Likes

So you can go into UI editor, add a card - say an entity card, then you should be able to search for your sensor there.

You should also be able to see it on the States page of the Developer tab.

1 Like

Let me try and get back.

Ok, so I do not know where it is going wrong.

Here is my entire configuration.yaml file:

# Loads default set of integrations. Do not remove.
default_config:

# Load frontend themes from the themes folder
frontend:
  themes: !include_dir_merge_named themes

automation: !include automations.yaml
script: !include scripts.yaml
scene: !include scenes.yaml

input_number:
  tank_water_percentage:
    name: "Tank Water Percentage"
    initial: 0
    min: 0
    max: 100
    step: 1

mqtt:
  binary_sensor:
    - name: "office door"
      state_topic: "office/balcony/door"
      payload_on: "OPEN"
      payload_off: "CLOSED"
      device_class: door

And my esp32c3 code is same:

#define MQTT_SERVER "192.168.29.159"  // Enter your MQTT broker address
#define MQTT_PORT 1883                      // Enter your MQTT broker port
#define MQTT_USER "mqtt-user"           // Enter your MQTT username
#define MQTT_PASSWORD "o$Lmqtt!@1729"       // Enter your MQTT password
#define MQTT_CLIENT_ID "office door"        // Unique client ID for the door sensor

Does client ID make any difference?

I am not able to get the entity as well.

How to debug this.

Ok, just discovered this now,

Now I am able to see Office door under states in developer tabs:

Is this correct?

Yes. The back-end state of a binary_sensor is always on or off. The front-end display will be “open” or “closed” in the dashboard because you have declared it with device_class: door (docs).

Finally, could see it in entity as well. I am so happy.

image

Thanks to you guyz, Daryl & Troon.

WORKING SOLUTION

Modifying the configuration.yaml file (Solution by Daryl):

mqtt:
  binary_sensor:
    - name: "office door"
      state_topic: "office/balcony/door"
      payload_on: "OPEN"
      payload_off: "CLOSED"
      device_class: door

And then restarted the homeassistant server and then found the instance of office door in STATEs under developer tabs.

And then could also see the entity in dashboard as well.


I am so happy!!. Now finally I can proceed with the deep sleep implementation.

I will modify the firmware on esp32c3 for implementing deep sleep now.

2 Likes