How to assign Yeelight effects to a Button

Hii,

I’m trying to assign the lighting effects to a button, so when I press the button the Yeelights effects are enabled. The effects are as follows:

Also would you know how I can toogle between the light colours. I have an ikea 5 button, and I wanted to chnage the colours of the lights with left and right.

Any help is greatly appreciated!!

If you use the light turn on service then there is an effect attribute.
Is the idea to loop through the list on each button press?

HI,
I can’t get it to work. The effect attribute does nothing when I created a simple automation of pressing a button and enabling the effect. (see the picture) Any idea what I’m doing wrong?

And yes, I want to press the right or left button, to toggle/loop through the colours. Maybe a scene or a script can achieve this, but as you can see I’m not smart enough to make it myself :smile:

To set an effect you need to write the name of the effect in the text box next to it.
There usually is a list of effects in the attributes of the light:

What I think you could do is create an input number that is the counter of what is the selected effect.
Make that number from 0-[number of effects-1].

Then in your automation you increment or decrement the number then set the effect to:

...
effect: "{{ state_attr('light.light', 'effect_list')[states('input_number.counter')|int] }}"

Hi Hellis,

Thankss I didn’t there were so many cool lighting effects. The reason the effect didn’t work before was that on dark mode, I couldn’t see the text box, so i didnt type the name of the effect.

Noww that is working, what do you mean by creating a counter? Could give me a little more detail pleasee :blush:

I mean an input_number, a helper.

Did it work?

I have never heard of helpers or inputnumbers.
Its too advanced for me. I will have to be content with turning the light on and off haha

Thanks for your help tho!!:smiling_face_with_three_hearts:

I know I don’t have the lastest version but configuration then helpers somewhere (if it has moved):

then add helper.
I think it will be easier with counter helper. You can set the min and max value of it.
So min value 0 and max value: count the number of effects and subtract 1.

And then in the automation we use this counter and either increment it or decrement it, then turn on the light.
You will need to change the entities and remote device.
Don’t forget to change the entities in the template of effect

alias: New Automation
description: ''
mode: single
trigger:
  - device_id: 9a34dc524acebdca64a4ad35af2a67c5
    domain: zha
    platform: device
    type: remote_button_short_press
    subtype: left
    id: left
  - device_id: 9a34dc524acebdca64a4ad35af2a67c5
    domain: zha
    platform: device
    type: remote_button_short_press
    subtype: right
    id: right
condition: []
action:
  - choose:
      - conditions:
          - condition: trigger
            id: left
        sequence:
          - service: counter.decrement
            data: {}
            target:
              entity_id: counter.counter
    default: []
  - choose:
      - conditions:
          - condition: trigger
            id: right
        sequence:
          - service: counter.increment
            data: {}
            target:
              entity_id: counter.counter
    default: []
  - service: light.turn_on
    data:
      effect: >-
        {{ state_attr('light.light',             
        'effect_list')[states('counter.counter')|int] }}
    target:
      entity_id: light.light

Okayy! You have motivated me to try this out.

I’ll try it out and let you know where I get stuck. I already I will get stuck somewhere haha.:hugs:

I can see you have used used the increments and decrements to toggle between effects. Can this be used to to toggle between colours too? Red green blue yellow etc etc

It’s possible.
I use a node red automation to move the hue 30 degrees on each left/right press of an IKEA remote.
If I hold the button it moves 3 degrees each 100 Ms if I recall correctly. Definitely possible but probably easier without a counter since you want it relative to what the color is now, not related to a counter.

I have the ikea 5 button remote too and node red, and I want to assign the left and right buttons to do exactly what you’re doing.
I don’t have a hue bulb but a yeelight one. Do you think the code you’re using will work for me?

I have the four button remote.
I think you could use the same node red sequences but perhaps they need some adaption.

My sequence is too many characters for the community, but it’s pasted here: [{"id":"927b9b077f357825","type":"ha-device","z":"4eb25acf17389316","name":"Up c - Pastebin.com

This gives you up for on, down for off.
Hold up or down for dimming.
Double click, and tripple click up/down.
Left and right to switch color, hold to gradually change color.

But it doesn’t do effects. I can perhaps add that to you later but I need to go now.
And the middle button wont do anything.

Regarding color shifting with left/right button…

I have no buttons, but I have Aqara Magic cubes. I’m not using below automation for Yeelight, but for some DIY by me bottles with WS2812B LED strip inside. You gave me great idea that I should deploy it for my Yeelight’s as well, cause it will work.

As said, I’m using it to shift LED colors with one of my cubes rotating left or right.

Rotate cube right:

if:
  - condition: template
    value_template: |
      {{ state_attr("light.bottle_lights", "hs_color")[0]>344.00 }}
then:
  - service: light.turn_on
    data_template:
      hs_color:
        - '1'
        - '{{ range(80,101)|random }}'
      brightness: |
        {{ state_attr('light.bottle_lights', 'brightness') }}
    entity_id: light.bottle_lights
else:
  - service: light.turn_on
    data_template:
      hs_color:
        - '{{ (state_attr("light.bottle_lights", "hs_color")[0])+15 }}'
        - '{{ range(80,101)|random }}'
      brightness: |
        {{ state_attr('light.bottle_lights', 'brightness') }}
    entity_id: light.bottle_lights

Rotate cube left:

if:
  - |
    {{ state_attr("light.bottle_lights", "hs_color")[0]<16.00 }}
then:
  - service: light.turn_on
    data_template:
      hs_color:
        - '359'
        - '{{ range(80,101)|random }}'
      brightness: |
        {{ state_attr('light.bottle_lights', 'brightness') }}
    entity_id: light.bottle_lights
else:
  - service: light.turn_on
    data_template:
      hs_color:
        - '{{ (state_attr("light.bottle_lights", "hs_color")[0])-15 }}'
        - '{{ range(80,101)|random }}'
      brightness: |
        {{ state_attr('light.bottle_lights', 'brightness') }}
    entity_id: light.bottle_lights

I am pretty sure this will work out of box for you. Just copy/paste it to your automation, replace light.bottle_lights everywhere with the name of your light entity and add appropriate trigger (idk what could be the name of trigger in automation when you are pressing these buttons).

TL;DR explanation for above process:

We are setting color here via hue and saturation. For people who don’t know, these are hue and saturation:

image

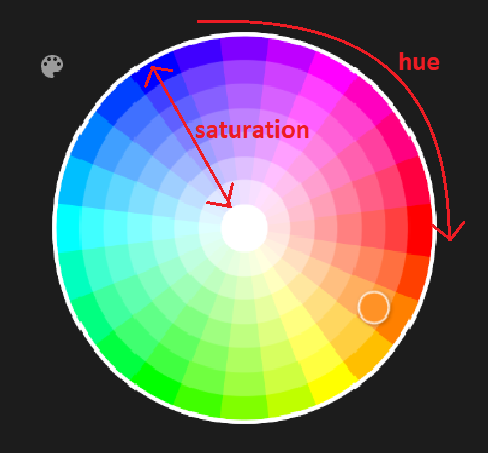
So basically, we would want saturation somewhere between 80 and 100, because everything below 80, most probably will look like “paled/washed”.
On the other hand, hue is actually the color and it could be between 1 and 360 (360 degrees of circle). I didn’t want to go deeper with color tone and I’m pretty happy with 24 tones from the picture above (if you are going around the circle), so 360 / 24 = 15 (degrees). On every cube rotate (button press in your case) I’m raising or lowering hue for 15 ( e.g. {{ (state_attr("light.bottle_lights", "hs_color")[0])-15 }} ). Of course, there is a problem if your hue is already low, below 15, and you want to lower it more and also if your hue is already high, above 345, and you want to raise it more. In these cases, you need to “re-start the circle” from beginning (or from the end) again. This is the reason for if-then-else acrobatics. Regarding saturation, You can put static value if you want, e.g. 100, but I liked to add little randomness in my case, so this is the reason for {{ range(80,101)|random }}.