How to control dumb AC (Air Conditioner) and Fans via Tuya IR / RF Remote from HA

OP contains instructions for IR devices via Google SDK.
For RF Fans/devices via Scenes (no Google SDK), check first comment!

Disclaimer: this is a multi-cloud workaround including Tuya and Google Assistant. Don’t proceed if you only want local control, unless you can share a better way!

It is frustrating that despite having 3 Tuya integrations (Official, localtuya, tuya-local), none support IR remotes and sub-devices.

Unlike Broadlink remotes, Tuya remotes don’t allow any kind of local/manual control, nor via API (that I know, happy know if possible!)

I had one Tuya IR remote, and a Broadlink RM3 Mini. I have 2 ACs, but I also have 2 ceiling fans that are RF. So, I bought a Tuya IR + RF remote to replace the Broadlink. I wanted to control the ACs from HA like a thermostat.

So… sharing what I did for IR AC:

How to control a Tuya IR AC from HA as a thermostat:
Seems like a lot, but don’t be scared :grinning_face_with_smiling_eyes:

Requisites:

  1. A Tuya IR remote with the AC already learnt
  2. Google Assistant with Tuya connected to it
  3. Official Tuya Cloud integration set up and working - sorry, no local control for this…
  4. Google Assistant SDK set up
  5. SmartIR integration - this allows to have the AC / Climate in HA with all the right modes for your AC. Generic Thermostat is not enough.
  6. Automation - covered below

Step 0: Requisites

Make sure you have the requirements 1-5 above installed and set up.
You might need some time if you didn’t already have it. In my case, I already had all from before…

Step 1: Smart IR

  1. Follow the instructions in the SmartIR Climate section to set it up
    You should end up with something like this in your condiguration.yaml:
smartir:

climate:
  - platform: smartir
    name: AC Comedor
    unique_id: ac_comedor
    device_code: 1070
    controller_data: home-assistant/ac-comedor/command
    # controller_data: remote.broadlink_rm_mini_3_remote
    temperature_sensor: sensor.home_temperature
    humidity_sensor: sensor.home_humidity
  - platform: smartir
    name: AC Habitacion
    unique_id: ac_habitacion
    device_code: 1070
    controller_data: home-assistant/ac-habitacion/command
    temperature_sensor: sensor.sensor_habitacion_temperature
    humidity_sensor: sensor.sensor_habitacion_humidity

Note: I have 2 in the example, which are actually controlled by the 2 different Tuya IR remotes. Plus, I have temp sensors in each room where the ACs are

Important: device_code depends on your AC, and it’s relevant because it defines the modes, temperatures, etc for your AC. Spend some time in the SmartIR Climate devices to find your model or the one that is similar to yours (open the files).

controller_data is just fake. Just use what I have (adapt the ac-xxx name).

  1. Restart HA so that these entities.
  2. You will now have new climate entities in HA.

Step 2: Prepare the AC in Google Home app
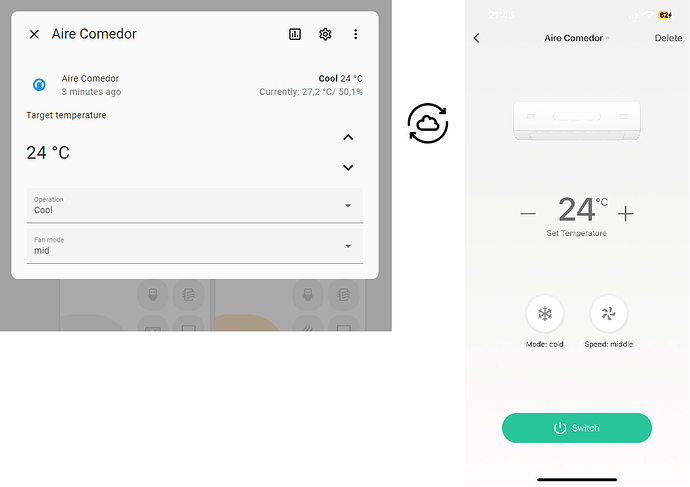
In the Google Home app, you probably see something like this for your Tuya AC device, a very limited, half-broken device that only allows On & Off, no temperature.


Good news: it’s only the UI - you can control it via voice, which is the base of this workaround, as you’ll see in Step 3.

  1. Rename that device to something “internal” and one-wordy, like ACLVR (standing for AC Living Room).

Step 3: The automation that makes
We need to make the HA climate trigger the changes to Google Assistant, so that Google Assistant makes the work with Tuya.

We will use the Google Assistant SDK to ask google to set the AC to the desired mode/temp/speed when we change it in the HA climate entity.

So, this is my automation:

alias: Aire Comedor  (Tuya Google SDK)
description: ""
trigger:
  - platform: state
    entity_id:
      - climate.ac_comedor
    id: power
    from: null
    to: null
  - platform: state
    entity_id:
      - climate.ac_comedor
    id: temperature
    attribute: temperature
    for:
      hours: 0
      minutes: 0
      seconds: 0
  - platform: state
    entity_id:
      - climate.ac_comedor
    id: fan speed
    attribute: fan_mode
condition: []
action:
  - choose:
      - conditions:
          - condition: trigger
            id:
              - power
        sequence:
          - if:
              - condition: state
                entity_id: climate.ac_comedor
                state: "off"
                alias: If Mode is Off
            then:
              - service: google_assistant_sdk.send_text_command
                data:
                  command: turn ACLVR off
                alias: Google to turn OFF
            else:
              - service: google_assistant_sdk.send_text_command
                data:
                  command: turn ACLVR on
                alias: Google to turn ON
                enabled: true
              - service: google_assistant_sdk.send_text_command
                data:
                  command: >-
                    set ACLVR to
                    {{states('climate.ac_comedor')|replace("fan_only", "fan
                    only") }}
                alias: Google to set mode
              - service: google_assistant_sdk.send_text_command
                data:
                  command: >-
                    set temperature ACLVR to
                    {{state_attr('climate.ac_comedor','temperature')|round()}}
                    degrees
                alias: Google to set temperature
              - service: google_assistant_sdk.send_text_command
                data:
                  command: >-
                    set ACLVR speed to
                    {{state_attr('climate.ac_comedor','fan_mode')}}
                alias: Google to set fan speed
            alias: On or Off
      - conditions:
          - condition: trigger
            id:
              - temperature
        sequence:
          - service: google_assistant_sdk.send_text_command
            data:
              command: >-
                set ACLVR temperature to
                {{state_attr('climate.ac_comedor','temperature')|round()}}
            alias: Google to set temperature
      - conditions:
          - condition: trigger
            id:
              - fan speed
        sequence:
          - service: google_assistant_sdk.send_text_command
            data:
              command: >-
                set ACLVR speed to
                {{state_attr('climate.ac_comedor','fan_mode')}}
            alias: Google to set fan speed
mode: single

When turning on, it sends all the commands (on, mode, temp, speed) one after the other. When changing temperature or fan mode/speed, it only sends that.

OPTIONAL - Step 4: Have the full AC control back in Google Home / Google Assistant

If you want to have the full AC control in the GA/GH app, you can expose the HA climate back to Google (which sends a command to Google, which controls Tuya IR AC), to have what we should get from Tuya directly in GA and HA… So, full circle :laughing:

If you weren’t already exposing the climate entities in your google-assistant entry in configuration.yaml, do it. Mine looks like this (you should already have most of this from requisite 4!), but read the documentation to adjust it to your needs (like expose_by_default: true instead of exposed_domains, etc.)

google_assistant:
  project_id: home-assistant
  service_account: !include SERVICE_ACCOUNT.JSON
  report_state: true
  exposed_domains:
    - light
    - input_boolean
    - climate

That should be it! Hopefully I haven’t forgotten anything, so let me know if you have issues or questions and I’ll review.

See next comment for Fans / RF devices.
3 Likes

I’ve expanded this for RF fans too:

Step 0: Requisites

  1. A Tuya RF remote with the Fan already learnt
  2. Scenes for the Fan On (if remote has it, mine don’t), Off, and Fan Speeds
  3. Official Tuya Cloud integration set up and working - sorry, no local control for this…
  4. SmartIR integration - this allows to have the AC / Climate in HA with all the right modes for your AC. Generic Thermostat is not enough.
  5. Automation - covered below

Step 0: Requisites

Make sure you have the requirements 1-3 above installed and set up.
You might need some time if you didn’t already have it. In my case, I already had all from before…

Step 1: Smart IR

  1. Follow the instructions in the SmartIR Fan section to set it up
    You should end up with something like this in your condiguration.yaml:
smartir:

fan:
  - platform: smartir
    name: Ventilador Comedor
    unique_id: ventilador_comedor
    device_code: 1081
    controller_data: home-assistant/fan-comedor/command
  - platform: smartir
    name: Ventilador Habitacion
    unique_id: ventilador_habitacion
    device_code: 1020
    controller_data: home-assistant/fan-habitacion/command

Note: I have 2 in the example

Important: device_code depends on your AC, and it’s relevant because it defines the modes, temperatures, etc for your AC. Spend some time in the SmartIR Fan devices to find your model or the one that is similar to yours (open the files, compare speeds & on/off modes, oscillation).

controller_data is just fake. Just use what I have (adapt the fan-xxx name).

  1. Restart HA so that these fan entities appear in HA.
  2. You will now have new climate entities in HA.

Step 2: The automation that translates HA Fan front-end to Tuya Scenes
We need to make the HA fan trigger the Tuya RF Scenes for the fan.

So, this is my automation:

alias: Ventilador Comedor (Tuya Scenes)
description: ""
trigger:
  - platform: state
    entity_id:
      - fan.ventilador_comedor
    id: "off"
    from: null
    to: "off"
    alias: On/Off
  - platform: state
    entity_id:
      - fan.ventilador_comedor
    id: "on"
    from: null
    to: "on"
    alias: On/Off
  - platform: state
    entity_id:
      - fan.ventilador_comedor
    id: speed
    attribute: last_on_speed
    for:
      hours: 0
      minutes: 0
      seconds: 0
    alias: When Speed changes
condition: []
action:
  - choose:
      - conditions:
          - condition: trigger
            id:
              - "off"
        sequence:
          - service: scene.turn_on
            data: {}
            target:
              entity_id: scene.ventilador_comedor_off
      - conditions:
          - condition: trigger
            id:
              - speed
              - "on"
        sequence:
          - service: scene.turn_on
            data: {}
            target:
              entity_id: >
                scene.ventilador_comedor_{{
                state_attr('fan.ventilador_comedor','last_on_speed') }}
mode: single

Please review it and adjust it to your scenes and fan, looking at its attributes. For example, the one I used has last_on_speed only so I use that to call the right scene (which are called scene.ventilador_comedor_1, scene.ventilador_comedor_2, … scene.ventilador_comedor_6 matching the 6 speeds from the SmartIF Fan files I grabbed, 1081 and 1020, for each of my fans (one 6 speeds plus winter/summer modes, one only 3 speeds).

OPTIONAL - Step 4: Have the full Fan control back in Google Home / Google Assistant

If you want to have the fan control in the GA/GH app, you can expose the HA fan to Google, to have what we should get from Tuya directly in GA and HA…

If you weren’t already exposing the fan entities in your google-assistant entry in configuration.yaml, do it. Mine looks like this (you should already have most of this from requisite 4!), but read the documentation to adjust it to your needs (like expose_by_default: true instead of exposed_domains, etc.)

google_assistant:
  project_id: home-assistant
  service_account: !include SERVICE_ACCOUNT.JSON
  report_state: true
  exposed_domains:
    - light
    - input_boolean
    - climate
    - fan

In the GH app, I only get On/Off, but I can voice control either via % or low, mid, mid high, high, etc. In a GH display I do get the speed :roll_eyes:


Don’t forget to restart HA and then ask google to “sync my devices!”

That should be it! Hopefully I haven’t forgotten anything, so let me know if you have issues or questions and I’ll review.

2 Likes

After many attempts, this was the only thing that worked for me. THANK YOU SO MUCH!!!

1 Like

Can You elaborate how You integrated Tuya via SmartIR?
Was unable to find support for Tuya or LocalTuya in SmartIR.
thank You

SmartIR does NOT support Tuya.

In this case, SmartIR is exposing an AC/Fan to HA, and when you use it it sends “fake”/empty IR codes to a non existent remote.

In parallel, an Automation is checking the changed you made in that AC/Fan and sending the desired state to Google, for Google to send it to Tuya.

All you need for it to work is explained in the post.

If you are picky, you will see SmartIR errors in the logs because the remote doesn’t exist. But it doesn’t matter.

1 Like

Hi! I’m having a problem where I can’t find the “fake” A/C on my Google Home app. On the requirements you put “Google Assistant SDK”, but the “google_assistant” part in the config.yaml is fot the “Google Assistant”, not the SDK version (or that is what I understood). I clarify this because I couldn’t sync the “Google Assistant” part for some reason. Did you manage to sync the Home Assistant devices into Google Home using the SDK? That would help me a lot.

Lovely guide, thank you so much for this! I got it to work easier than I expected!

Only thing I’m struggling with is step 4 to feed back to Google Home:

I tried simply copypasting your code, but obviously I dont have this json you include…

Can you ellaborate a bit on this last step?
Thank you so much!

IT WORKS !!!

can you upload the code so that it works with Better Thermostat. I want to use window sensors, and that one has them included in it

That is part of the Google Assistant - Home Assistant intregration configuration, which you either have already or need to set up.

I’m only highlighting that you need to include climate in the list of exposed domains to Google Assistant

Are you asking me to edit the code so that it works with Better Thermostat?

Sorry, not happening. I just shared what I did to connect a Tuya AC to HA using Google Assistant, nothing to maintain or update here :smile:. You are more than free to try yourself and share your success with the community!

1 Like

Thanks, and I understand
but spoke too soon, this works but temporary, the thing is I set to cooling, for example room temp is 26 and I set it to 22, but it sends off command in about 2 minutes temp. is still 26 (or maybe 25) and it shuts down the AC
what might be the problem for this?

Thank you so much for sharing this!
It works for me, and it’s easier than i expected :smile: