Uhhh, yes you can. There’s a template weather integration, it’s even built in.
Rest sensor to get the xml put into a template weather.
Uhhh, yes you can. There’s a template weather integration, it’s even built in.
Rest sensor to get the xml put into a template weather.
Really? Could you tell me where? I don’t find anything about it🥴
Thanks, I’ll try to use it. I’m not really good, and I don’t understand if it’s really what I want. I try to read the documentation well and understand, I would not want to use my location.I just want to use xml data, I hope it’s possible. Thanks
Yes, you have to create a rest sensor that reads the xml into a sensor’s attributes. Then use that entity and it’s attributes to create your weather entity.
This will not be easy, and you’ll need to learn a lot of advanced functionality in HA to make it happen.
Every day is a school day. Thanks — have built mine already.
@Diegocampy — have a go with this and see how you get on. The forecast_template expects a list of dictionaries with the key:value pairs as shown towards the end of this page:
I don’t know where to start, I tried, but I didn’t succeed.
I suggest you start posting what you’ve tried. No one is going to write this for you but we will be glad to help you along the way.
What I did is in the first post. Now in the Home Assistant I see a lot of sensors. I all mapped them, but I don’t understand how to use them in Weather.
I have write a file yaml with this code:
# Prima Mezza Giornata
  - platform: rest
    resource: https://www.arpa.veneto.it/previsioni/it/xml/bollettino_utenti.xml
    name: arpav_simbolo0
    value_template: "{{ value_json.previsioni.meteogrammi.meteogramma[states('sensor.arpav_zona_id')|int].scadenza[0].previsione[0]['@value'] | default('Valore non disponibile') }}"
    scan_interval: 600
  - platform: rest
    resource: https://www.arpa.veneto.it/previsioni/it/xml/bollettino_utenti.xml
    name: arpav_data0
    value_template: "{{ value_json.previsioni.meteogrammi.meteogramma[states('sensor.arpav_zona_id')|int].scadenza[0]['@data'] | default('Valore non disponibile') }}"
    scan_interval: 600
  - platform: rest
    resource: https://www.arpa.veneto.it/previsioni/it/xml/bollettino_utenti.xml
    name: arpav_cielo0
    value_template: "{{ value_json.previsioni.meteogrammi.meteogramma[states('sensor.arpav_zona_id')|int].scadenza[0].previsione[1]['@value'] | default('Valore non disponibile') }}"
    scan_interval: 600
  - platform: rest
    resource: https://www.arpa.veneto.it/previsioni/it/xml/bollettino_utenti.xml
    name: arpav_temperatura0
    value_template: "{{ value_json.previsioni.meteogrammi.meteogramma[states('sensor.arpav_zona_id')|int].scadenza[0].previsione[2]['@value'] | default('Valore non disponibile') }}"
    scan_interval: 600
  - platform: rest
    resource: https://www.arpa.veneto.it/previsioni/it/xml/bollettino_utenti.xml
    name: arpav_precipitazioni0
    value_template: "{{ value_json.previsioni.meteogrammi.meteogramma[states('sensor.arpav_zona_id')|int].scadenza[0].previsione[3]['@value'] | default('Valore non disponibile') }}"
    scan_interval: 600
  - platform: rest
    resource: https://www.arpa.veneto.it/previsioni/it/xml/bollettino_utenti.xml
    name: arpav_probabilita0
    value_template: "{{ value_json.previsioni.meteogrammi.meteogramma[states('sensor.arpav_zona_id')|int].scadenza[0].previsione[4]['@value'] | default('Valore non disponibile') }}"
    scan_interval: 600
And Now I have this element for all days:
But I don’t understand where is the right rue for me ![]() . I am really mortified, until a few months ago I didn’t even know what a yaml file was, I try to learn, but often I copy from examples, both of these procedures I don’t understand them. Or rather, I didn’t understand what I should write in which other files .
. I am really mortified, until a few months ago I didn’t even know what a yaml file was, I try to learn, but often I copy from examples, both of these procedures I don’t understand them. Or rather, I didn’t understand what I should write in which other files .
I’ve documented mine here, which might help you:
The difficult bit will be converting your XML sources into the forecast structure that the entity requires, which isn’t helped by your sources formatting data like this:
<scadenza data="dom 25 febbraio pomeriggio">
  <previsione title="Simbolo" type="image" value="https://www.arpa.veneto.it/previsioni/images/meteosymbols/a4.png"/>
  <previsione title="Cielo" type="text" value="Irregolarmente nuvoloso con schiarite"/>
  <previsione title="Temperatura 2000m" type="text" value="max -3 C"/>
  <previsione title="Temperatura 3000m" type="text" value="max -10 C"/>
My advice would be to find a different weather data provider.
I’ve been trying since last night, I managed to get something, look here:

I used this code for the Weather which draws data from the other sensors I had created (it translates the written weather from the local weather service, the other data such as temperature, humidity, pressure and wind are from my weather station). I don’t know if it’s the most correct solution, but for now it works. I was unable to do the same for the forecasts for the following days, I will continue to search and will also read your documentation hoping it can help me with the codes. Thank you
weather:
  - platform: template
    name: ARPAV Weather
    condition_template: >
      {% set condition_text = states('sensor.arpav_cielo0') %}
      {% if 'Nuvoloso' in condition_text %}
        cloudy
      {% elif 'Coperto' in condition_text %}
        cloudy
      {% elif 'Grandine' in condition_text %}
        hail
      {% elif 'Soleggiato' in condition_text %}
        sunny
      {% elif 'Sereno o poco nuvoloso' in condition_text %}
        partlycloudy
      {% elif 'Pioggia' in condition_text %}
        rainy
      {% elif 'Nebbia' in condition_text %}
        fog
      {% else %}
        unknown
      {% endif %}
    temperature_template: "{{ states('sensor.giardino_temperature') }}"
    humidity_template: "{{ states('sensor.giardino_humidity') }}"
    pressure_template: "{{ states('sensor.cucina_pressure') }}"
    wind_speed_template: "{{ states('sensor.anemometro_wind_strength') }}"
    wind_bearing_template: "{{ states('sensor.anemometro_direction') }}"
This will pull out the second number from "max 10/12 C" so you can use it as an actual number:
    temperature_template: "{{ (states('sensor.arpav_temperatura0').split('/')[1])|select('in','-0123456789.,')|join|replace(',','.') }}"
    temperature_unit: "°C"
Change the [1] for [0] if you want to use the first number instead. It should work even if the XML source includes decimal points or commas.
I had posted a wrong code, now corrected, I actually use the data from my weather station for the current temperature, and not “max 10/12 C”, but your code will certainly help me for the forecast data. Which I haven’t yet managed to integrate into the weather entity
I would like to try to do everything well as you did, starting from the recovery of the data with REST. Would you like to help me? I don’t have an API key as you wrote in your code.Is the same possible?
I calmly managed to configure the current weather situation,
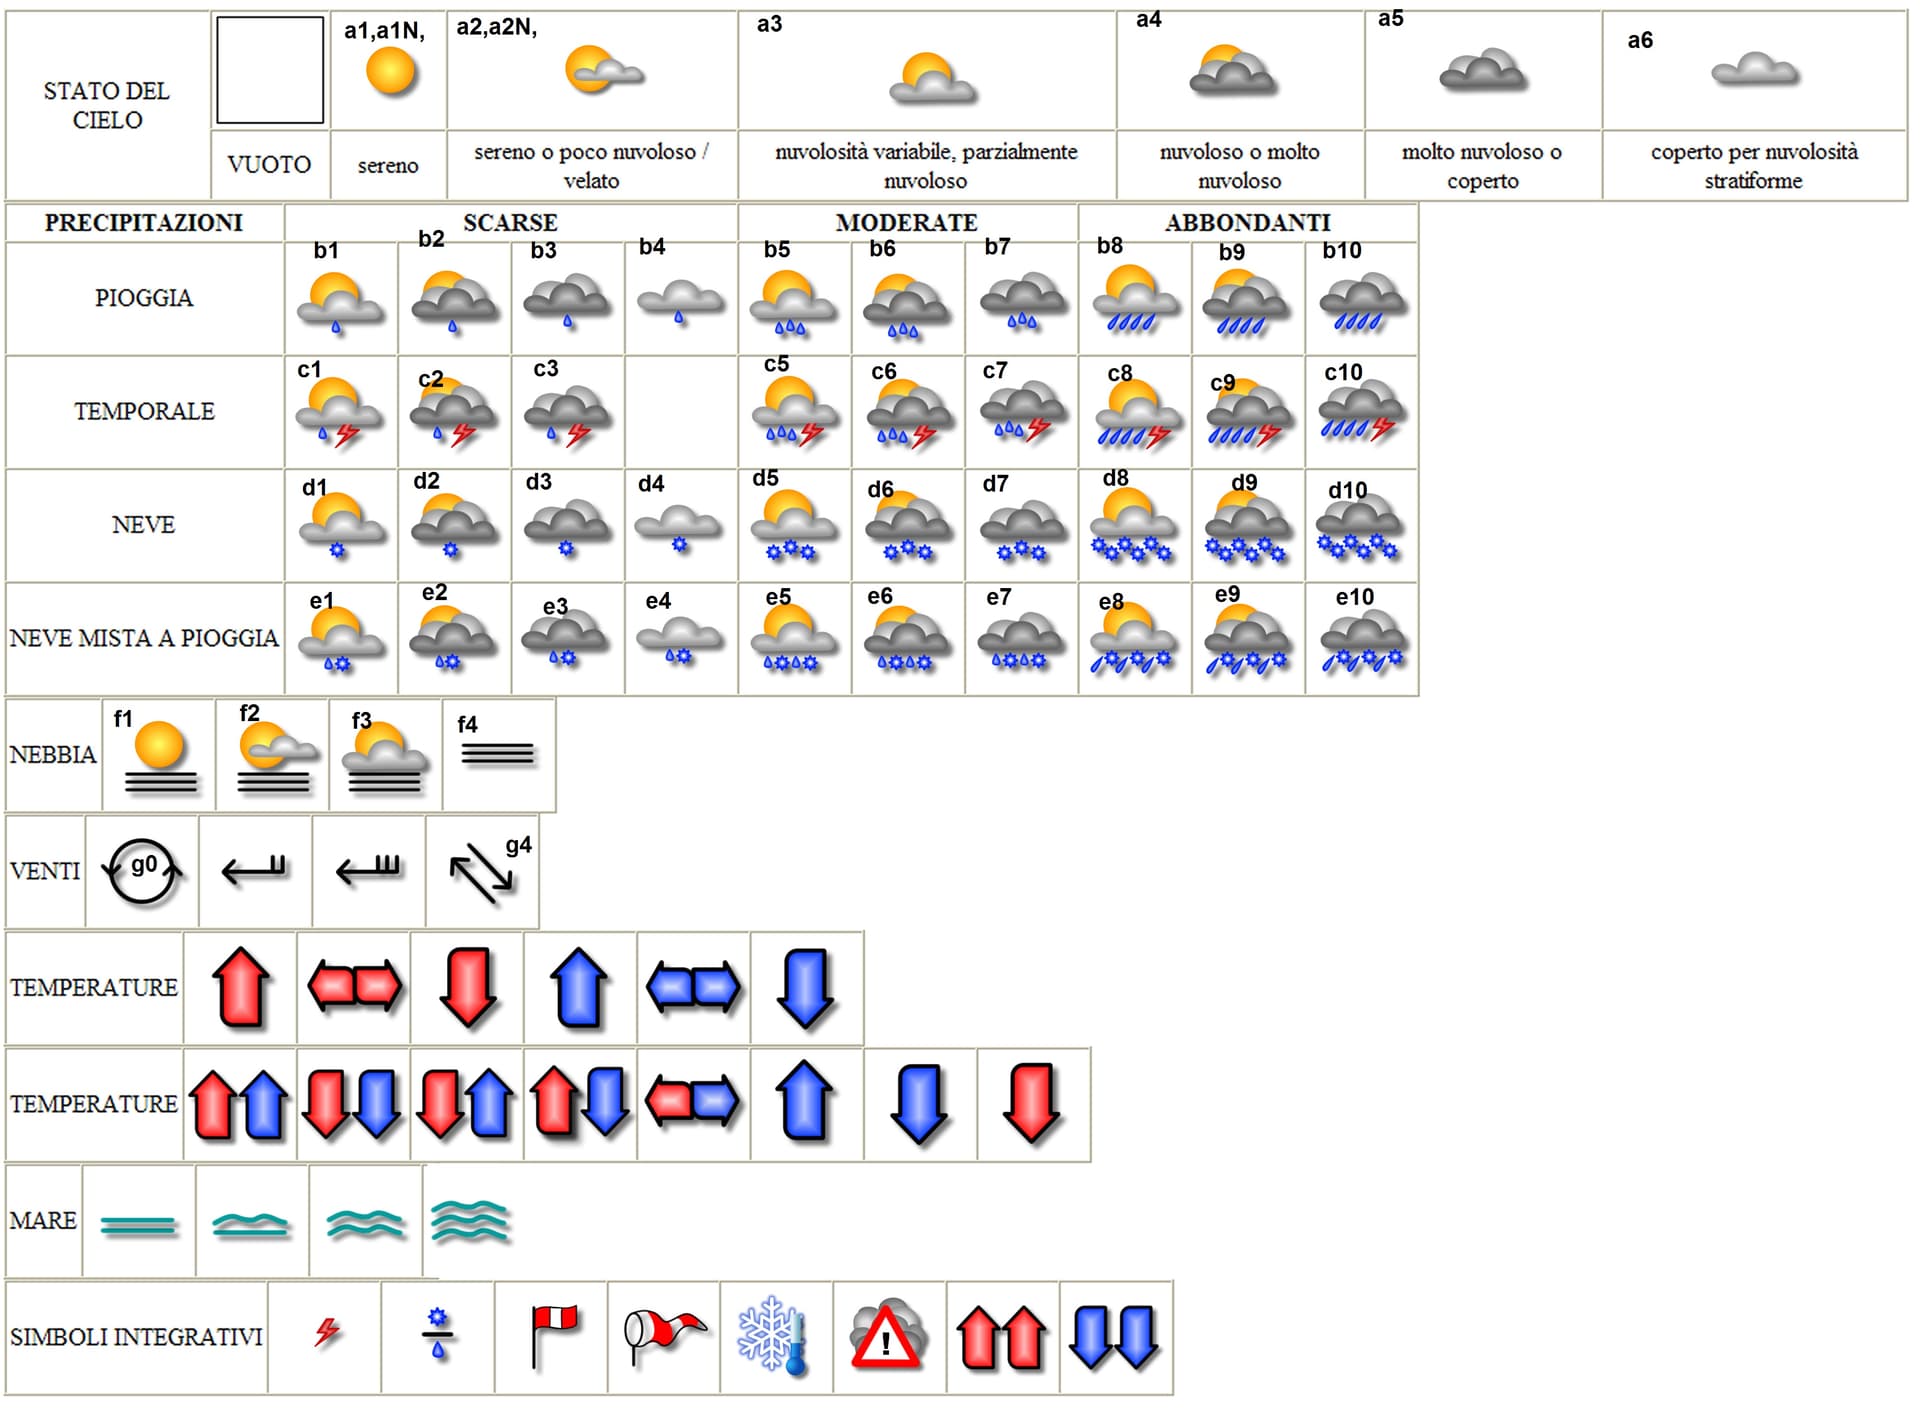
I found all the symbols and created a code that converts the text of the symbol with the weather forecast
but I didn’t understand how to insert the following days

this is my code:
weather:
  - platform: template
    name: ARPAV Weather
    condition_template: >
      {% set condition_text = states('sensor.arpav_simbolo0') %}
      {% if 'b6.png' in condition_text or
            'b7.png' in condition_text or
            'b8.png' in condition_text or
            'b9.png' in condition_text or
            'b10.png' in condition_text %}
        pouring
      {% elif 'a1N' in condition_text %}
        clear-night
      {% elif 'a4' in condition_text or
              'a5' in condition_text or
              'a6' in condition_text %}
        cloudy
      {% elif 'a3' in condition_text %}
        partlycloudy
      {% elif 'f1.png' in condition_text or
              'f2.png' in condition_text or
              'f3.png' in condition_text or
              'f4.png' in condition_text %}
        fog
      {% elif 'c1.png' in condition_text or
              'c2.png' in condition_text or
              'c3.png' in condition_text or
              'c5.png' in condition_text or
              'c6.png' in condition_text or
              'c7.png' in condition_text or
              'c8.png' in condition_text or
              'c9.png' in condition_text or
              'c10.png' in condition_text %}
        lightning-rainy
      {% elif 'b1.png' in condition_text or
              'b2.png' in condition_text or
              'b3.png' in condition_text or
              'b4.png' in condition_text or
              'b5.png' in condition_text %}
        rainy
      {% elif 'd1.png' in condition_text or
              'd2.png' in condition_text or
              'd3.png' in condition_text or
              'd4.png' in condition_text or
              'd5.png' in condition_text or
              'd6.png' in condition_text or
              'd7.png' in condition_text or
              'd8.png' in condition_text or
              'd9.png' in condition_text or
              'd10.png' in condition_text %}
        snowy
      {% elif 'e1.png' in condition_text or
              'e2.png' in condition_text or
              'e3.png' in condition_text or
              'e4.png' in condition_text or
              'e5.png' in condition_text or
              'e6.png' in condition_text or
              'e7.png' in condition_text or
              'e8.png' in condition_text or
              'e9.png' in condition_text or
              'e10.png' in condition_text %}
        snowy-rainy
      {% elif 'a1' in condition_text or
              'a2' in condition_text %}
        sunny
      {% else %}
        unknown
      {% endif %}
    temperature_template: "{{ states('sensor.giardino_temperature') }}"
    humidity_template: "{{ states('sensor.giardino_humidity') }}"
    pressure_template: "{{ states('sensor.cucina_pressure') }}"
    wind_speed_template: "{{ states('sensor.anemometro_wind_strength') }}"
    wind_bearing_template: "{{ states('sensor.anemometro_direction') }}"
I have already created all the sensors with the forecasts for the next few days, but I don’t understand how to insert them into weather. Can you help me? Thanks, and I apologize again if I’m not able
You need to build a forecast list object that matches the format shown here:
Mine looks like this (truncated to two items, not all data entries are needed):
[
  {
    "datetime": "2024-03-01T12:00:00+00:00",
    "is_daytime": true,
    "condition": "pouring",
    "humidity": 86,
    "pressure": 98675,
    "temperature": 6,
    "templow": 3,
    "precipitation_probability": 59,
    "wind_speed": 6
  },
  {
    "datetime": "2024-03-02T00:00:00+00:00",
    "is_daytime": false,
    "condition": "cloudy",
    "humidity": 92,
    "pressure": 98996,
    "temperature": 4,
    "templow": 3,
    "precipitation_probability": 28,
    "wind_speed": 3
  }
]
You need to build a forecast_twice_daily_template that creates that structure from your sensors in the same sort of way I did in mine.
You’ll need to work out how to get a nice ISO-formatted timestamp and is_daytime boolean from your date field. Here’s an attempt, mapping is_daytime to the afternoon:
{% set input = "sab 2 marzo pomeriggio" %}
{% set w, d, m, t = input.split() %}
{% set mn = ['gennaio','febbraio','marzo','aprile','maggio','giugno','luglio',
             'agosto','settembre','ottobre','novembre','dicembre'].index(m)+1 %}
{% set ts = "%d-%02d-%02dT%02d" % (now().year + (1 if mn < now().month else 0), mn, d|int, 12 if t == "pomeriggio" else 0) %}
{{ { "time": (ts|as_datetime).isoformat(),
     "is_daytime": t == "pomeriggio" } }}
but the later forecasts in that XML are full-day only so you’ll need to treat those separately.
For each of the data items, you’ll need to transform the XML output into the correct format, so dropping units to leave just a number etc.
Lots of work, I’m afraid.
thank you so much for your patience in trying to help me, but I’m so unprepared that I can’t make a mistake, I stop even before. ![]() maybe it’s time to abandon and use an already existing weather. Maybe too complex for me. I’m only sorry for having created a thousand sensors, but not being able to use them in some way
maybe it’s time to abandon and use an already existing weather. Maybe too complex for me. I’m only sorry for having created a thousand sensors, but not being able to use them in some way ![]()
Ciao Diego,
I would like to have the same sensors from ARPAV…
Can you help me?
Maybe in private session and in italian.
Grazie
C’ho rinunciato… Non sono arrivato a concludere la cosa. Non sono riuscito a creare una entità meteo come volevo
Cosa ti mancava?
Ho visto che eri riuscito ad estrarre tutto; i dati li avevi tutti, giusto?