If you can see the state of a device from Home Assistant, in most cases you can create a virtual energy sensor for it.
In this example, I will create a template power meter sensor and use it with a Home Assistant integration called Riemann sum integral to create an energy sensor for a ceiling fan, so it can be tracked in the energy dashboard.
Electrical power is measured in units of power called Watts. It shows how much power a device is using at an instant. (Power or Watts is Joules of energy over time but let’s keep things simple.) Energy is how much power is used over a time and it is measured as W/time and commonly used as kWh (kilo Watts per hour). Energy is always calculated by power over a certain time, that’s why an integral operation is required for the measured time. In reality even AC voltage is calculated over time using integration with proper meters. (RMS Voltage)
My fan entity fan.livingroom_ceiling_fan has 6 speed settings (16%, 33%, 50%, 66%, 83% and 100%) and an on/off state. It also has a reverse/forward direction setting but since the difference in power consumption was so small I decided to disregard it and instead calculated an average consumption over time including over both directions. I used a real power meter to measure its consumption and here is a list showing its average consumption.
fan off = 0 W
fan speed at 16% = 5.94 W
fan speed at 33% = 7.98 W
fan speed at 50% = 12.99 W
fan speed at 66% = 17.93 W
fan speed at 83% = 23.07 W
fan speed at 100% = 37.14 W
To do this correctly we have to add a small amount of fluctuation to our virtual power meter, just like how a real one works. In average this will not have any affect on our data. If we won’t do this, integration will not work because for the sake of efficiency, Home Assistant does not create periodic data points if the value has not changed. Since integration works over time, it will not be able to integrate over a time where no data points are present. So we will add a small random fluctuation to our template power sensor from a range of -0.05 W to 0.05 W.
The template {{ (range(-5, 5)|random/100)|round(2) }} will give us this fluctuation and we will add this to our power value.
Also we want our virtual power meter to make a measurement every 2 seconds, so we need fluctuating data points every 2 seconds. To do this we will use a Trigger-based Template sensor.
Here is how I made mine:
template:
  - trigger:
      - platform: time_pattern
        seconds: '/2'
    sensor:
      - name: Template PM Living Room Fan Power
        icon: 'mdi:flash'
        device_class: power
        unit_of_measurement: "W"
        state_class: measurement
        state: >
          {%- if is_state("fan.livingroom_ceiling_fan", "on") -%}
            {%- if is_state_attr("fan.livingroom_ceiling_fan",'percentage', 16) -%}{%- set pwr = 5.94 -%}
            {%- elif is_state_attr("fan.livingroom_ceiling_fan",'percentage', 33) -%}{%- set pwr = 7.98 -%}
            {%- elif is_state_attr("fan.livingroom_ceiling_fan",'percentage', 50) -%}{%- set pwr = 12.99 -%}
            {%- elif is_state_attr("fan.livingroom_ceiling_fan",'percentage', 66) -%}{%- set pwr = 17.93 -%}
            {%- elif is_state_attr("fan.livingroom_ceiling_fan",'percentage', 83) -%}{%- set pwr = 23.0 -%}
            {%- elif is_state_attr("fan.livingroom_ceiling_fan",'percentage', 100) -%}{%- set pwr = 37.14 -%}
            {%- endif -%}
            {{ (pwr + range(-5, 5) | random/100)|round(2) }}
          {%- else -%}
            0.00
          {%- endif %}
Now we can use this power sensor data to create our energy meter:
sensor:
  - platform: integration
    source: sensor.template_pm_living_room_fan_power
    name: "Template PM Living Room Fan Integral"
    unique_id: template_pm_living_room_fan_integral
    round: 0
It is important to include round: 0 because it will give us an energy reading resolution of 1W/h and that will create more than enough data points. If we don’t include it, there will be too many data points since the default rounding is 3. You should also be able to do this integration using the GUI with helpers as well.
Below is how to create the same energy sensor from the helper GUI if you don’t want to create it using YAML.
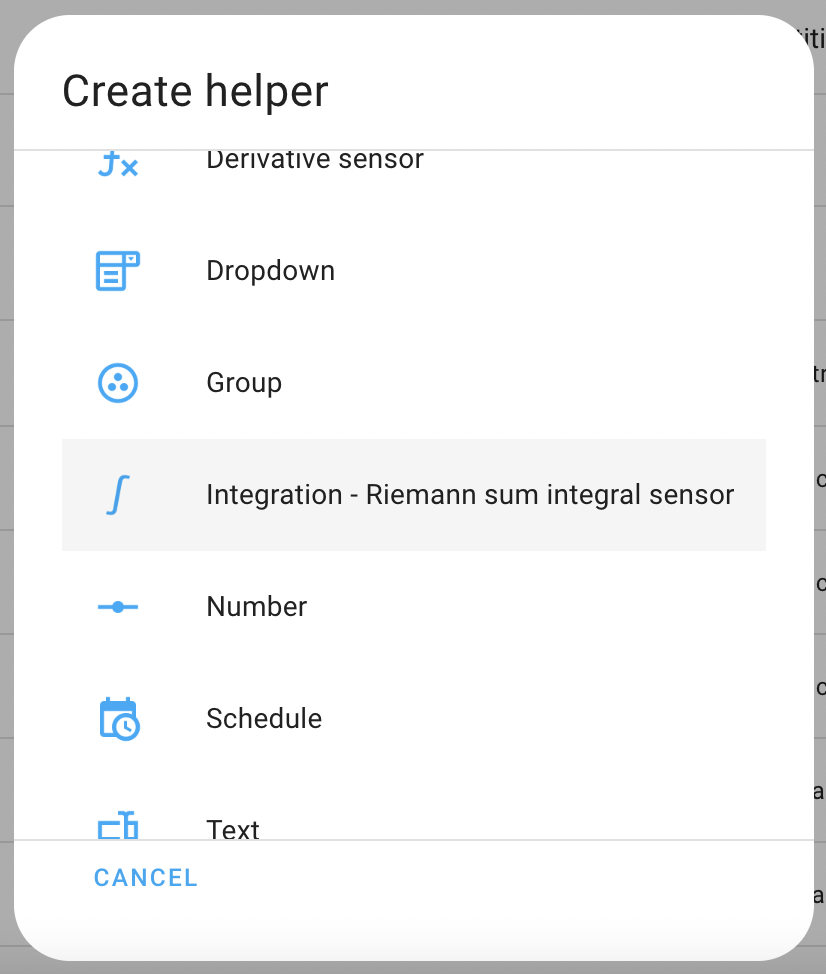

Add integral helper, enter input sensor, give it a name, set precision to 0, keep prefix at none and leave time unit in hours. That’s it!
Wait a couple of hours for the energy sensor to become available in the energy dashboard.
Now you can create energy sensors for all your smart devices.
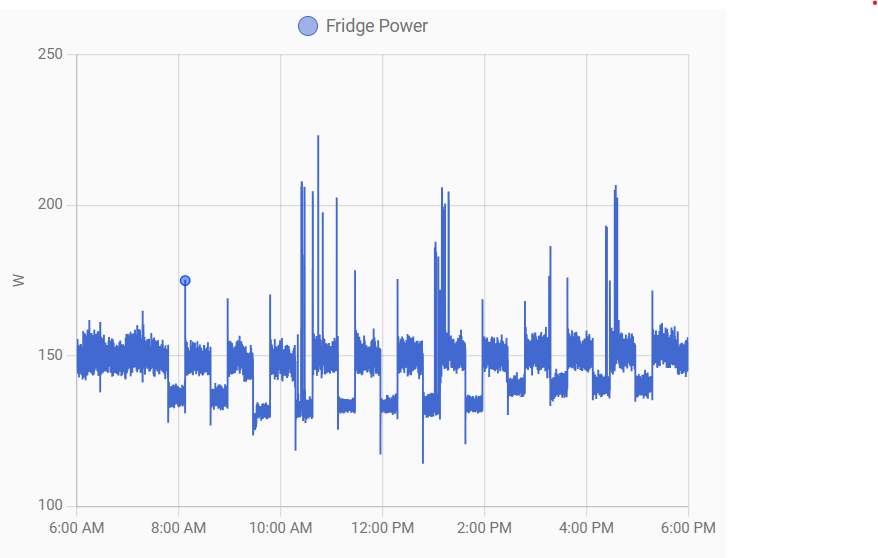
I would also like to mention a bit about how electrical consumption works because even though this virtual power meter sensor approach is great for so many devices, it will not work properly on some devices, such as TVs or amplifiers which have an unpredictable range of consumption depending on volume or image.
Additionally, you might also think that this approach should work perfectly with simple devices such as heaters which are nothing more than a resistor. However the reality is that the resistance of the heating element changes with temperature which will cause the drawn current to change which will result in change in utilized power. The same also applies to electronics as well, as their efficiency changes with temperature.
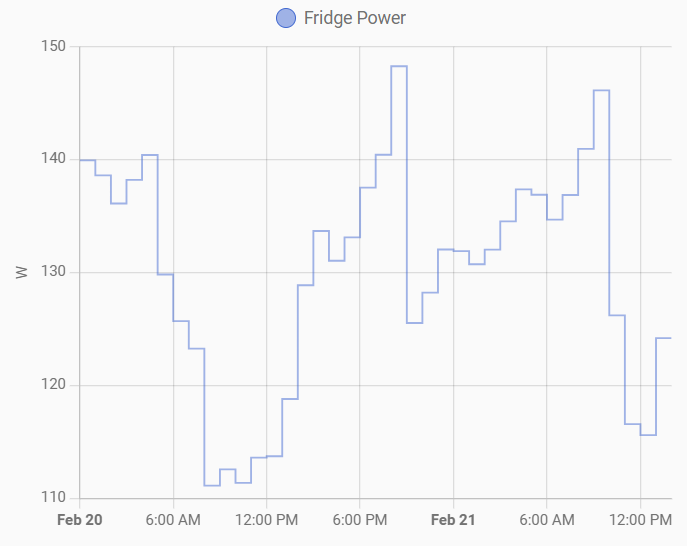
On top of all this, your mains voltage will fluctuate over time as well. Here is how my 3 phase mains voltage looks over 24 hours. As you can see there is a fluctuation of about 10Volts in 24 hours in my case. However in a 24 hour average it is always very close to 230V.

Everything that has an effect on calculated power interacts with one another so power usage of even a simplest device is thus never very stable. Considering this, always use devices’ power consumption averaged over some time for this virtual power and energy meter method.
I would really appreciate it if you would share your experience and configuration if you decide to use this method.
Good luck.