I didn’t need to do anything special.
If you look at the documentation, the last paragraph describes this behavior. FTD devices will act as router and node, MTD only as node. FTD is the default.
The part of my config that you quoted might not even be needed for you, you can try without it first. See the second more basic config in my earlier post.
Cool, that sounds much easier than what I came up with ![]()
Hi,
i have only a homepod as thread border router. Is it possible that an H2 as end device would work via thread?
Yes I think it should work. The only tricky part will be how to get the network data from the Homepod. I am not very familiar with Thread/Matter and Homepod, I think if you have the Homepod setup in Home Assistant as your TBR, you can get the network data the same way I described above. Otherwise, it might be more tricky. I think you might have to follow these steps to make the Homepod device’s network your preferred network in Home Assistant first, at least to get the network credentials.
Yes, i can confirm that now. Made my first thread sensor. ![]()
1 Like
I’m just starting on my thread journey and this thread was super helpful.
It would be nice to know the strength of the devices connection in the network, similar to LQI or RSSI for Zigbee / Wifi, but I guess you can’t have everything, unless someone knows a way ?
I also found this article that now makes the process of creating cheap thread routers even easier:-
I ended up buying these:-
They are esp32-h2 based devices with on board usb c so you can flash them directly via USB initially. One thing to note, these are 2MB flash only, so I had to do a little fiddling to get them to work and thought I’d share it here.
Out of the box, a basic esp home config as described here and else where will work, but you’ll run out of available memory if you include the ota, logger and api components. You can happily comment these out and they’ll still work just fine as thread routers, but if you want to get these component back, and maybe add some more head room then you will need a custom partition.
I’ve never done this before, so a bit of fiddling and chatgpt later and I have a working device.
Firsly this is the ephome yaml code:-
esphome:
  name: your_name_here
  friendly_name: Your Name

esp32:
  variant: ESP32H2
  flash_size: "2MB"
  framework:
    type: esp-idf
    sdkconfig_options:
      CONFIG_ESPTOOLPY_FLASHFREQ_40M: "y"
  partitions: "files/esp32h2mini_partition.csv"


logger:

api:

ota:
- platform: esphome

network:
  enable_ipv6: true

openthread:
  device_type: FTD
  tlv: PUT YOURS IN HERE.
Note the reference to the partitions file. I made a sub folder under my esphome folder called ‘files’ and put it in there, you can put it in your esphome folder directly if you prefer.
This is a simple CSV file with the following contents, name it whatever you like, just make sure the file name and path matches in your yaml:-
# Name,   Type, SubType, Offset,  Size,
nvs,      data, nvs,     0x9000,  0x3000,
otadata,  data, ota,     0xC000,  0x2000,
app0,     app,  ota_0,   0x10000, 0x100000,
app1,     app,  ota_1,   0x110000, 0xF0000
I believe the header row isn’t required.
Now the esphome code will compile fine and give you some more headroom to add other sensors etc if you want to.
I’ve fully tested it, works great, ota works fine, sensors that I’ve added, all work fine.
I’ve got a Thread network visible in HA, made of a HomePod, AppleTV and IKEA Dirigera. One side of my house has poor Thread reception so I was thinking it should be straightforward to spin up an ESP32 as a cheap Thread Router - so I have a couple of ESP32-C6’s on the way to play with.
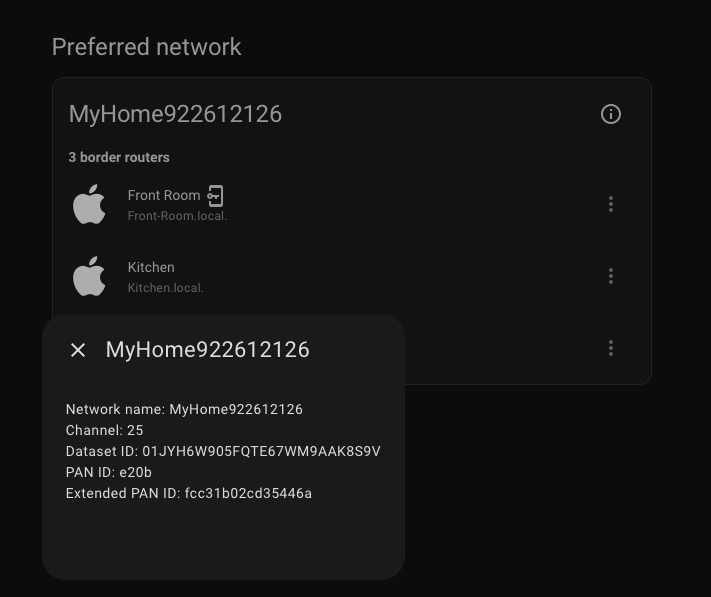
I’ve done a bunch of reading, but where I am stuck is on the Dataset TLV’s. My HA Thread panel shows my three TBR’s, they are configured as the preferred network, but the info panel stops at Extended PAN ID.
So, I assume this means when I go to configure the ESP32, I won’t have the data/keys I need to actually make it join the network. Am I missing something? Is there another way to get this info - or am I overthinking it and I should be looking for a way to build and add this as a Matter over Thread device?
So in your case, the network is managed by the Apple devices, not HA. I don’t know enough about this, but I would look into migrating everything to a network managed by HA. I think that’s what this thread explains.
Alternatively, there may be a way outside of HA to extract the TLV data for the Apple network. Looks like it’s maybe not 100% straight-forward, but there do seem to be some solutions.
Also, I’ve seen mentions that the credentials for the Thread network from Apple devices are synced to the keychain on MacOS devices. So if you have one of those, you might find it in your keychain as com.apple.thread.network.credentials.
The MyHomeXxxx TLV should be visible in the HA companion app for iPhone, under Settings → Companion App → Debugging → Thread as the “Active Operational Dataset”
I’m not sure why the Thread integration hides this information for Apple networks. For users that add an OTBR to their Apple mesh, HA suddenly decides it’s ok to display the TLV, but for Apple-only, it is hidden from you even though it is known.
1 Like
Thanks. I saw those although they seem to be reliant on the Nanoleaf app. But a good option for some I think.
I had a look in my keychain - no thread network credential there.
This is it! I followed those steps and now have my network’s TLV. Not sure why I wasn’t able to find this documented anywhere (or just available in the Thread integration!) but at least I’ve got it.
There are two credentials shown (which says “Apple Keychain” @najal!) which have a “Transfer to Home Assistant” button that I’m not brave enough to press. Can I figure out which devices they relate to with the Border Agent ID? I’m guessing they map to my Homepod mini and AppleTV. If I hit transfer I assume that puts HA in control… but I also would guess my HomeKit side would get upset ![]()