Alright, so after many hours finding different tidbits of how to do this in different threads (none of which fully explained what to do) I figured it would be nice if there was a full process on how to give us the option of making the Apple Thread Network our preferred thread network. So without further ado, below are full requirements/steps to make the Apple Thread network your preferred network in Home Assistant. I'm reading the new release of the HA Companion App will allow us to combine the HA Thread with Apple Thread but I can't confirm that as I'm not part of beta testing.
Pre-requisites
-
Home Assistant Thread Capable Device configured per documentation for that device.
Home Assistant Yellow
Home Assistant SkyConnect -
Home Assistant Integrations below. These will be configured when you configure your thread capable device.
Matter
Open Thread Border Router
Thread -
Home Assistant Addons below.
Advanced SSH & Web Terminal
Matter Server
Samba Share (configure as outlined in the Documentation) -
Apple Thread Border Router. Options for this are outlined here.
-
Nanoleaf Thread Device. The most inexpensive option is the Matter A19 bulb but any Nanoleaf thread device will work.
Steps to Integrate
- Take a backup of your Home Assistant instance so that if anything goes wrong you can easily revert to the backup as we will be making a lot of configuration changes as part of this setup. Backup can be created from “Settings”, “System”, “Backups”, “Create Backup” inside Home Assistant.
- Configure your Home Assistant Thread capable device and Apple Thread Border Router per documentation.
- Add your Nanoleaf thread device via the Apple Home App (do NOT use the Nanoleaf App to deploy).
- This will add the device to your Apple Thread Network.
- Perform all the steps below in the Nanoleaf app.
- Open the Nanoleaf app and it should automatically see the device you added in Apple Home.
- Click the 3 dots on the bottom right and select “Thread Network”.
- You’ll see the device you added in an “Unknown Network” stating “Complete Setup” under it. Click the device and continue to complete setup (you’ll need to scan the QR code again). This fully integrates the device into the Nanoleaf app.
- Update firmware of device if prompted. This isn’t required but I would always recommend doing this for any new device.
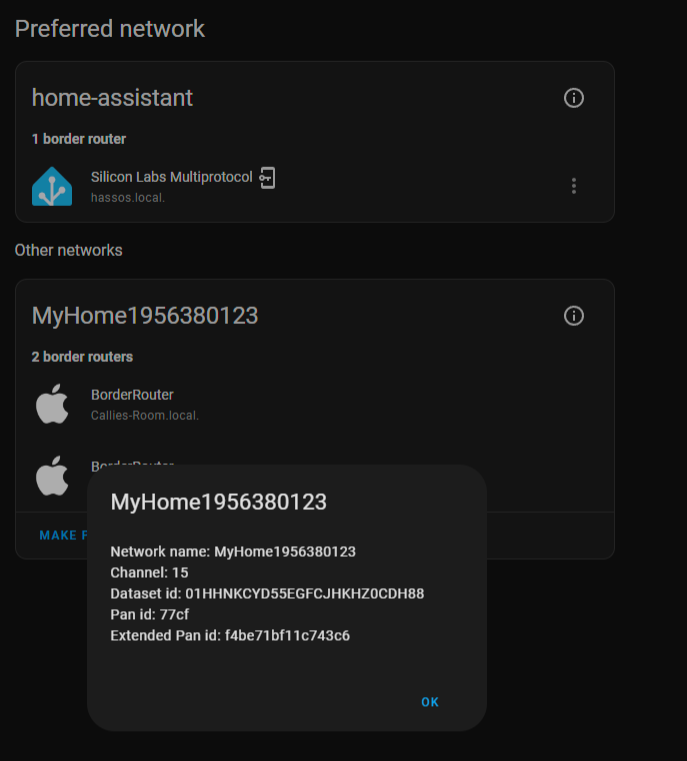
- Go back into the Thread Network menu and you’ll now see the device you added and the Apple Border Router in a Thread Network named something like “MyHome…..”. Click the name of the network and copy all of the following details. I emailed them to myself from my phone so I could copy/paste from my PC where I was setting everything up. It may not be obvious, but you CAN copy directly from this screen - long press the item you want to copy, and the copy option will pop up.
- Name
- Channel
- PAN ID
- Extended PAN ID
- Network Key
- PSKc
- Configure your Home Assistant Thread network to use the same Channel as the Apple Thread Network. I use Home Assistant Yellow so these steps will outline that. I do not know if the steps are the same for other devices, but you should be able to google how to verify/change the channel the thread network uses for other devices.
- Click “Settings”, “System”, “Hardware”, “Configure”, “Configure IEEE 802.15.4 radio multiprotocol support”, “Reconfigure IEEE 802.15.4 radio multiprotocol support”. If the Channel doesn’t match what your Apple Thread network is using, then update the Channel to match that. If it already does (Channel 25 is common default for thread) you don’t need to make a change and can cancel out.
- As Home Assistant Yellow allows you to have your Zigbee network share the same channel as thread be sure to update the Zigbee channel if needed. Go to “Settings”, “Devices & Services”, “Zigbee Home Automation”, “Configure”, and click the edit icon (pencil) next to the channel and update it to mirror the channel used above.
- If you had to change the channel restart your Home Assistant device by clicking “Developer Tools”, “Restart”.
- After restarting you may get 2 errors stating Zigbee is no longer using the correct channel, click on the first one and say to accept the new configuration. Wait 5-10 minutes before proceeding to be sure the channel changes are fully complete. Verify they are complete by going into Zigbee and confirming it shows the correct channel. You may need to restart one more time to get rid of the other error so do that now, confirm no errors after restart, and proceed.
- Configure the script needed to get the TLV you need for Home Assistant to allow you to make the Apple Thread Network your primary. Huge thanks to Veldkornet in the Home Assistant community for creating and providing this script in various threads. I had nothing to do with the creation of this script.
- Copy the script below into a notepad file and replace the Channel, PAN ID, Extended PAN ID, Network Key, Network Name, and PSKc with information you copied out of the Nanoleaf app. Do not remove the quotations around the data you’re copying into the script or it will fail to run.
import python_otbr_api
from python_otbr_api import PENDING_DATASET_DELAY_TIMER, tlv_parser
from python_otbr_api.pskc import compute_pskc
from python_otbr_api.tlv_parser import MeshcopTLVType, MeshcopTLVItem

# Apple Thread Network Info
CHANNEL = <Channel>
PANID = “<PAN ID>“
EXTPANID = “<Extended PAN ID>“
NETWORK_KEY = “<Network Key>“
NETWORK_NAME = “<Network Name>“
PSKC = “<PSKc>“
TIMESTAMP = b'\x00\x00\x00\x00\x00\x03\x00\x00'

channel = MeshcopTLVItem(tag=0, data=CHANNEL.to_bytes(length=3, byteorder='big'))
pan_id= MeshcopTLVItem(tag=1, data=bytes.fromhex(PANID))
ext_pan_id = MeshcopTLVItem(tag=2, data=bytes.fromhex(EXTPANID))
network_name = MeshcopTLVItem(tag=3, data=str.encode(NETWORK_NAME))
pre_shared_key = MeshcopTLVItem(tag=4, data=bytes.fromhex(PSKC))
network_key = MeshcopTLVItem(tag=5, data=bytes.fromhex(NETWORK_KEY))
timestamp = MeshcopTLVItem(tag=14, data=TIMESTAMP)
tlv_new = {0: channel, 1: pan_id, 2: ext_pan_id, 3: network_name, 4: pre_shared_key, 5: network_key, 14: timestamp}
tlv = tlv_parser.encode_tlv(tlv_new)
print(tlv)
- Save the script and rename it to change the extension from .txt to .py. If you can’t see the extension to change it just google how to show file extensions for whatever OS you’re using and then rename it.
- I named it “apple-ha-thread.py” so will refer to it this way going forward.
- Copy the apple-ha-thread.py script to your Home Assistant instance. I put it in config/custom_components location.
- This can be done using the Samba share add-on listed as a pre-requisite so if you’re unsure how to do this please complete the setup of that add-on and read the documentation.
- Configure Advanced SSH & Web Terminal.
- On the “Info” tab of the add-on enable “Show in sidebar” and disable Protection Mode.
Important: This allows you to run commands in a virtualbox when using the add-on to connect to the cli which is required to install the requirements for running the script in the next step. If you skip this step the commands won’t work.
- Run the script.
- Within Home Assistant click the “Terminal” link on the sidebar.
- Run the command “pip install python-otbr-api”.
- This will fail if you did not disable Protection Mode in the previous step.
- Change directory into the location you saved the script. For me I run the command “cd config/custom_components”.
- Type “ls” (lowercase L) to verify the script is in this location.
- Run “python apple-ha-thread.py”.
- Copy the result which is the TLV of the Thread Network.
- To copy hold SHIFT, highlight what you need to copy, right click and click copy (holding shift the whole time). Note: I had issues getting copy to work in Edge but was able to with Firefox.
- Go to the Thread integration, click Configure, in the top right click the 3 dots, and select “Add dataset from TLV”. Paste the TLV obtained in the previous step here and click “Add Dataset”.
- You will now have the option to make the Apple Thread network your preferred Thread network by clicking “MAKE PREFERRED NETWORK”.