How to use PZEM004T Energy Monitor with esphome

No, nothing to with calibration, I tested actual current transformer produces, and it’s badly nonlinear with low currents.

Also, resolution and accuracy do increase if more turns in the transformer, for example see this, It’s 10 times here, but the principle is would be the here using two transformers for 2 time increase.

Your solar inverter actually produces very high frequency pulses into the mains, the average of which is a reasonable approximation to the mains waveform.
However it has a great deal of electrical noise on it (like loads of spikes).
These can really confuse things expecting a fairly nice sine wave.
If you can put ferrites around the conductors, they will limit the high frequency noise.
Also keeping your clamp as far away from the inverter as you can may help reduce how much of the high frequency noise is seen but the PZEM module.
Steve

1 Like

Can indeed confirm you can wire two current transformers in parallel, and it works fine. (probably need to be in the same orientation). This can be slightly expensive alternative for increased accuracy if looping incoming wire can’t be feasibly done.

If I want to add three Pzem 004 to the Wemos do I have to connect them to the Wemos to change the address or is it not necessary?

By default the pzem004t have all the same address I think. Changing them so that each module got a unique address is necessary when you want to use more than one on the same bus :bulb:

1 Like

Thanks for the reply, but I’m a newbie and don’t know how to proceed.
As reported here
Peacefair PZEM-004T V3 Energy Monitor — ESPHome
I tried inserting the code, and actually in the log I notice that the modbus address is changed. But according to the link this code needs to be cleared. So I wonder, how should I proceed. Do I first write the code for three Pzem sensors giving each one its own ID, then temporarily paste the code to change the address and repeat three times, each time with a different ID?

Yes, something like this.

You just need to change the address in the yaml (based on this snippet) and attach the next module.

So uploading the yaml with address x and attach one pzem module
Then check logs if it works (like you did already) go ahead disconnect that module and at best mark it (write the address on the module itself for future reference).

Then you do the same by uploading a yaml but with a new adress, again attaching one module and so forth.

In the end you have modules with different address and can just proceed like normal - the yaml snippet for code changing shouldn’t be present anymore - it only needs to be one time and is save in the module.

1 Like

Thanks a lot, I’ll try it soon and tell you

Instruction how to use PZEM_004T_V3 without ESPHome (native Modbus and module Bluetooth TTL):
https://4pda-to.translate.goog/forum/index.php?showtopic=871505&st=33420&_x_tr_sl=ru&_x_tr_tl=en&_x_tr_hl=uk&_x_tr_pto=wapp#entry123597514

Hello, I just got a pzem04t but I feel like the CT cable is very short. If I solder longer wires will it impact in the measurements?

Pretty sure I had to lengthen mine as well. As long as it’s relatively short, you’ll be fine.

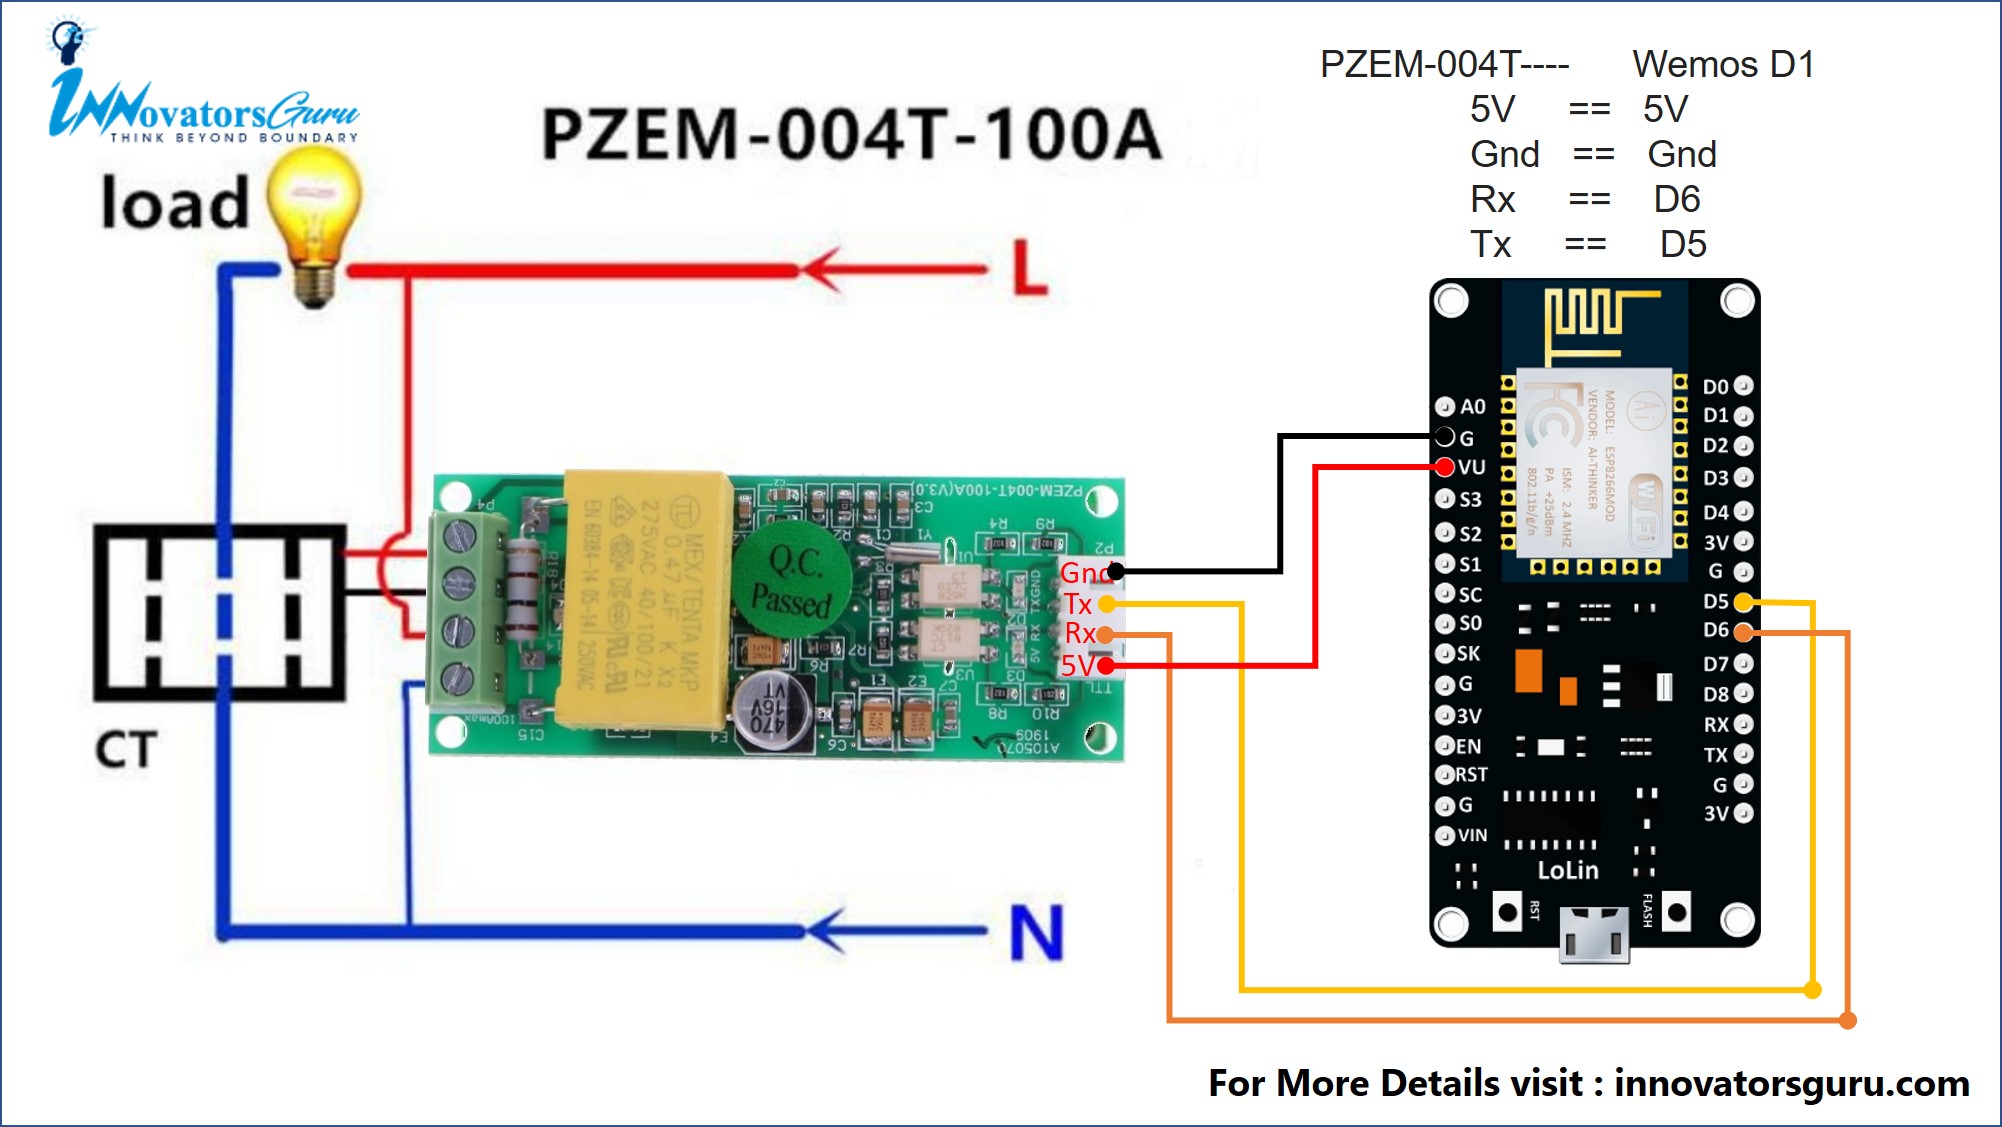
Recently, on advise, I received a PZEM004T-V3 and attached it to a Wemos D1 R2 (in ESPhome). Got it working and it gives pretty expected results.

The official documentation, yes I try to read the RTFM, gives the yaml sketch how to give each PZEM a different UART id. The only reason for this can be only when you attach multiple PZEM to one ESP. However the (perfect) yaml sketch and the master/slave UART requirements are a bit missing in this official documentation.

Yes, you can derive this info from the different PZEM topics but it would be nice if best practice is collected in the official documentation. I am too fresh in this topic to update this myself. Anyone?

I notice some people calibrate were other people use the PZEM as-is. Is there still a need for it with V3?

For which case? To connect one or multiple pzem’s to one UART bus? Feel free to change/edit the docs and ad the “perfect” yaml sketch :muscle:

No, pzem’s come pre-calibrated and I never noticed people try to calibrate this device :thinking: Any source to this? Tasmota docs even claim that they “can’t” be calibrated - in esphome obviously you could filter the results and use something like calibrate_linear but most likely just make the readings worse with this. :raised_hands:

I wish I could guide other people to the perfect multi PZEM and show them what needs to be done in case single master UART or perhaps the other option of using multi UARTs but that is a bridge too far for me at this point in time. True I can copy and paste but not verify yet if it is all valid,

calibration remark is clear, but even for starters like me a dummy remark could be helpful:
“There is no need to calibrate the PZEM, ESP functions like calibrate_linear will not improve results.”

BTW Did some comparing with an old water cooker and the results were pretty in line. I was able to compare the PZEM (1051w) against Electricity Meter Power consumption phase L2 of DSMR (1049w) yesterday which agrees on this calibration (the cooker itself was 900w but likely the build up whitewash (kalk) residue changed this).

At this point I also not able to improve my github skills and update the documentation because I am on the edge of going on holiday and my girlfriend will drag me from my PC any moment.

Thanks, I did it and it seems working fine.

Another question, if I connect the L and N reversed on the pzem (the 100A version), will it damage it or affect measurements? Or it doesn’t matter?

On the CT? No, it doesn’t matter as it’s AC voltage so it’s ‘going both directions’.

No, I don’t mean the CT. I mean the actual Live and Neutral wires that connect to the pzem. Does it matter or could the be connected indistinctly?

I mean it PROBABLY won’t matter for the same reason, but I would definitely connect it properly. What reason would there be to not do it right?

I see diagrams over internet and the connections of Live and Neutral differ. Here is the one that comes with the manual and here one diagram from tasmota.

I am powering the pzem and esp32 from AC similar to this. So the charger supplies 5V to the esp32, then the esp32 supply 5V to the pzem TTL and at the same time the pzem AC part get its proper power. It might happen that when connecting the plug to the wall, the L and N would be reversed. However, it seems that it doesn’t matter I just tested it and it seems to work just fine.

1 Like

Share my working .yaml config :grinning:

I have using 6 pzem with esp01s board (VCC <-> 3.3V without any modification on pzem board)

It work normally, but after a few hour, 1 pzem always lost readng data (crc error in logs) another 5 pzem reading fine.
If I remove 1 of pzem cable, another 5 pzem will read data normally.
So I remove 1 pzem out use only 5 pzem and it work fine for month now.

Here is my final version of yaml file that all 5 pzem working fine.

substitutions:
  hostname: "esp-pzem"
  platform: esp8266
  board: esp01_1m
  password: "OTA_PASSWD"
  ssid: "WIFI_SSID"
  psa: "WIFI_PASSWD"
  key: "API_KEY"
  selfap: "PZEM_SELFAP"
  selfpsa: "AP_PASSWD"

esphome:
  name: $hostname
  platform: $platform
  board: $board

logger:
# to disable serial output set baudrate to 0
#  baud_rate: 0

api:
  encryption:
    key: $key

ota:
  password: $password

wifi:
  ssid: $ssid
  password: $psa

  ap:
    ssid: $selfap
    password: $selfpsa

captive_portal:

web_server:
  port: 80

#GPIO 2 use for modbus, led can not be use 
#status_led:
#  pin: 2

time:
  - platform: homeassistant
    id: esptime 

uart:
  id: uart_modbus
  tx_pin: 0
  rx_pin: 2
  baud_rate: 9600
  data_bits: 8
  stop_bits: 1
  parity: NONE

modbus:
  id: modbus_id
  uart_id: uart_modbus
#  send_wait_time: 50ms

switch:
  - platform: restart
    name: "Restart"

text_sensor:
  - platform: version
    name: version
  - platform: wifi_info
    ip_address:
      name: ip
    ssid:
      name: ssid
    bssid:
      name: bssid

sensor:
  - platform: wifi_signal
    name: "WiFi signal"
    update_interval: never
    id: wifi_stat
  - platform: uptime
    name: $hostname Uptime
    update_interval: never
    id: upt

  - platform: pzemac
    address: 23 #0x17
    update_interval: never
    id: pzem1
    voltage:
      name: "Line Voltage"
      id: vol1
    frequency:
      name: "Line Frequency"
      id: freq1
    current:
      name: "Ch-1 Current"
      id: cur1
    power:
      name: "Ch-1 Power"
      id: power1
      state_class: measurement
    power_factor:
      name: "Ch-1 Power Factor"
      id: pow_factor1
  - platform: total_daily_energy
    name: "Ch-1 Total Daily Energy"
    id: totaldailyenergy1
    unit_of_measurement: kWh
    accuracy_decimals: 3
    device_class: energy
    filters:
      - multiply: 0.001
    power_id: power1

  - platform: pzemac
    address: 22 #0x16
    update_interval: never
    id: pzem2
#    voltage:
#      name: "Ch-2 Voltage"
#      id: vol2
#    frequency:
#      name: "Ch-2 Frequency"
#      id: freq2
    current:
      name: "Ch-2 Current"
      id: cur2
    power:
      name: "Ch-2 Power"
      id: power2
      state_class: measurement
    power_factor:
      name: "Ch-2 Power Factor"
      id: pow_factor2
  - platform: total_daily_energy
    name: "Ch-2 Total Daily Energy"
    id: totaldailyenergy2
    unit_of_measurement: kWh
    accuracy_decimals: 3
    device_class: energy
    filters:
      - multiply: 0.001
    power_id: power2

  - platform: pzemac
    address: 21 #0x15
    update_interval: never
    id: pzem3
 #   voltage:
 #     name: "Ch-3 Voltage"
 #     id: vol3
 #   frequency:
 #     name: "Ch-3 Frequency"
 #     id: freq3
    current:
      name: "Ch-3 Current"
      id: cur3
    power:
      name: "Ch-3 Power"
      id: power3
      state_class: measurement
    power_factor:
      name: "Ch-3 Power Factor"
      id: pow_factor3
  - platform: total_daily_energy
    name: "Ch-3 Total Daily Energy"
    id: totaldailyenergy3
    unit_of_measurement: kWh
    accuracy_decimals: 3
    device_class: energy
    filters:
      - multiply: 0.001
    power_id: power3

  - platform: pzemac
    address: 20 #0x14
    update_interval: never
    id: pzem4
  #  voltage:
  #    name: "Ch-4 Voltage"
  #    id: vol4
  #  frequency:
  #    name: "Ch-4 Frequency"
  #    id: freq4
    current:
      name: "Ch-4 Current"
      id: cur4
    power:
      name: "Ch-4 Power"
      id: power4
      state_class: measurement
    power_factor:
      name: "Ch-4 Power Factor"
      id: pow_factor4
  - platform: total_daily_energy
    name: "Ch-4 Total Daily Energy"
    id: totaldailyenergy4
    unit_of_measurement: kWh
    accuracy_decimals: 3
    device_class: energy
    filters:
      - multiply: 0.001
    power_id: power4

  - platform: pzemac
    address: 19 #0x13
    update_interval: never
    id: pzem5
   # voltage:
   #   name: "Ch-5 Voltage"
   #   id: vol5
   # frequency:
   #   name: "Ch-5 Frequency"
   #   id: freq5
    current:
      name: "Ch-5 Current"
      id: cur5
    power:
      name: "Ch-5 Power"
      id: power5
      state_class: measurement
    power_factor:
      name: "Ch-5 Power Factor"
      id: pow_factor5
  - platform: total_daily_energy
    name: "Ch-5 Total Daily Energy"
    id: totaldailyenergy5
    unit_of_measurement: kWh
    accuracy_decimals: 3
    device_class: energy
    filters:
      - multiply: 0.001
    power_id: power5

interval:
  - interval: 10s
    then:
      - delay: 150ms
      - lambda: "id(pzem1).update();"
      - delay: 150ms
      - lambda: "id(pzem2).update();"
      - delay: 150ms
      - lambda: "id(pzem3).update();"
      - delay: 150ms
      - lambda: "id(pzem4).update();"
      - delay: 150ms
      - lambda: "id(pzem5).update();"
      - delay: 150ms
      - lambda: "id(wifi_stat).update();"
      - delay: 150ms
      - lambda: "id(upt).update();"

1 Like