install NVMe
connect monitor and keyboard
connect network cable
connect power supply
Now the Odroid-M1 starts in the Petitboot.
select “Exit to shell” and confirm
enter “udhcpc” and confirm
enter “netboot_default” and confirm:
enter “exit” and confirm:
select “Debian 12 (Bookworm) Netboot Installer” and confirm:
Select your language:
Select your Country:
Select your Keyboard-Layout:
Odroid-M1 name:
Domain-Name:
Select the location of the mirror server:
Select the mirror server:
If the mirror server requires credentials, enter them here:
Users and passwords (root):
Do not enter a root password so that the user to be created next comes into the sudo group:
Confirm the previous entry (no password):
Users and passwords (users):
Enter your name or any name:
Enter your username:
Set a password for yourself:
Confirm the password:
Partitioning
Select “Guided - use full disk”:
Select the hard drive to partition:
select “separate /home-partition”:
Stop partitioning and apply changes:
Confirm the changes again:
Confirm or reject statistics:
Software selection (SSH server, standard system tools):
Complete installation:
After installation, Debian is available:
first boot:
first login:
The system has started:
From now on via ssh (debian:22) - After logging in you will find yourself in the user directory /home/
sudo apt-get install systemd network-manager udisks2 apparmor curl -y
Download Docker installation scripts:
curl -fsSL https://get.docker.com -o get-docker.sh
Make Docker installation script executable:
chmod +x get-docker.sh
If you want to change the Docker directory (by default to /var/lib/docker), you must create the directory before installing Docker and link it from the default directory. e.g.:
sudo mkdir /opt/docker
sudo chmod 777 -R /opt/docker
sudo ln -s /opt/docker /var/lib/docker
Normally a corresponding entry in /etc/docker/daemon.json is sufficient. However, the supervised installer overwrites this file. After the supervised installer, this file can be edited and the symlink to the Docker directory can be deleted.
Docker installation:
sudo ./get-docker.sh
sudo usermod -aG docker <username>
sudo shutdown -r now
After logging in again, the boot parameters for AppArmor and CGroups v1 are set:
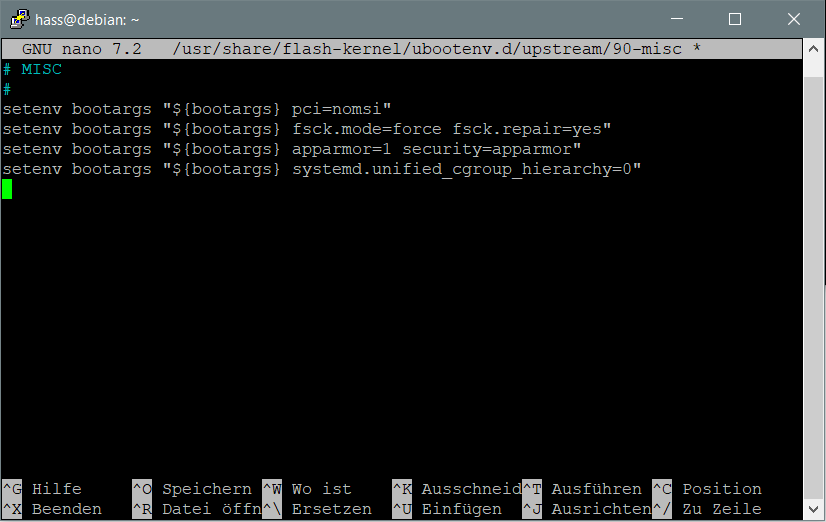
sudo nano /usr/share/flash-kernel/ubootenv.d/upstream/90-misc
Add the following two lines:
setenv bootargs "${bootargs} apparmor=1 security=apparmor"
setenv bootargs "${bootargs} systemd.unified_cgroup_hierarchy=0"
Save and close:
Shortcut: ctrl + o
Shortcut: ctrl + x
Update Bootscript:
sudo update-bootscript
Reboot:
sudo shutdown -r now
After logging in again, additional dependencies are installed:
sudo apt-get install cifs-utils dbus jq libglib2.0-bin lsb-release nfs-common systemd-journal-remote systemd-resolved -y
Because the name resolution does not work after this, the file
/etc/systemd/resolved.conf
must be edited:
sudo nano /etc/systemd/resolved.conf
Use your own router’s IP address:
DNS=<YOUR ROUTER-IP>
FallbackDNS=9.9.9.9
Restart service or reboot:
sudo systemctl restart systemd-resolved.service
und/oder
sudo shutdown -r now
Download OS-Agent:
wget https://github.com/home-assistant/os-agent/releases/download/1.6.0/os-agent_1.6.0_linux_aarch64.deb
Installation OS-Agent:
sudo dpkg -i os-agent_1.6.0_linux_aarch64.deb
Download Supervised-Installer:
wget https://github.com/home-assistant/supervised-installer/releases/latest/download/homeassistant-supervised.deb
If a custom Homeassistant directory is desired, it must be created now - e.g.:
sudo mkdir /opt/hassio
sudo chmod 777 -R /opt/hassio
Supervised installation with custom folder:
sudo DATA_SHARE=/opt/hassio MACHINE=odroid-m1 dpkg --force-confdef --force-confold -i homeassistant-supervised.deb
Supervised installation without custom folder:
sudo MACHINE=odroid-m1 dpkg --force-confdef --force-confold -i homeassistant-supervised.deb
sudo shutdown -r now
sudo nano /etc/default/grub
add GRUB_DISABLE_OS_PROBER=false
Save and close:
Shortcut: ctrl + o
Shortcut: ctrl + x
sudo update-grub
sudo shutdown -r now


