This blueprint is designed to unlock the full potential of the IKEA Bilresa Smart Scroll Wheel when used via Matter/Thread to control your Smart Lights.
(Note: This blueprint is optimized for Lights only. It does not support Media Player/Volume control in this version.)
Many users experience lag or “jumpy” behavior when using this device via Matter. This blueprint solves that by using a custom Hybrid Engine dedicated to smooth lighting adjustments.
Key Features
Hybrid Engine:
Scrolling uses Sensors directly for butter-smooth Dimming, Color Temperature, or RGB changes.
Buttons use Events for reliable switching.
Atomic Control:
Total freedom! You don’t just assign a mode to the whole remote.
You can configure each of the 3 Scroll Zones independently (Brightness, Kelvin, RGB, or Presets).
You can configure each of the 3 Buttons independently, with separate actions for Double Click and Hold (e.g. set specific Colors or Warm/Cold white).
RGB & Kelvin Support: Full support for color changing (Rainbow scroll) and temperature control.
Requirements (Crucial!)
Because this device exposes many entities via Matter, you must enable/disable specific ones in Home Assistant for this blueprint to work correctly.
ENABLE these Sensors:
Look for entities ending in (1), (2) (Zone 1)
Look for entities ending in (4), (5) (Zone 2)
Look for entities ending in (7), (8) (Zone 3)
ENABLE these Events:
Look for event entities ending in (3), (6), and (9).
DISABLE these Sensors:
Sensors ending in (3), (6), and (9) are not needed and should be disabled to reduce Thread network traffic.
Setup Tip regarding Lights
If you want to control multiple lights at once (e.g., a chandelier or a room), please create a Helper Group (Light Group) in Home Assistant and select that group in the blueprint. Targeting multiple individual entities directly via the blueprint may cause synchronization issues (“Popcorn effect”).
When configuring the blueprint, look at the number in parentheses at the end of your entity names:
Scroll Zone 1: Select sensors ending in (1) and (2).
Scroll Zone 2: Select sensors ending in (4) and (5).
Scroll Zone 3: Select sensors ending in (7) and (8).
Button 1 (Left/Top): Select the event ending in (3).
Button 2 (Middle): Select the event ending in (6).
Button 3 (Right/Bottom): Select the event ending in (9).
Version History
V1.0: Initial Release (Atomic Edition). Dedicated Light Control with optimized direction detection.
🇩🇪 Klicke hier für die Deutsche Beschreibung
Deutsche Beschreibung
Dieser Blueprint holt das Maximum aus dem IKEA Bilresa Smart Scrollrad heraus, wenn es über Matter/Thread genutzt wird, um deine Beleuchtung zu steuern.
(Hinweis: Dieser Blueprint ist rein auf Lichtsteuerung optimiert. Er unterstützt in dieser Version keine Media Player / Lautstärke.)
Viele Nutzer haben bei diesem Gerät über Matter mit Verzögerungen oder “ruckeligem” Verhalten zu kämpfen. Dieser Blueprint löst das Problem mit einer speziellen Hybrid Engine.
Die Highlights
Hybrid Engine:
Scrollen: Nutzt direkt die Sensoren. Das garantiert butterweiches Dimmen oder Farbwechsel ohne Netzwerk-Lag.
Tasten: Nutzen Events. Das garantiert, dass jeder Klick (Einzel, Doppel, Halten) zuverlässig erkannt wird.
Atomic Control (Totale Freiheit):
Du legst nicht einen Modus für die ganze Fernbedienung fest.
Du kannst jeden der 3 Scroll-Bereiche einzeln belegen (Helligkeit, Kelvin, RGB oder Presets).
Du kannst jede der 3 Tasten einzeln konfigurieren, mit eigenen Aktionen für Doppelklick und Halten.
RGB & Kelvin: Volle Unterstützung für Farbwechsel (Regenbogen-Scrollen) und Farbtemperatur.
Voraussetzungen (Wichtig!)
Da das Gerät über Matter extrem viele Entitäten bereitstellt, musst du in Home Assistant die richtigen aktivieren bzw. deaktivieren, damit der Blueprint funktioniert:
AKTIVIEREN (Sensoren):
Sensoren mit Endung (1), (2) (Zone 1)
Sensoren mit Endung (4), (5) (Zone 2)
Sensoren mit Endung (7), (8) (Zone 3)
AKTIVIEREN (Events):
Event-Entitäten mit Endung (3), (6) und (9).
DEAKTIVIEREN (Sensoren):
Die Sensoren mit Endung (3), (6) und (9) werden nicht benötigt und sollten deaktiviert bleiben, um das Thread-Netzwerk zu schonen.
Wichtiger Tipp für Lampen
Wenn du mehrere Lampen gleichzeitig steuern willst (z.B. eine Gruppe im Wohnzimmer), erstelle bitte unbedingt eine Helfer-Gruppe (Light Group) in Home Assistant und wähle diese im Blueprint aus. Wenn du im Blueprint mehrere einzelne Lampen direkt anwählst, kann es zu Synchronisationsfehlern (“Popcorn-Effekt”) kommen.
Zuordnungshilfe (Mapping Guide)
Achte bei der Auswahl im Blueprint auf die Zahl in der Klammer am Ende des Entitäts-Namens:
Hi @stone13,
I have just created this account to comment on your blueprint! I feels pretty solid, setup was pretty easy for a HA starter like me. Sadly, I am getting double triggers for dimming and color temperature. (e.g. 5% steps will not be 5% → 10% but 5% → 10% → 15%). For dimming I can easily reduce the percentage per step, but 200K instead of 100k is unacceptable according to my wife
Welcome Lennart, and thank you so much for the feedback!
You were absolutely right—this is a classic “switch bouncing” issue where the hardware sends two events very quickly. I have just updated the Blueprint to Version 1.0.1 to fix this.
The Fix: I changed the automation mode to single and added a small debounce delay (150ms) at the end of the actions. This forces the automation to ignore the second “ghost” trigger that was causing the double jumps.
Please try re-importing the blueprint and let me know if the dimming is smooth for you now!
Wow, thanks for the quick reply, works like a charm. I have just further reduced the 100K steps to 50 in yaml, now both parts of our household are happy
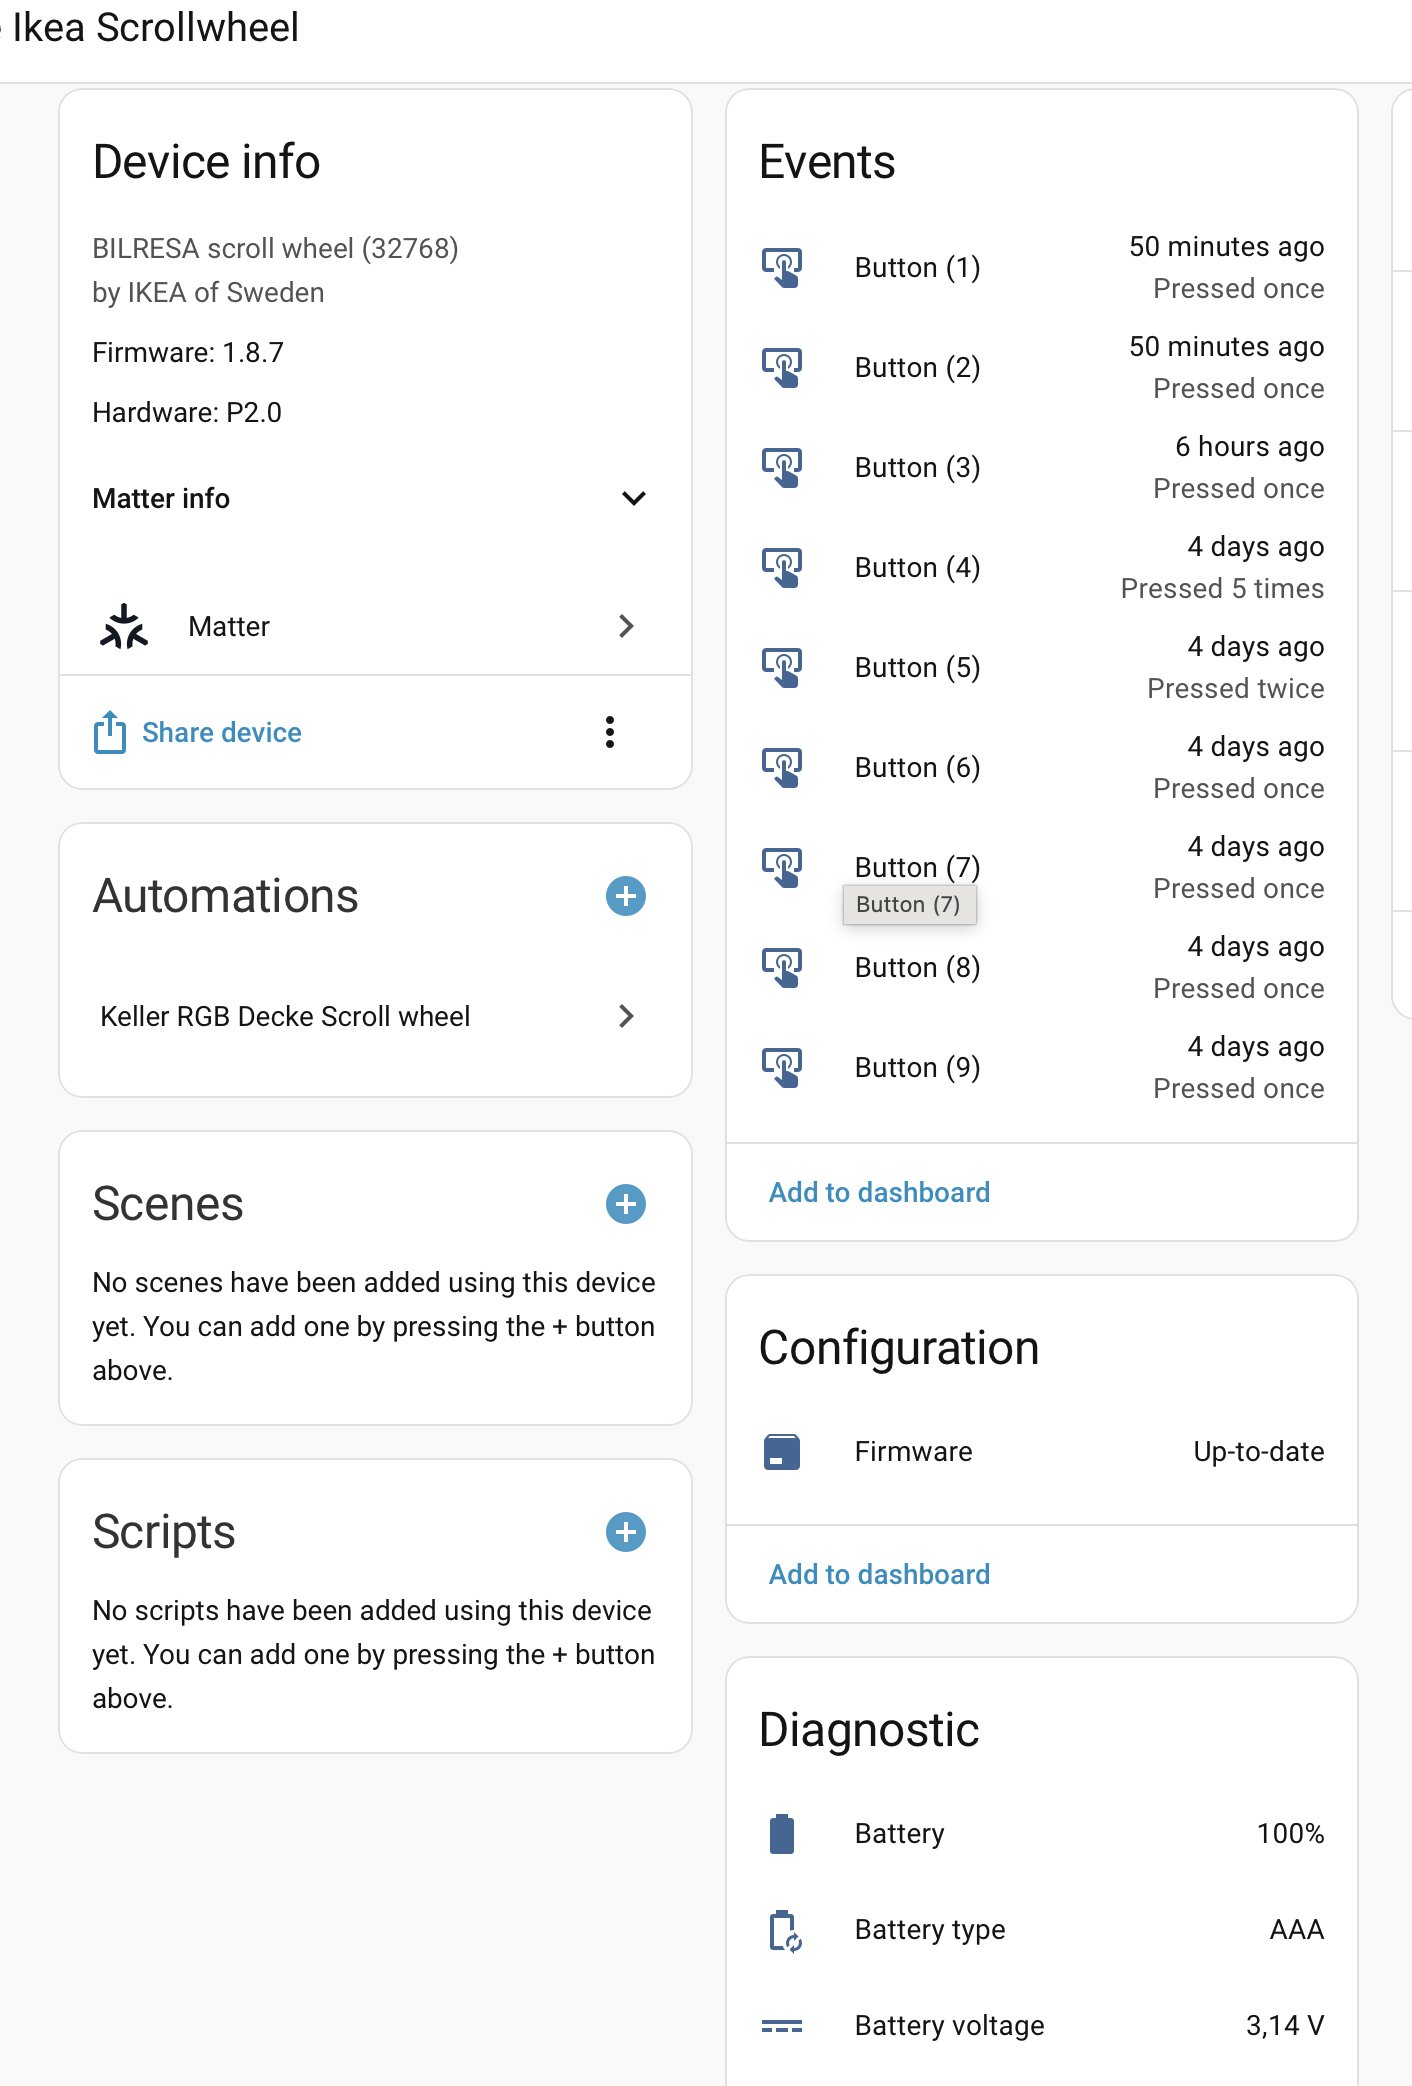
Can you explain what this exactly means. I am in the scroll wheel settings page and there is events, configuration, diagnostic…
How do i enable the sensors? Do I need to set something in diagnostics?
I am not sure what to do, I can see that there are events coming in, but there is the problem that my RGB light seems to dim down but never gets brighter again, but stays very dim. Maybe you can give a more clear instruction on how to do the three settings.
Under Events you will find the entities like event.xxx_1 and under Diagnostics you have to open the hidden entities section. Here you should enable the entities named like sensor.xxx_1 etc.
I need to control 2 rooms, so I’d like to use 2 channels for that. I think adding support for multiple lamps (one per channel) would be a great idea and would make the blueprint more flexible.
The protocol has nothing to do, it’s the way the device reports the scrolling.
The device reports the first notch you scroll almost instantly, but then it waits around 500 ms, half a second, before reporting more notches scrolled to avoid flooding the network, allow time for the smooth transitions to finish, etc.
Unless you scroll just one notch for a very slight adjustment, you have a response time of at least half a second, plus the transition time of the light if you want it smooth. That’s why the scroll is perceived as laggy.
The lag that can be improved but it’s not possible in Home Assistant yet is the on/off toggling by pressing the button. Home Assistant does not expose the initial_press or short_release events to blueprints so they cannot use it to toggle the light fast (when using multi_press_1 it waits for a potential double press).
Edit: Lag vs Scrolling speed
It’s worth remarking this comment was about the lag: you scroll and you don’t see the changes until 500+ milliseconds later. That’s unavoidable unless IKEA reduces the timings.
How fast you can scroll the wheel is another story. Right now the hidden sensors tell you each 500 ms that you’re still scrolling, but you don’t know how many notches have been scrolled to change the brightness proportionally. That’s why in current blueprints, for the same amount scrolled, if you go slow it changes the brightness more than if you go fast. The multipress_ongoing events will fix that when they are available in HA. They are also separated 500 ms though: you’ll be able to get the expected result regardless of the scrolling speed but the lag will not improve.
Have you tested these on ikea? I could swear I didn’t notice a 500ms delay in the demo setup there. I was really dissapointed when I got home and realized how useless they are in my HA setup
If you mean the remotes with lights at stores, they probably have the BILRESA directly bound to the light without hub, using Zigbee Touchlink. DIRIGERA running its automation with Matter events is also laggy.
The way the device works in Zigbee and Matter is quite different, even in behaviour. In Zigbee it controls the absolute brightness and a small scroll means a low brightness instead of a small change. I guess the time between commands is lower too.
The issue is not Matter but the reporting interval they chose when integrated via Matter. Matter does not impose those 500 ms, they could have gone for 100 ms or 200 ms or a different strategy to report the notches so it feels more instant.
Thank you both for the great discussion and the deep dive into the Matter reporting intervals! You are absolutely right: the ~500ms delay and the risk of flooding the Thread network make smooth dimming a real challenge.
Regarding the incredibly fast response time you saw in the IKEA store or their ads, @mocelet hit the nail on the head: IKEA uses direct Zigbee binding (Touchlink) for those demos. The remote talks directly to the bulb without routing through a hub or the Matter protocol. Matter over Thread simply behaves differently and has these mandatory reporting intervals.
However, I just wanted to jump in and clarify how this blueprint is designed to tackle these exact hardware limitations to get you as close to that native feel as possible:
1. The Button Lag:@mocelet mentioned that HA doesn’t expose the short_release event to blueprints, causing a delay while waiting for a double press. The good news is: this blueprint actually does use the short_release event! By checking for {{ trigger.to_state.attributes.event_type in ['multi_press_1', 'short_release'] }}, the blueprint toggles the light almost instantly the moment you let go of the button, completely bypassing the double-click wait time.
2. Scroll Choppiness & Network Flooding: To handle the choppy scrolling and protect the Thread network, the blueprint uses mode: single combined with a small debounce delay (around 150ms) at the end of the action sequence. This filters out the overlapping “ghost” triggers and makes the repeat / while dimming loop much smoother than standard implementations.
(By the way: I just updated the blueprint on GitHub to V1.0.3 to include a safeguard against “ghost switching” after Home Assistant restarts! Feel free to update if you haven’t already).
Thanks again for the technical insights, it’s really helpful to see how everyone experiences the device under the hood!
There are no mandatory reporting intervals, IKEA decided that 500 ms was a good compromise, they could have gone for 100 ms if they wanted.
The problem is the Matter integration does not send the short_release event when the button supports multi_press, it is not exposed. The blueprint cannot trigger on that event because the event is never generated.
Thanks for the clarification, you are right on both points.
I originally assumed the 500ms interval was a strict Matter limitation, but it makes sense that it’s an IKEA firmware choice to balance battery life and network traffic.
Also, thanks for the information regarding the short_release event. I wasn’t aware that the Matter integration doesn’t expose it at all when the button supports multi_press. Good to know that my trigger condition for it is basically a placebo, and the blueprint is simply dealing with the standard multi_press_1 delay.
I really appreciate the technical insights. This kind of feedback is very helpful!
 Key Features
 Hybrid Engine:
 Atomic Control:
 RGB & Kelvin Support: Full support for color changing (Rainbow scroll) and temperature control.
 Requirements (Crucial!)
 Setup Tip regarding Lights
 Import Blueprint
 Mapping Guide (How to find your entities)