The Smarter.am cloud service is (for all intents and purposes) dead. AFAIK, all Smarter products are therefore no longer ‘smart’. Long live ESPHome!
With help from the information in this guide, I’ve successfully converted my Smarter iKettle 3.0 to ESP32/ESPHome. My project is a bit more ambitious. I’ve completely replaced the logic board within the iKettle 3.0, and have attempted to replicate all of its functions (with one exception), including:
- No change to appearance/no additional wires
- Retain original power button and power LED
- RGB LED to show WiFi connection status
- HX711 to read the load cell to weigh the kettle to estimate fill level
- Buzzer to indicate turn on/off or on error
- Connect to and read kettle thermistor for auto-off/thermostatic control
I haven’t bothered trying to replicate the light sensor/LDR that interprets flashes from your phone’s screen to upload WiFi connection details for initial setup.
DISCLAIMER: Probably don’t do this. I’m no expert. I’m scraping by with an electronics GCSE from 1999, ChatGPT, a multimeter, basic soldering iron and awareness of the potential dangers. That said, such a disclaimer wouldn’t have stopped me, so I’m sharing my work for likeminded people.
Opening up the iKettle base, you’ll find a 3-wire connector joining the power board and the logic board. These three wires are a 5v supply, GND and connection to the positive side of the relay coil. Bridging the 5v and relay control wires causes the relay to click on and would provide power to the kettle element.
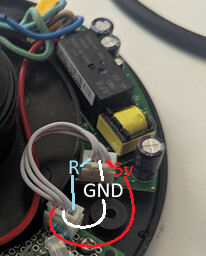
So, safety aside, this is a pretty easy conversion. We can leave the power board alone, and build something that can read the kettle temp and connect 5v to the relay control wire to turn on/disconnect to turn off.
Parts list:
- ESP32-S3 Mini
- HX711 ADC/pressure sensor to measure weight
- RGB LED (common cathode) for status indication
- White LED for power indication
- Active buzzer for the beep
- PN2222 transistor
- 104pF ceramic cap
- 3 x 330 ohm resistors
- 1 x 47k resistor for the thermistor (10k might be better - not sure)
- Right angle push button
- JST-XH connector kit
- Assorted multicoloured wire
Tools:
- Soldering iron
- Philips screwdriver
- Wire strippers
- Multimeter (to check continuity across joined connections/voltages)
- 2.54mm crimp tool
- Dremel to cut perf board
- Thermometer (to read water temp and tune the thermistor values accordingly)
I started by attempting to cut a perf board to roughly the same shape as the original iKettle logic board:
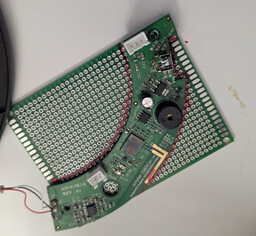
I then attempted to situate the components in the only way I could get them all to fit. I had to sacrifice one of the screw holes by the status LED, and had to cut the standoff to make room for my new board.
I’ve neglected to take a photo of the underside of my board, but honestly that wouldn’t necessarily help because it’s a bit of a mess.
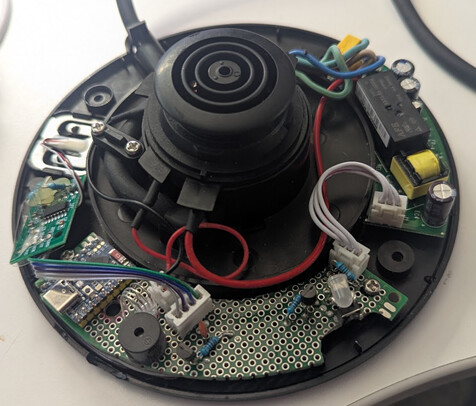
Here’s what my board looks like installed. I soldered JST-XH connectors onto the board for the connection to the power board, HX711 and thermistor so that it can be removed easily. The load cell and resistors required to create a ‘half bridge’ (see diagram) are soldered to the HX711 itself:
The HX711 is just kinda placed inside, unsecured.
Ignore the second transistor next to the buzzer. It’s not needed.
Here’s my circuit diagram:

Note that the thermistor is not on the board, it’s inside the kettle itself. On the board I have a 2-pin HX-2A connector, which re-uses the existing connector. The same applies to the 5v/GND/Relay connections - I’ve soldered an HX-3A to the board and am re-using the existing connector.
…and here’s my YAML:
esphome:
  name: smart_kettle
  friendly_name: "Smart Kettle"

  on_boot:
    priority: -100
    then:
      - script.execute: boot_led_sequence

esp32:
  board: esp32-s3-devkitc-1
  framework:
    type: arduino

logger:
  level: info

api:
  encryption:
    key: !secret api_key

ota:
  - platform: esphome
    password: !secret ota_password

wifi:
  ssid: !secret wifi_ssid
  password: !secret wifi_password
  on_connect:
    then:
      - script.execute: wifi_connected

captive_portal:

web_server:
  port: 80

status_led:
  pin: GPIO48

globals:
  - id: kettle_on
    type: bool
    restore_value: no
    initial_value: "false"

switch:
  - platform: gpio
    id: rgb_red
    pin: GPIO6
    internal: true

  - platform: gpio
    id: rgb_green
    pin: GPIO5
    internal: true

  - platform: gpio
    id: rgb_blue
    pin: GPIO4
    internal: true

  - platform: gpio
    id: power_led
    pin: GPIO10
    internal: true

  - platform: gpio
    id: buzzer
    pin: GPIO12
    internal: true

  - platform: gpio
    id: relay
    pin: GPIO13
    restore_mode: ALWAYS_OFF
    internal: true
    on_turn_on:
      - globals.set:
          id: kettle_on
          value: "true"
      - script.execute: relay_safety_timer
    on_turn_off:
      - globals.set:
          id: kettle_on
          value: "false"
      - switch.turn_off: power_led

  - platform: template
    name: "Smart Kettle"
    icon: mdi:kettle
    lambda: |-
      return id(kettle_on);
    turn_on_action:
      - script.execute: kettle_on_request
    turn_off_action:
      - script.execute: kettle_off_sequence

binary_sensor:
  - platform: gpio
    id: power_button
    pin:
      number: GPIO11
      mode: INPUT_PULLUP
      inverted: true
    on_press:
      - script.execute: kettle_toggle_request

  - platform: template
    id: kettle_on_base
    name: "Kettle On Base"
    lambda: |-
      return id(load_cell).state < -80000;
    on_release:
      then:
        - if:
            condition:
              lambda: 'return id(kettle_on);'
            then:
              - script.execute: kettle_off_sequence

sensor:
  - platform: hx711
    id: load_cell
    name: "Load Cell"
    dout_pin: GPIO7
    clk_pin: GPIO8
    update_interval: 200ms
    filters:
      - median:
          window_size: 7
          send_every: 3
    unit_of_measurement: "g"
    accuracy_decimals: 0
    internal: true

  - platform: template
    name: "Kettle Fill Percentage"
    lambda: |-
      float w = id(load_cell).state;
      float pct = (w + 119000.0) / (-445000.0 + 119000.0) * 100.0;
      if (pct < 0) pct = 0;
      if (pct > 100) pct = 100;
      return pct;
    unit_of_measurement: "%"
    update_interval: 2s

  - platform: adc
    pin: GPIO9
    id: adc_ntc
    attenuation: 11db
    update_interval: 2s

  - platform: resistance
    id: ntc_res
    sensor: adc_ntc
    resistor: 47kOhm
    configuration: DOWNSTREAM

  - platform: ntc
    id: kettle_temp_raw
    sensor: ntc_res
    calibration:
      b_constant: 3931
      reference_resistance: 50.9kOhm
      reference_temperature: 25

  - platform: template
    id: kettle_temp
    name: "Kettle Temperature"
    lambda: |-
      return (id(kettle_temp_raw).state + 16.7) * (85.8 / 67.7) + 14.2;
    unit_of_measurement: "°C"
    accuracy_decimals: 1
    update_interval: 2s
    filters:
      - lambda: |-
          if (x < 0 || x > 120) return NAN;
          return x;
      - sliding_window_moving_average:
          window_size: 5
          send_every: 1
    on_value:
      then:
        - if:
            condition:
              lambda: 'return x >= 100.0 && id(kettle_on);'
            then:
              - script.execute: kettle_off_sequence

script:

  - id: kettle_toggle_request
    then:
      - if:
          condition:
            lambda: 'return id(kettle_on);'
          then:
            - script.execute: kettle_off_sequence
          else:
            - script.execute: kettle_on_request

  - id: kettle_on_request
    then:
      - if:
          condition:
            and:
              - binary_sensor.is_on: kettle_on_base
              - lambda: 'return id(kettle_temp).state < 100.0;'
          then:
            - switch.turn_on: relay
            - switch.turn_on: power_led
            - switch.turn_on: buzzer
            - delay: 200ms
            - switch.turn_off: buzzer
          else:
            - script.execute: error_beep

  - id: relay_safety_timer
    mode: restart
    then:
      - delay: 120s
      - if:
          condition:
            lambda: 'return id(kettle_on);'
          then:
            - script.execute: kettle_off_sequence

  - id: kettle_off_sequence
    then:
      - switch.turn_off: relay
      - switch.turn_off: power_led
      - repeat:
          count: 3
          then:
            - switch.turn_on: buzzer
            - delay: 250ms
            - switch.turn_off: buzzer
            - delay: 250ms

  - id: error_beep
    then:
      - repeat:
          count: 5
          then:
            - switch.turn_on: buzzer
            - delay: 250ms
            - switch.turn_off: buzzer
            - delay: 250ms

  - id: boot_led_sequence
    mode: restart
    then:
      - while:
          condition:
            not:
              wifi.connected:
          then:
            - switch.turn_on: rgb_blue
            - delay: 250ms
            - switch.turn_off: rgb_blue
            - delay: 250ms

  - id: wifi_connected
    then:
      - switch.turn_off: rgb_blue
      - switch.turn_on: rgb_green
For testing, you’ll want to set comment out the ‘internal: true’ lines so that all the controls/sensor values will be displayed on the web portal for testing/tuning, and then you can update the YAML accordingly. To tune the load cell and thermistor readings, paste the YAML into ChatGPT and say ‘help me to correct these sensor values’, and provide the readings when the kettle is on/off the base, empty versus full, room temp water versus boiling, etc.), it’ll do the work for you.
There are no doubt many improvements that could be made to the code. Feel free to let me know.
I spent a good few days on this, all so I can once again control my kettle via HA/Alexa. Was it worth it? Of course!