It’s been awhile, but I’m pretty sure this will get you going in the right direction:
Yes, I used presets for the most common things I make.
meatmaptemp:
  tracked_entity_id:
    - input_select.meat_type
    - input_select.meat_temps
  value_template: >
     {% set tartemp = {
        "Poultry": {
            "Rare": 150,
            "Medium-Rare": 150,
            "Medium": 155,
            "Medium-Well": 160,
            "Well": 165
        },
        "Pig": {
            "Rare": 140,
            "Medium-Rare": 145,
            "Medium": 160,
            "Medium-Well": 165,
            "Well": 170
        },
        "Lamb": {
            "Rare": 140,
            "Medium-Rare": 145,
            "Medium": 160,
            "Medium-Well": 165,
            "Well": 170
        },
        "Beef": {
            "Rare": 120,
            "Medium-Rare": 130,
            "Medium": 135,
            "Medium-Well": 145,
            "Well": 155
        },
        "Venison": {
            "Rare": 120,
            "Medium-Rare": 130,
            "Medium": 135,
            "Medium-Well": 145,
            "Well": 155
        },
        "Alligator": {
            "Rare": 140,
            "Medium-Rare": 145,
            "Medium": 160,
            "Medium-Well": 165,
            "Well": 170
        }
     } %}
     {% set meattype = states.input_select.meat_types.state %}
     {% set meattemp = states.input_select.meat_temps.state %}
     {{ tartemp[meattype][meattemp] | int }}
I also have all the probe alarms in automations that announce status through Alexa. I am happy to have learned the probe status (plugged in or not) in this thread, I never got that one and I plan to redo mine so I can use conditional cards to hide charts/temps when the probe is not inserted.
Great stuff!
Great ideas mate. I am keen to get this going as well, although I’d prefer ESPHome. Will try that first.
Looking at your temps you aren’t doing low and slow, you should give that a crack, it’s brilliant!
We should take the temp thoughts offline … but it depends of course on your cooking unit. I have a Caja China and have done probably 100 whole animals (gator, lamb, pig, boar, etc.). Those are from some direct experience in what I can do in that box.
Curious about the timer. When I was experimenting with logging serial and using the official app, it seemed like the timer wasn’t pushing any data to the BBQ4T and was just an in app feature. Does an actual alarm sound on the unit when a timer expires? I might have missed a datapoint.
No, I don;t even push things back to the unit. The whole display is on the TV or a PAD. The timer is 100% Home Assistant. Both the timer and all four probes send TTS to Alexa also for temp/timer warnings … as in:
- id: '1626904362258'
  alias: iBBQ Probe Alarm
  description: ''
  trigger:
  - platform: template
    value_template: "{% if states('sensor.ibbq_probe_1') != 'unknown' and states('sensor.ibbq_probe_1')\
      \ | round | int > states('input_number.ibbq_target_probe_1') | round | int %}\n\
      \  true\n{% elif states('sensor.ibbq_probe_2') != 'unknown' and states('sensor.ibbq_probe_2')\
      \ | round | int > states('input_number.ibbq_target_probe_2') | round | int %}\n\
      \  true\n{% elif states('sensor.ibbq_probe_3') != 'unknown' and states('sensor.ibbq_probe_3')\
      \ | round | int > states('input_number.ibbq_target_probe_3') | round | int %}\n\
      \  true\n{% elif states('sensor.ibbq_probe_4') != 'unknown' and states('sensor.ibbq_probe_4')\
      \ | round | int > states('input_number.ibbq_target_probe_4') | round | int %}\n\
      \  true\n{% endif %}"
  condition:
  - condition: state
    entity_id: binary_sensor.ibbq_power
    state: 'on'
  action:
  - service: media_player.play_media
    data:
      media_content_id: air_horn_03
      media_content_type: sound
    target:
      entity_id:
      - media_player.deck_alexa
      - media_player.kitchen_alexa
      - media_player.stereo_alexa
  - service: notify.alexa_media_stereo_alexa
    data:
      data:
        type: tts
      message: i B B Q temperature probe warning
  - service: notify.alexa_media_deck_alexa
    data:
      message: i B B Q temperature probe warning
      data:
        type: tts
  - service: notify.alexa_media_kitchen_alexa
    data:
      message: i B B Q temperature probe warning
      data:
        type: tts
  mode: single
-
and this:
- id: '1626908831776'
  alias: iBBQ Timer Announcement
  description: ''
  trigger:
  - platform: state
    entity_id: timer.ibbq_timer
    from: active
    to: idle
  condition: []
  action:
  - service: media_player.play_media
    data:
      media_content_id: air_horn_03
      media_content_type: sound
    target:
      entity_id:
      - media_player.deck_alexa
      - media_player.kitchen_alexa
      - media_player.stereo_alexa
  - service: notify.mobile_app_sm_g955u
    data:
      message: The i B B Q timer is finshed
      title: iBBQ Update Status
  - service: notify.alexa_media_deck_alexa
    data:
      message: The i B B Q timer is finshed
      title: IBBQ Timer
      data:
        type: tts
  - service: notify.alexa_media_stereo_alexa
    data:
      message: The i B B Q timer is finshed
      title: IBBQ Timer
      data:
        type: tts
  - service: notify.alexa_media_kitchen_alexa
    data:
      message: The i B B Q timer is finshed
      title: IBBQ Timer
      data:
        type: tts
  - service: input_boolean.turn_off
    target:
      entity_id: input_boolean.ibbqtimeswitch
  mode: single
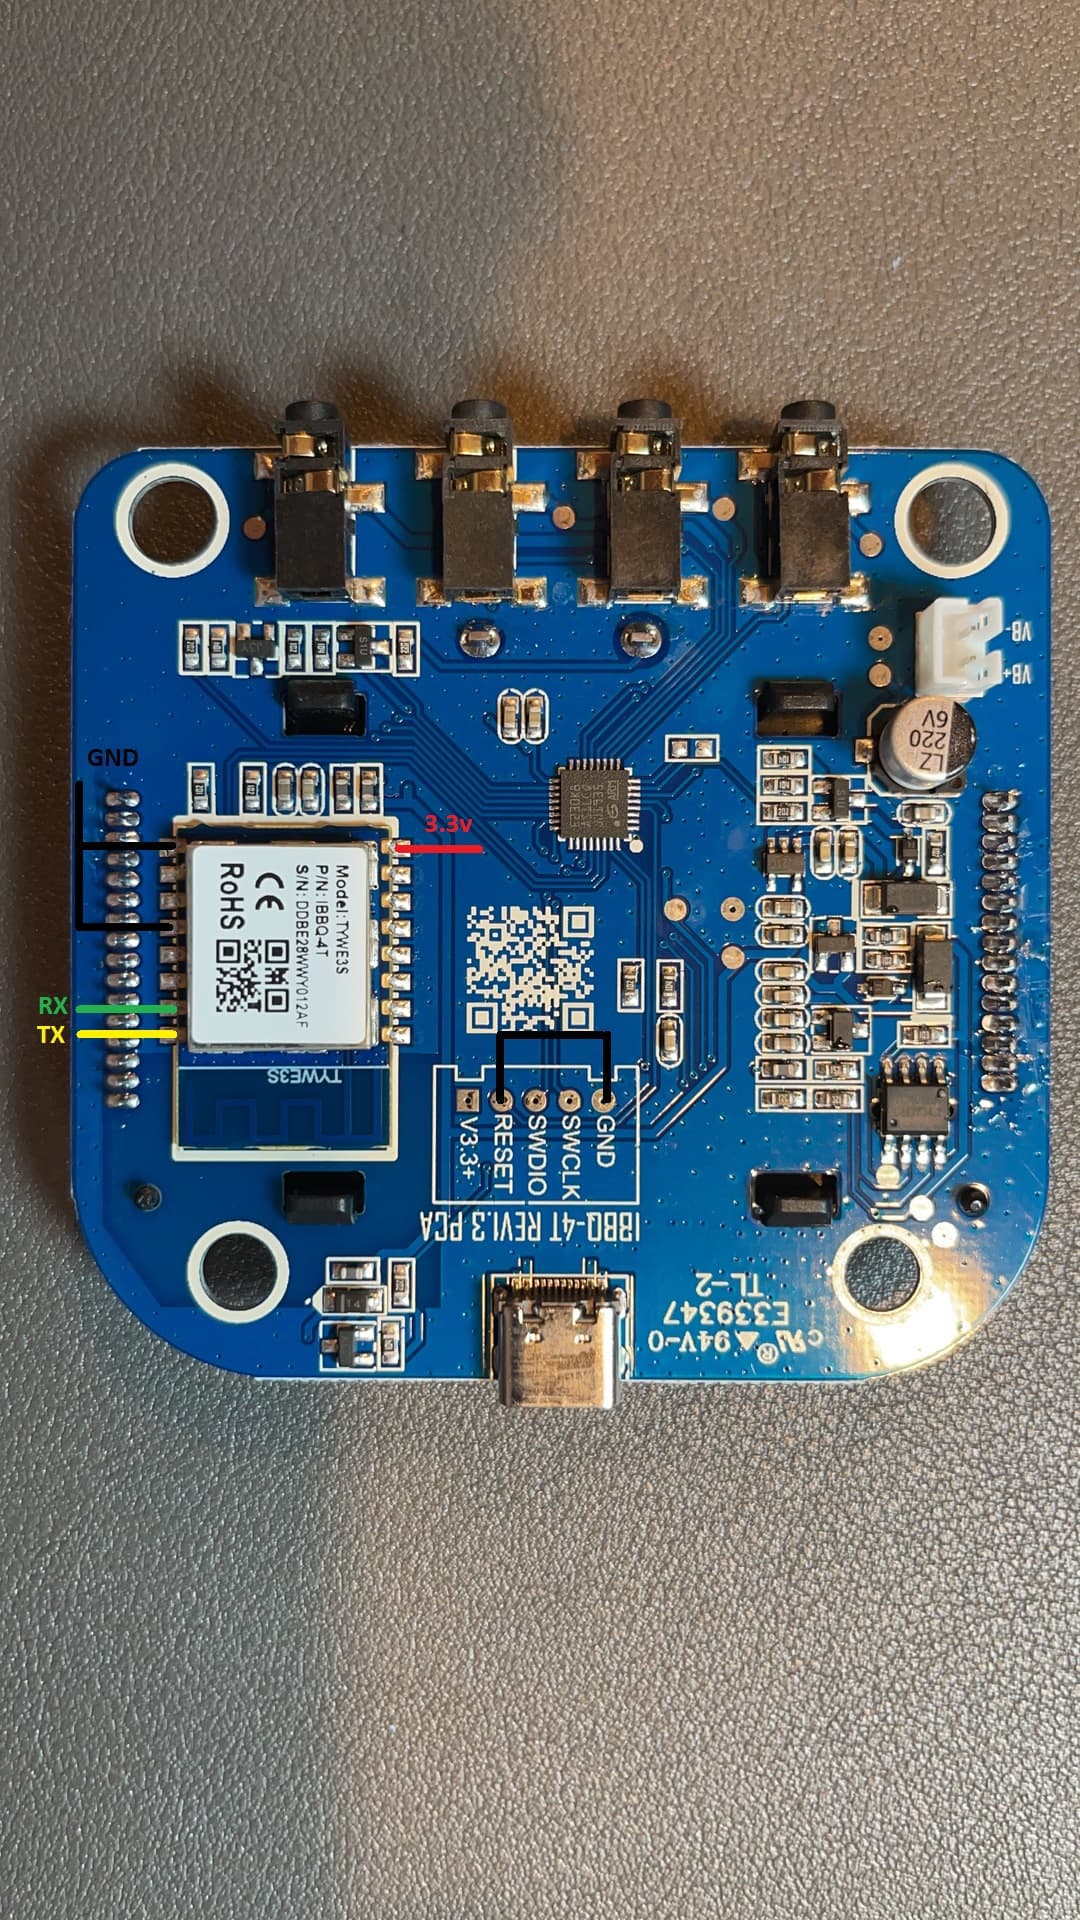
For those looking to flash their BBQ4T. There is a nice break out of the Reset pin for the MCU. You can use a short jumper wire to ground it 3 points over. This disables the MCU so the serial port will work for flashing. I believe I used the onboard 3.3v just unplugged and plugged in the battery to boot the ESP.
1 Like
Its not much yet but I was thinking about implementing the normal HA climate card for this.

I like that. I would use that over a slider.

@bmorgan … it looks like you have max set to 400 no matter what. Does the gauge needle move smooth? Or does it jump to 0 and then back up?
I will try and set it as you have but I do not like the set values, these need to be dynamic (max and the zones for green, yellow, red).
I have the warning level set to 300, but that can be easily changed in the card. I do get occasional blips as you describe but they don’t cause a problem. I thought the gauges looked cool at first, but have dropped that look altogether.
android view

Yes, understood. I tested a lot of things today and regardless of what I do, essentially the Tuyalocal integration seems to set everything to “0” and then send the new temperature. So you get a needle that rotates like “110” to “0” then “111”. When we are doing cooks, that is normally cast to a Television so I am not concerned with the mobile interface … just looks ridiculous that every 30 secs the needle goes to “0” then back to the new temperature. I was try9ng to implement a “do not draw me is the value is 0” functionality but hell, I gave up.
Onto to working on the big stereo implementation now!!
I would note that for one test I plugged in the canvas gauges you have with the same result, the needle goes to “0” and then to the new temp. Given I do not see this in other examples … I see smooth changes … it is not really a gauge issue, it is a Tuya issue. It must be the state changes like …
100,0,101,0,103,0,105,0 …
I suppose I could create a sensor from another sensor that draws values greater than “0” but what a waste of time. I’ll taking the “bouncing needles”
On a PC or TV, the mini-graph is off to the right and no bouncing needles! I also devote one whole tab in panel mode to just the mini-graph for monitoring once the smoker temp has settled down.
Can you post your config for this? I am looking to set this up with mine.
That should be everything. I never got around to shrinking the images.
the label template for probe 3 needs “return” after else
Hello Guys, really great work! Thanks a lot for the effort you have put into this!
→ My main problem: I’m too stupid to open the case to flash the board. → There is no screw below the bumpers. So I assume there are only clips? Even with a case opener I’m not getting along.
→ Any hints from your side?
Thanks.
Christian
Damn! Why haven’t I seen this??? Thank you craig! By the way, nice hint in regards to heat it up.
Cheers!
So finally it works great. Just to make sure the others will have it easier. My learnings out of this:
- The screws are below the face plate.
- The ftdi interface needs to be directly connected to the esp controller itself. The pinout (esp. for 3,3V) is a fakeout! Just solder directly to the controller (RX, TX, GND, 3,3V, GPIO-0) as shown in the pictures in this thread.
- Connect GPIO 0 to GND (and leave it there) → Restart the controller (via Reset to GND pinout, or through “on/off”)
- Use the ESP config from this thread an add your wifi credentials
- after flashing and removing the soldered wires. Plug in the battery and press the “on” switch.
Side-Note: during flashing I have used the power supply from the FTDI controller, not the battery.
Have fun.