inkBoard - dashboards for Kobo and desktop

Uh yeah. My adhd got out of hand a bit…

Anyhow, inkBoard is a python library that you can use to generate dashboards. It was originally designed to run on ereaders, so everything is made from scratch using Pillow. To make it a bit more user friendly, dashboards can be written entirely in YAML.

Its heavily inspired by both Home Assistant and ESPHome, so you’ll find similarities is usage. Hopefully that makes getting started a bit easier.

https://inkboard-documentation.readthedocs.io

If you want to try it out, I wrote a tutorial which can be found in the documentation:

https://inkboard-documentation.readthedocs.io/en/latest/tutorial/index.html

Documentation for using it with Home Assistant can be found here:

https://inkboard-documentation.readthedocs.io/en/latest/integrations/homeassistant_client/index.html

There are a few preview videos on the landing page of the documentation. I’ll upload them to youtube later so I can also embed them in this post. There is an example with all the Home Assistant elements in the designer repository, which is also linked in the documentation.

Here are the videos of it in action!

The desktop one is more of a showcase of various features, and the end result for the tutorial.

The ereader is connected to my Home Assistant server, and is currently set up to show me the weather and control the lights around my desk.

If people are interested, I can share some more configurations as well.

Hello,

Thank you very much for your work, I am really happy to find a new use for my Kobo Libra H2O.

I followed your tutorials, and the one on mobileread to deploy everything. After a few ickups (because I am on Linux) I can deploy a inkBoard to the Kobo.

The only issue I have, is that the Kobo interface is not reliable.
I have something basic for the moment:

  • an icon with a state style to reflect a LED strip status
  • a button to toggle the LED strip
  • a slider to control the LED brightness

With the designer, everything works perfectly (the icon’s and slider’s state change based on what I do in home assistant), and the button and slider instantly change the LED status.
However, when I run the inkBoard on the kobo, clicking on the button is unreliable (i have to double, maybe triple click to see an effect, sometimes). Changing the brightness with the slider on the Kobo is impossible.

Did I miss something to configure? Is it device related (I know inkBoard was tested on a Kobo Glo HD, so maybe the Libra is less powerful, although the processor seems similar)?

Thank you for your time

Sources:

Thanks for the kind words!
Could you perhaps post your configuration, and maybe the logs?

Going from what you said so far, my guess is the issue is with the touch screen implementation. Most older kobo models (maybe newer ones without water-proofing too) use infrared sensors as the touch sensors, whereas the Libra H2O has a capacitive ones.

Considering the button does work, but only sometimes, I am hoping it is simply debouncing the touches (capacitive screens are more precise and sensitive, if I am not mistaken). Could you try running the dashboard on your kobo with the touch_debounce_time key set lower? (the default value is 0.01).

...
device:
  platform: kobo
  touch_debounce_time: 0.001
...

and see if becomes more responsive?

Otherwise, can you set the logs for the kobo input to verbose, and show me what they tell you? I put most of the log messages to verbose in the end, but setting the component individually should prevent the logs from being flooded by other components. The yaml snippet below should do that:

...
logger:
  inkBoard.platforms.kobo.aioKIP: VERBOSE
...

Thank you for your fast reply !

So, to start, here is the configuration:

inkBoard:
  name: inkBoard Tutorial
  integrations: home_assistant
  integration_start_time: -1

logger:
  level: VERBOSE

device:
  platform: kobo
  name: Hass Example
  touch_debounce_time: 0.0001

home_assistant:
  url: should be moved in a secrets.yaml
  token: should be moved in a secrets.yaml too 

elements:
  - type: Button
    id: LED-toggle
    text: LED
    font_color: black
    background_color: gray
    tap_action:
      action: call-service-action
      data:
        action: light.toggle
        target:
          entity_id: light.0x00158d00077ded38
  - type: Icon
    id: LED-state
    background_color: black
    background_shape: circle
    entity: light.0x00158d00077ded38
    state_styles:
      "on":
        icon: mdi:lightbulb
        icon_color: white
      "off":
        icon: mdi:lightbulb-off
        icon_color: gray
  - type: Slider
    id: LED-slider
    entity: light.0x00158d00077ded38
    orientation: vertical

layouts:
  - type: GridLayout
    rows: 2
    columns: 4
    column_sizes: [w/4, "?"]
    id: my-layout
    elements:
      - LED-state
      - LED-toggle
      - LED-slider

screen:
  background: [255,255,255]

statusbar:

main_tabs:
  hide_navigation_bar: true
  tabs:
    - element: my-layout
      name: My Layout

You were right with the screen technology being the culprit! It is much more responsive with touch_debounce_time (not sure how far down does it go, I had to lower it to 0.0001 to get something smooth).

For the slider, that’s still not it. But I actually discover something interesting.
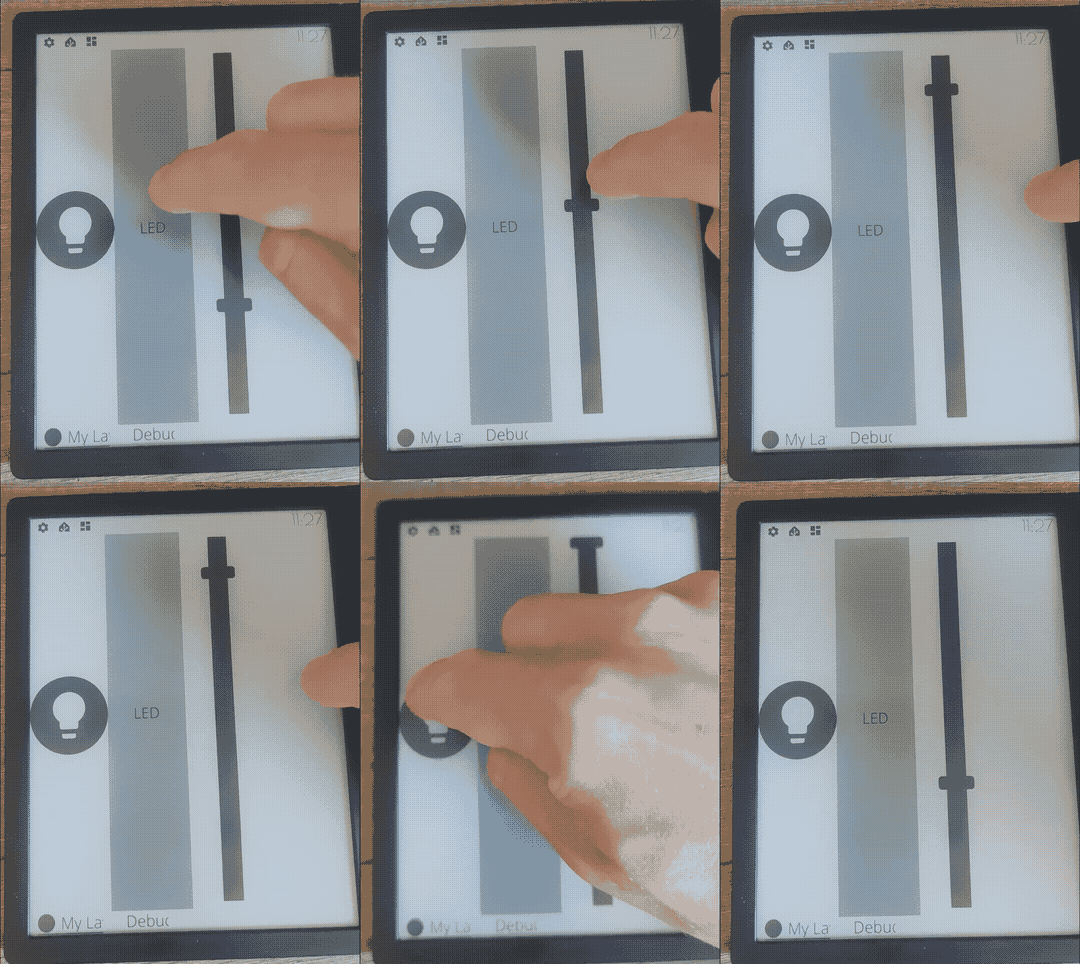
It seems that the touch screen and the display are not aligned together.
If I only display the slider (not the button and the icon) i can control the slider, but I have to click on a lign at a 90° angle, where nothing is displayed.
I tried to rotate the screen using the rotation attribute in the device section, same issue with rotation = 0,1,2. In 3 I cannot control the slider at all.
Do you have an idea about that ?

For the logger, I tried to put your line in the yaml but got an error. With level: VERBOSE it works. Maybe I was not supposed to put inkBoard.platforms.kobo.aioKIP: VERBOSE in the inkBoard yaml description on the Kobo ?

I am not putting logs here, because I do not know what part would be interesting to troubleshoot the issue.

Great to hear the screen is responsive now! I am not sure how far down it goes either. I have actually put a note down for myself to implement a way to disable the debouncing all together.

I made a mistake in the logger yaml. It should be like this I believe:

...
logger:
  logs:
    inkBoard.platforms.kobo.aioKIP: VERBOSE
...

The way you put it in your config put the base logging level at verbose, which makes it likely that the logs are flooded with less interesting messages for sure.

The touches being off is the fault of the input handler too, or well, it being written for the infrared sensors instead of capacitive, I suspect. For the infrared screens, the touch coordinates do not rotate along with the screen, so to keep coordinates are rotated such that the origin point is always in the top left corner.

There isn’t any option I built into the config to disable that behaviour right now. If the logs are set to verbose, the input handler should log messages starting with something like Rotation of {...} (Canonical: .... Another option, which I used to test this all out is using a custom element that simply prints the touched coordinates. That was more intuitive in my case, however it would require using a custom function.

def change_text(element, coordinates):
    print(f"Clicked on element {element}")
    new_text = f"You clicked on x: {coordinates[0]} y: {coordinates[1]}"
    element.update({"text": new_text})

Putting that into a .py file in custom/functions should allow using it in the config (I have better explained using custom functions in the tutorial, but let me know if you need help with it).

...
main_tabs:
  hide_navigation_bar: true
  tabs:
    - name: Debug Button
      element:
        type: Button
        text: Tap me to debug
        tap_action: custom:change_text
    - element: my-layout
      name: My Layout
...

Your dashboard should now simply be showing the debug button, with optionally some other elements. Touching it should print the coordinates you touched.
Now, if everything would work the way it should (which it most likely is not), you would expect to see the following coordinates as (x,y) (MAX is a placeholder for the maximum coordinate in that direction):

  • top left corner: coordinates close to (0,0)
  • bottom left corner: coordinates close to (0, MAX)
  • top right: close to (MAX, 0)
  • bottom right: close to (MAX,MAX)

The aforementioned logs should also reflect the same results, although I personally found the interactive button to be more intuitive. Anyway, could you let me know what the results are for you? Preferably when using different rotation values too.

Thank you for all the info :+1:

For the logger, it was not working at first, I got a

...
  File "/mnt/onboard/.adds/inkBoard/.venv/lib/python3.9/site-packages/inkBoard/logging.py", line 249, in setup_logging
    for log_name, level in config.logs:
ValueError: too many values to unpack (expected 2)

I corrected it by editing line 249 of /mnt/onboard/.adds/inkBoard/.venv/lib/python3.9/site-packages/inkBoard/logging.py

#Was
for log_name, level in config.logs:
#Changed to
for log_name, level in config.logs.items():

And now it is working great (and yes, I have far less debug messages).

For the rotation and coordinates. The button was not always updating the coordinates, but as they were in the logs, I guess this is not an issue.
Here is what I obtained with the different rotations. Top/bottom/left/right are always meant in the way the elements are displayed (meaning, they follow the rotation of the screen), just to be sure we understant the same thing.

rotation 0:
- top left Rotation of 0 (Canonical: 0), Original (x,y): (173, 1106), rotated to (rx,ry): (173, 1106)
- top right Rotation of 0 (Canonical: 0), Original (x,y): (196, 122), rotated to (rx,ry): (196, 122).
- bottom left Rotation of 0 (Canonical: 0), Original (x,y): (1508, 1151), rotated to (rx,ry): (1508, 1151).
- bottom right otation of 0 (Canonical: 0), Original (x,y): (1503, 114), rotated to (rx,ry): (1503, 114).

rotation 1:
- top left Rotation of 1 (Canonical: 1), Original (x,y): (117, 146), rotated to (rx,ry): (146, 1147).
- top right Rotation of 1 (Canonical: 1), Original (x,y): (1570, 200), rotated to (rx,ry): (200, -306).
- bottom left Rotation of 1 (Canonical: 1), Original (x,y): (123, 1071), rotated to (rx,ry): (1071, 1141).
- bottom right Rotation of 1 (Canonical: 1), Original (x,y): (1556, 1070), rotated to (rx,ry): (1070, -292).

rotation 2:
- top left otation of 2 (Canonical: 2), Original (x,y): (1545, 98), rotated to (rx,ry): (-281, 1582).
- top right Rotation of 2 (Canonical: 2), Original (x,y): (1517, 1201), rotated to (rx,ry): (-253, 479).
- bottom left Rotation of 2 (Canonical: 2), Original (x,y): (162, 89), rotated to (rx,ry): (1102, 1591).
- bottom right Rotation of 2 (Canonical: 2), Original (x,y): (167, 1163), rotated to (rx,ry): (1097, 517).

rotation 3:
- top left Rotation of 3 (Canonical: 3), Original (x,y): (1598, 1126), rotated to (rx,ry): (554, 1598)
- top right Rotation of 3 (Canonical: 3), Original (x,y): (38, 1142), rotated to (rx,ry): (538, 38).
- bottom left Rotation of 3 (Canonical: 3), Original (x,y): (1591, 113), rotated to (rx,ry): (1567, 1591).
- bottom right Rotation of 3 (Canonical: 3), Original (x,y): (82, 122), rotated to (rx,ry): (1558, 82).

I am surprised to see negative values for rotation 1 and 2. Also, it seems that (0,0) is at the top right in rotation 1, and that is does not stick to the same corner as the screen is rotating.

I do not understant that for now, I will try to dig more.

Thank you for your help, and let me know if you need anything else.

To give a better idea of the issue, here is a gif showing it (sorry for the quality, i had to make it fit into 3MB)

test

Thanks for this! I’ve made a commit to fix it already so in future versions that should not happen anymore.

Okay, I understand what is happening, and how to fix it. The input handler expects the top left to be (0,0) when the rotation value is 0. According to what you provided, that is actually the case when the rotation is 1. The fbink library does have a rotation of 0 being equal to upright, but I also assumed that all touch screens used that coordinate system as well.

The (rx, ry) becoming negative in the case of certain rotations makes sense in this case, due to how they are calculated. Basically, the height or screen length are wrong in those case, but the x,y coordinates are subtracted, meaning you could have a coordinate over the screen width (which is longer), subtracted from the total height, i.e. leading to a negative value. Not what is meant to happen, but also the expected result from what is going wrong :slight_smile:

In aioKIP.py (in the kobo platform folder), can you replace the function _rotate_coordinates with the following code:


    def _rotate_coordinates(self, x: int, y: int):
        "Rotates the x and y coordinates received such that the upper left corner registers as (0,0) and x is the horizontal axis and y is the vertical axis"

        rota = fbink.current_rota
        rota_map = {0: 90, 1: 0, 2: 270, 3: 180}
        rx = x
        ry = y

        if rota_map[rota] == 0:
            ##No need to transpose them
            rx = x
            ry = y
        elif rota_map[rota] == 90:
            rx = y
            ry = fbink.screen_height - x
        elif rota_map[rota] == 180:
            rx = fbink.screen_width - x
            ry = fbink.screen_height - y
        elif rota_map[rota] == 270:
            rx = fbink.screen_width - y
            ry = x

        _LOGGER.log(VERBOSE, f"Rotation of {rota}={rota_map[rota]}° (Canonical: {fbink.current_rota_canonical}), Original (x,y): {(x,y)}, rotated to (rx,ry): {(rx, ry)}.")
        return (rx, ry)

If I mapped the logs you provided to the correct rotation values, this should result in the correct transformation being applied. If not, could you try and experiment which rotation numbers correspond to which angles? The 0 degree rotation has to be rotation number 1.

Keep in mind this code is only a hard fix for your device, but from here I should be able to work out a more flexible solution as well.

It is working :tada:

I only had to change this part:

rota_map = {0: 270, 1: 0, 2: 90, 3: 180}

Thank you very much for your support to make this work.
I still have to design my dashboard to have something nice (so I may come back here later :wink:) and maybe test the other integrations.

Have a nice week-end !

Great to hear!

I’d love to see the final product :smile:
If you need any help or run into other bugs, let me know :slight_smile: