I am having trouble getting a Shelly-1 device to associate with my system. From this page Shelly 1 Switch Module Configuration for Tasmota, I got with proper wire attachments for programming. I then went to LocalHomeAsst->ESPHome and clicked New Device. I entered a couple of values, then skip, then I manually entered this yaml file:
I then did ‘[three dots]->Plug into the computer’ and the .bin file is created and put on my desktop - simple! I then clicked ‘Open ESPHOME Web’ and clicked Connect. This showed me the USB port to which my USB adaptor is attached, so I selected it and clicked Connect. I then clicked Install, selected the .bin file that was just created, and then it tells me: Failed to initialize. Try resetting your device or holding the BOOT button while selecting your serial port until it starts preparing the installation. I get the same error message when I click ‘Prepare for adoption->Make adoptable’.
I must be missing something because this same process worked when I configured a SOnOff S20 device – what am I doing wrong?
That was my thought, but I did solder a wire into the ground wire and inserted both, so I think this was handled properly… (I just put the multimeter on both leads and the connection is fine.)
Some further reading suggested that the wire to GPIO0 is supposed to be unhooked from ground before starting serial communications - tried that but same result as above.
tom_l and nickrout: Based on your comment, I found this page Shelly - Home Assistant and tried accessing the device directly. I clicked on ‘Add integration’ and a window popped up saying “Before set up, battery-powered devices must be woken up, you can now wake the device up using a button on it.” and it wanted a host IP address. Based on my reading, I believe that it wants the IP address of the Shelley device, but I have no idea how to find that. I looked in CloudTrax for the list of local WiFi clients, but did not see anything new. And yes, I attached a 110 VAC cord to the device and plugged it into the wall, and yes, the voltage selection jumper is set properly.
Some looking around suggested the IP 192.168.33.1, but that didn’t do anything.
When the shelly first starts up it forms an access point that you connect a cellphone or wifi computer to. If I recall correctly the shelly will be at 192.168.33.1 and your phone will be at 192.168.33.something.
You then access the shelly’s web page at 192.168.33.1 and set it up to access your home access point.
Once you have done that, reboot the shelly and HA should find it.
Yeah this is the biggest tip. Use the web page in the device to set it up, not the Shelly app. It may have changed as I haven’t used it for ages, but the app was useless.
One (hopefully) final question: I went back to Home Assistant, added the Shelly integration, input the IP address, and was shown “The device is using an unsupported firmware version.” Via a web-page (on my desktop) to the Shelly device, I went to Settings->Firmware Update and there saw the message "The current Firmware version of your Shelly device is 20191217-140757/1047-long-id-for-shelly-devices@a0661583 No newer firmware available. " Now I am really confused (and it is hard the believe that firmware that is two plus years old is the most recent).
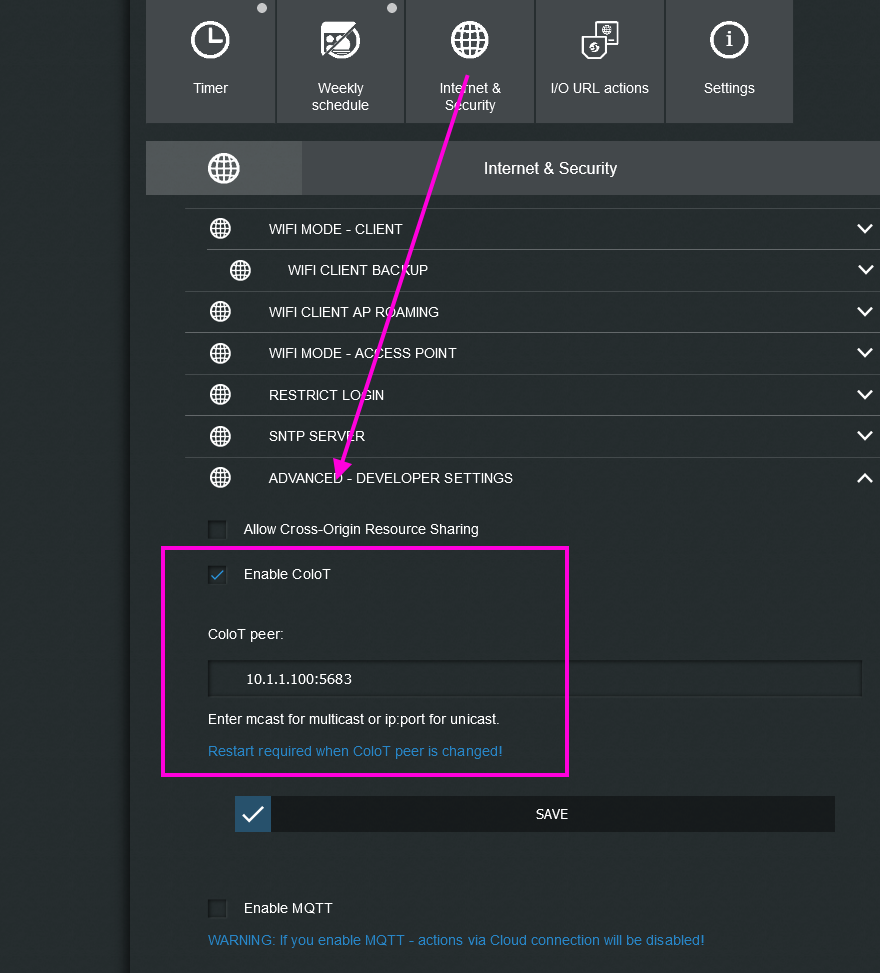
There is not option to ‘Enable Colo T’. I did find some stuff about forcing an OTA update and I want to try that, but the website http://archive.shelly-tools.de/, which seems to assemble the proper URL, is asking for a Shelly Type and I have no idea which one to select.
Okay - I figured out that my device is a SHSW-1, so I entered the info and got the following URL: http://192.168.73.210/ota?url=http://archive.shelly-tools.de/version/v1.11.0/SHSW-1.zip. (Not the latest version, but should be close enough for testing purposes). I entered this URL into the address bar of my browser and saw: {“status”:“updating”,“has_update”:false,“new_version”:"",“old_version”:“20191217-140757/1047-long-id-for-shelly-devices@a0661583”}
FWIW- I have never gotten this to work with new devices. I just use espHomeFlasher.
I have one Shelley in the wall that has Tasmota flashed to it, but it’s been a couple of years so I forget the process I used to flash Tasmota on it.
Generally, any ESP device, ground pin GPIO0, apply power, (you can remove the ground now or later- it doesn’t matter), flash the bin file, remove the ground on GPIO0 if you haven’t already, reset or power off/on the device.
I may put ESPHome on it in the future, but the switch box that it’s inside of is in an inconvenient location in case the OTA fails. I.E., if it isn’t broken, don’t fix it.
If you definitely don’t manage to use your shelly device you can flash with Tasmota using OTA with this project: https://github.com/yaourdt/mgos-to-tasmota
No need to wire it, works OTA.
Then you will be able to update to ESPHome using the Tasmota dashboard.