Integrating LoRaWAN sensors into Home Assistant
I’m intrigued by Smart Home technologies. I’ve been using Home Assistant to both automate my home and as a testbed for new sensor integrations. There’s no off-the-shelf integration yet for LoRa so I patched together some components to test out LoraWAN over distances farther than my Wifi can reach.
Although LoRa touts up to 10-mile range I wanted to see what was really achievable with off-the-shelf hardware in my neighborhood. There are a few LoRa demonstration projects using two LoRa modules but I wanted to be able to deploy multiple LoRa nodes. LoRaWAN is well-suited, its MAC-layer network protocol providing bi-directional communication, over-the-air provisioning and encryption. However with that comes the complexity of LoRaWAN gateways and a network server.
I bought a Dragino LPS8 LoRaWAN gateway off of Ebay for $80. I chose this gateway because its firmware is OpenSource and the gateway itself is relatively cheap.
For the network server I could have used The Things Network (TTN), but I wanted a non-cloud, OpenSource solution so I went with ChirpStack. I already have a Linux server that hosts Home Assistant, zwavejs2mqtt and zigbee2mqtt as Docker containers and a Mosquitto MQTT server so adding ChirpStack was straightforward.
LoRa module
For the sensors I chose Heltec ESP32 LoRa V3 clones from Hiletgo. I installed the Arduino 15 IDE development environment but mostly used the arduino-cli once the support libraries were installed. I had some difficulty in getting the correct libraries installed from the Heltec instructions, probably because I had installed older versions of the libraries using git pull. The instructions at Heltec ESP32+LoRa Series Quick Start — esp32 latest documentation were the ones I finally used. After following the instructions you should be able to select the Heltec LoRa 32 V3 board.

You should also be able to see the LoRaWAN example under the Examples…Heltec-Example menu. If not, you probably won’t have the necessary LoRaWan102 library installed in the Arduino hardware/heltec directory. The LoRaWan_OLED example is the one I started with to test the gateway and network server.
For configuration, I used “Generate by ChipID” for LORAWAN_DEVEUI and “REGION_US915” for LoRaWan Region. You’ll need to select an appropriate frequency plan for your location. TTN has a good write-up here.
In the sketch, you will want to set overTheAirActivation to true. In some frequency plans, you’ll also need to set the userChannelsMask to something other than the default. In the US915 plan, there are 8 possible channel plans of which I chose US915_1. So for me
/*LoraWan channelsmask*/
/* using channels 8-15 */
uint16_t userChannelsMask[6]={ 0xFF00,0x0000,0x0000,0x0000,0x0000,0x0000 };
Once compiled and uploaded to the LoRa 32 module, the console will show something similar to this on boot:
ESP-ROM:esp32s3-20210327
Build:Mar 27 2021
rst:0x1 (POWERON),boot:0x8 (SPI_FAST_FLASH_BOOT)
SPIWP:0xee
mode:DIO, clock div:1
load:0x3fce3808,len:0x43c
load:0x403c9700,len:0xbec
load:0x403cc700,len:0x2a3c
SHA-256 comparison failed:
Calculated: dcde8d8a4817d9bf5d5d69a7247667264e4e10ac7493514868b61f5aa6146539
Expected: ffffffffffffffffffffffffffffffffffffffffffffffffffffffffffffffff
Attempting to boot anyway...
entry 0x403c98d8

LoRaWAN US915 Class A start!

+OTAA=1
+Class=A
+ADR=1
+IsTxConfirmed=1
+AppPort=2
+DutyCycle=15000
+ConfirmedNbTrials=4
+ChMask=00000000000000000000FF00
+DevEui=CE7554DC00002461(For OTAA Mode)
+AppEui=0000000000000000(For OTAA Mode)
+AppKey=88888888888888888888888888886601(For OTAA Mode)
+NwkSKey=15B1D0EFA463DFBE3D11181E1EC7DA85(For ABP Mode)
+AppSKey=D72C78758CDCCABF55EE4A778D16EF67(For ABP Mode)
+DevAddr=007E6AE1(For ABP Mode)


joining...
LoRaWAN gateway, Dragino LPS8
The Dragino LPS8 User Manual does a good job describing the installation and setup. I also offloaded the ChirpStack MQTT Packet Forwarder from the network server to the Dragino. That would in theory allow me to eliminate the network server and handle the gateway MQTT messages directly. However, I
tested with the network server.
Installing the ChirpStack MQTT forwarder
It’s certainly possible to skip this step and just configure the gateway to send Semtech UDP packets to the server. In that case, the ChirpStack configuration will need to include the chirpstack-gateway-bridge.
During the forwarder installation on the Dragino, it’s necessary to ssh into the gateway and configure the forwarder by editing /etc/chirpstack-mqtt-forwarder/chirpstack-mqtt-forwarder.toml. This connects the Semtech-UDP-formatted messages to the Mosquitto MQTT broker on the server host. Mine looks like this:
# For a complete configuration example and documentation, please refer to:
# hhttps://www.chirpstack.io/docs/chirpstack-mqtt-forwarder/configuration.html

[logging]
  level="info"
  log_to_syslog=true

[backend]
  enabled="semtech_udp"

  [backend.semtech_udp]
    udp_bind="0.0.0.0:1700"

[mqtt]
  topic_prefix="us915_1"
  server="tcp://***.****.com:1883"
  username="******"
  password="******"
  ca_cert=""
  tls_cert=""
  tls_key=""
The topic_prefix must match at least one of the configured regions in the ChirpStack server. See below for more information about that.
Once configured, I found the Dragino wouldn’t connect to the MQTT broker, showing log warnings about a DNS rebind attempt. The problem and solution are discussed here: DNS not resolving local addresses - Installing and Using OpenWrt - OpenWrt Forum. I used the following commands during an SSH session to fix this:
root@dragino-1ef56c:/tmp# uci set dhcp.@dnsmasq[0].rebind_protection='0'
root@dragino-1ef56c:/tmp# uci commit dhcp
root@dragino-1ef56c:/tmp# /etc/init.d/dnsmasq reload
After accessing the Dragino gateway webpage, I configured the LoRaWAN to Semtech UDP mode with the following parameters:

The frequency plan is configured on the LoRa menu. Since I was using US915_1, mine looked like this:

My Dragino is located in the attic and uses the supplied antenna.
ChirpStack network server
The ChirpStack repository on Github describes the ChirpStack installation using Docker Compose. Once the repository is cloned to the server host, the docker-compose.yml needs to be edited. Since I was using an existing MQTT broker and had moved the packet forwarder to the Dragino, my docker-compose.yml looks like this:
version: "3"

services:
  chirpstack:
    image: chirpstack/chirpstack:4
    command: -c /etc/chirpstack
    restart: unless-stopped
    volumes:
      - ./configuration/chirpstack:/etc/chirpstack
      - ./lorawan-devices:/opt/lorawan-devices
    depends_on:
      - postgres
      - redis
    environment:
      - MQTT_BROKER_HOST=172.17.0.1   # the docker network gateway
      - MQTT_BROKER_USERNAME=******
      - MQTT_BROKER_PASSWORD=******
      - REDIS_HOST=redis
      - POSTGRESQL_HOST=postgres
    ports:
      - 8080:8080

  chirpstack-rest-api:
    image: chirpstack/chirpstack-rest-api:4
    restart: unless-stopped
    command: --server chirpstack:8080 --bind 0.0.0.0:8090 --insecure
    ports:
      - 8090:8090
    depends_on:
      - chirpstack

  postgres:
    image: postgres:14-alpine
    restart: unless-stopped
    volumes:
      - ./configuration/postgresql/initdb:/docker-entrypoint-initdb.d
      - postgresqldata:/var/lib/postgresql/data
    environment:
      - POSTGRES_PASSWORD=******

  redis:
    image: redis:7-alpine
    restart: unless-stopped
    volumes:
      - redisdata:/data

volumes:
  postgresqldata:
  redisdata:
In the configuration/chirpstack/chirpstack.toml file, I enabled the region I was using as defined by the id in configuration/chirpstack/region_us915_1.toml. The topic_prefix in the region_*.toml file must match the topic configured in the MQTT forwarder configuration, whether in this stack or on the Dragino, here US915_1.
  # Enabled regions.
  #
  # Multiple regions can be enabled simultaneously. Each region must match
  # the 'name' parameter of the region configuration in '[[regions]]'.
  enabled_regions=[
    "us915_1",
  ]
I suggest you import and build the lorawan-devices repository. You’ll be able to select the Heltec Lora 32 device during device configuration.
When the containers are up and running using docker-compose up you can login to the ChirpStack server at your-network-host:8080.
If your configurations are correct, your gateway should show in the Tenant…Gateways dialog along with the configured region. If not, I would use MQTT Explorer or subscribe to [topic_prefix]/# to see if MQTT messages from the gateway are getting published.
Defining a device
Before defining a device in ChirpStack, you must create a Device Profile. This allows you to select a device-profile template from the lorawan-devices repository, here the HelTec WiFi LoRa 32 (V2) Class A OTAA) and US915 region.
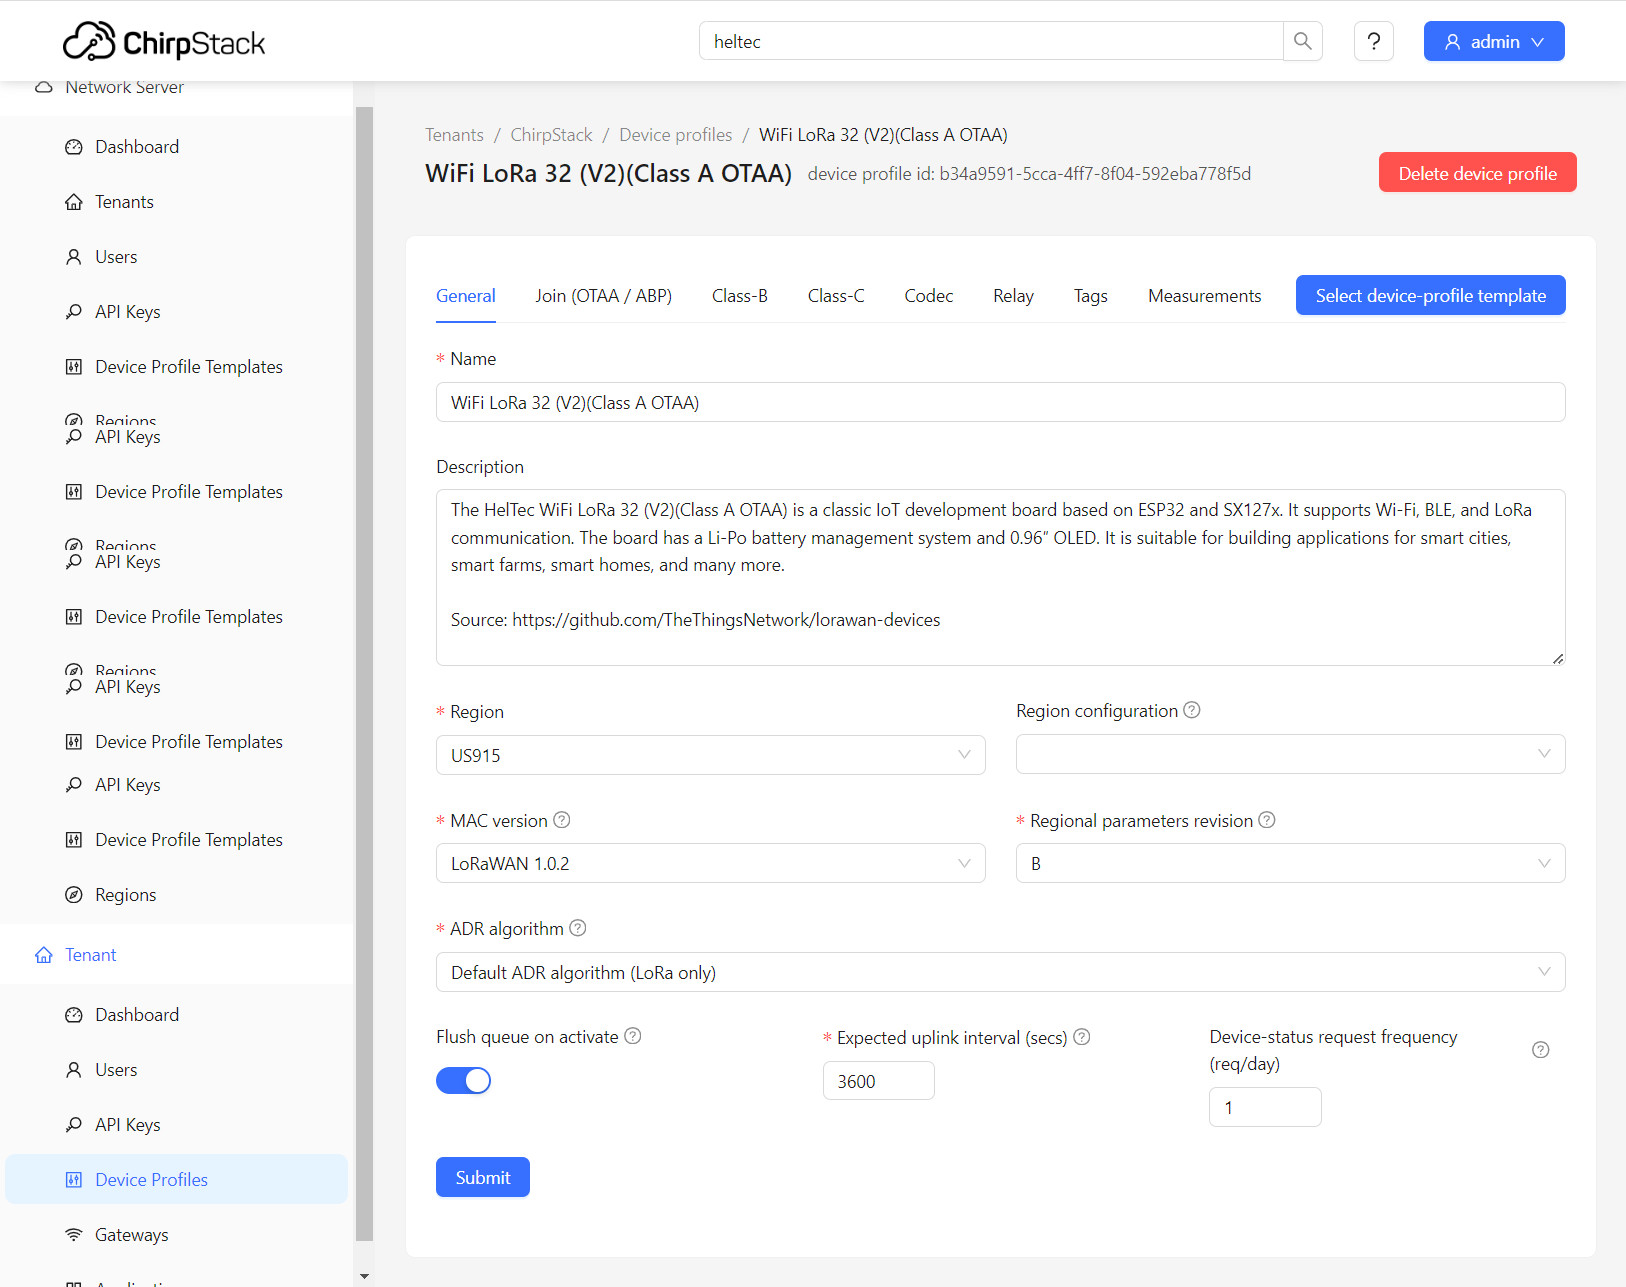
To enable a LoRa device connection, you’ll need to create an application. Clicking on the application brings up a device configuration menu. Using Add Device and the Configuration dialog, enter the Device EUI from the device’s startup console output (+DevEui=) and select WiFi LoRa 32 (V2)(Class A OTAA) as the device profile. On the OTAA keys dialog, enter the device’s application key (+AppKey=).
With the device defined in ChirpStack, the LoRa 32 should complete its OTAA handshaking with the server via the gateway and begin transmitting test packets and receiving confirmations.

Device data
The server publishes a wealth of information about each received packet on the MQTT topic application/[ApplicationID]/device/[DeviceEUI]/event/up. For example,
{
  "deduplicationId": "0ccff706-ffdd-4da2-9141-5a35c3bc0996",
  "time": "2023-10-18T13:17:57.904450+00:00",
  "deviceInfo": {
    "tenantId": "52f14cd4-c6f1-4fbd-8f87-4025e1d49242",
    "tenantName": "ChirpStack",
    "applicationId": "dcb1f7d7-9aa5-413c-a914-8c6f590c0447",
    "applicationName": "test",
    "deviceProfileId": "b34a9591-5cca-4ff7-8f04-592eba778f5d",
    "deviceProfileName": "WiFi LoRa 32 (V2)(Class A OTAA)",
    "deviceName": "second",
    "devEui": "ce7554dc00002461",
    "deviceClassEnabled": "CLASS_A",
    "tags": {}
  },
  "devAddr": "0041c462",
  "adr": true,
  "dr": 3,
  "fCnt": 74,
  "fPort": 2,
  "confirmed": true,
  "data": "AAECAw==",
  "rxInfo": [
    {
      "gatewayId": "a840411ef56c4150",
      "uplinkId": 2558570145,
      "time": "2023-10-18T13:17:57.904450+00:00",
      "rssi": -69,
      "snr": 10.2,
      "channel": 1,
      "location": {
        "latitude": 35.**********,
        "longitude": -78.*********
      },
      "context": "Q+m4Ow==",
      "metadata": {
        "region_config_id": "us915_1",
        "region_common_name": "US915"
      },
      "crcStatus": "CRC_OK"
    },
    {
      "gatewayId": "a840411ef56c4150",
      "uplinkId": 3593569903,
      "time": "2023-10-18T13:17:57.905007+00:00",
      "rssi": -69,
      "snr": 10.2,
      "channel": 1,
      "location": {
        "latitude": 35.*********,
        "longitude": -78.*********
      },
      "context": "Q+m4Ow==",
      "metadata": {
        "region_common_name": "US915",
        "region_config_id": "us915_1"
      },
      "crcStatus": "CRC_OK"
    }
  ],
  "txInfo": {
    "frequency": 904100000,
    "modulation": {
      "lora": {
        "bandwidth": 125000,
        "spreadingFactor": 7,
        "codeRate": "CR_4_5"
      }
    }
  }
}
The packet data are encoded as base64 in the “data” field, here “AAECAw==”. This is the appData array sent by the LoRaWan_OLED sketch.
Decoding device data
While I suppose it’s possible to write some type of base64 decoder in jinja2 for Home Assistant, I wanted to use the existing MQTT/JSON capabilities. ChirpStack currently provides three possible codec (coder/decoder) options: none (default), Cayenne LPP and JavaScript functions. Cayenne Low Power Payload (LPP) defines a protocol to encode sensor data types into binary format. There’s a very nice implementation for Arduino at GitHub - ElectronicCats/CayenneLPP: Library for Arduino compatible with Cayenne Low Power Payload. This library extends the original TTN Cayenne implementation to include additional sensor types.
To use the ElectronicCats codec, install the CayenneLPP by ElectronicCats and ArduinoJson libraries using the Arduino IDE. In the ChirpStack GUI, select Device Profiles and the WiFi LoRa 32 (V2)(Class A OTAA) profile. In the Codec dialog, Select JavaScript functions for the Payload codec. Cut the decoders/decoder.js script contents from the CayenneLPP source files and paste it into the Codec functions dialog box for the Codec. ChirpStack will now decode the binary data into any of the sensor types defined by the CayenneLPP implementation to JSON format.
For my testing, I attached a Ublox-7 GNSS module to the LoRa 32 to encode module position and calculate the distance to home. My prepareTxFrame in a modified LoRaWan_OLED sketch looks like:
static void prepareTxFrame( uint8_t port )
{
  gnss_acquire();

  CayenneLPP *lpp = new CayenneLPP( LORAWAN_APP_DATA_MAX_SIZE );

  lpp->reset();
  lpp->addGPS( 1, lat, lon, alt/1000 );
  lpp->addDistance( 2, acc );
  lpp->addDistance( 3, dist * 1000 );
  lpp->addDigitalOutput( 4, ( digitalRead( LED_PIN ) == HIGH ? 1 : 0 ));

  appDataSize = lpp->copy( appData );

  delete lpp;
}
I encoded the GPS data, horizontal accuracy, distance to home and the state of the white LED (GPIO35) on the LoRa 32 module. ChirpStack decodes the payload data and publishes an additional object field:
  "data": "AYgFeoXz+HcAHLUCggAAhNADggAAXnoEAQA=",
  "object": {
    "digital_out_4": 0,
    "gps_1": {
      "latitude": 35.****,
      "altitude": 73.49,
      "longitude": -78.****
    },
    "distance_2": 34,
    "distance_3": 24.186
  },
In Home Assistant, I defined the MQTT sensor and device tracker:
mqtt:
  sensor:
    - name: "LoRa 1 Distance"
      state_topic: "application/dcb1f7d7-9aa5-413c-a914-8c6f590c0447/device/9ffa12f40000bcfa/event/up"
      value_template: "{{ value_json.object.distance_3  | round(0) }}"
      unit_of_measurement: "m"
  device_tracker:
    - name: "LoRa 1"
      unique_id: "9ffa12f40000bcfa"
      json_attributes_topic: "application/dcb1f7d7-9aa5-413c-a914-8c6f590c0447/device/9ffa12f40000bcfa/event/up"
      json_attributes_template: "{ \"latitude\": {{ value_json.object.gps_1.latitude }}, \"longitude\": {{ value_json.object.gps_1.longitude }}, \"gps_accuracy\": {{ value_json.object.distance_2 }} }"
Encoding device data
How about sending data to the LoRa module? That proved a bit more difficult. The ChirpStack codec needs to define a function called encodeDownlink that converts JSON data into a byte array, just the opposite of the decodeUplink function. ElectronicCat’s library doesn’t provide an encoder. I couldn’t find a good example of an encoding function. And it wasn’t clear if the function’s input was a JSON-formatted string or an already converted JSON object.
The ChirpStack developers implemented the stack in Rust but embedded quickjs to handle the JavaScript codecs. From code inspection, I discovered that the encodeDownlink is supplied with a JsonObject of the data to be encoded. For quickjs, that can only be an object, not an array, so I had to add an additional object to the JSON data which defines the array.
// Encode downlink function.
//
// Input is an object with the following fields:
// - data = Object representing the payload that must be encoded.
// - variables = Object containing the configured device variables.
//
// Output must be an object with the following fields:
// - bytes = Byte array containing the downlink payload.
//
// our data looks like: {"array":[{"channel":4,"name":"digital_out","value":1}]}

function encodeDownlink(input) {

  var i = 0;
  var output = [];

  input.data.array.forEach(( item ) => {

    switch ( item.name ) {
      case "digital_out":
        item.type = 1;
        break;
      default:
        item.type = 255;
        break;
    }

    output[i++] = item.channel;
    output[i++] = item.type;
    output[i++] = item.value;

  });

  return {
    bytes: output
  };
}

// test the ChirpStack decoder using quickjs interpreter
//
//const input = { "data": {"array":[{"channel":4,"name":"digital_out","value":1}]} };
//var result = encodeDownlink(input);
//print (JSON.stringify( result ));
Testing the encoder in ChirpStack can be a bit tedious. There was also an issue in ChirpStack V4 at the time of this writing that prevented updating the JavaScript in the codec so the device profile needed to be re-created each time. To test the encoder, I built and installed quickjs in Linux. It comes with a command-line interpreter. The encodeDownlink function can be tested using the interpreter by uncommenting the code at the end.
In the device’s sketch, I added the decoder:
void decodeDownlinkMsg( uint8_t *buf, uint8_t bufsize, uint8_t port )
{
    StaticJsonDocument<256> jsonBuffer;
    CayenneLPP lpp(0);

    JsonArray array = jsonBuffer.to<JsonArray>();
    lpp.decode( buf, bufsize, array );

    for ( JsonObject item : array ) {

      int lpp_type = item["type"];
      switch ( lpp_type )
      {
        case LPP_DIGITAL_OUTPUT:

          if ( item["channel"] == 4 )
          {
            int setval = LOW;
            if ( item["value"] == 1 )
            {
              setval = HIGH;
            }
            gpio_hold_dis( (gpio_num_t )LED_PIN );
            gpio_deep_sleep_hold_dis();
            digitalWrite( LED_PIN, setval );
            gpio_deep_sleep_hold_en();
            gpio_hold_en( (gpio_num_t )LED_PIN );
          }
          break;

        default:
          break;
       }
    }
}

void downLinkDataHandle(McpsIndication_t *mcpsIndication)
{
	printf("+REV DATA:%s,RXSIZE %d,PORT %d\r\n",mcpsIndication->RxSlot?"RXWIN2":"RXWIN1",mcpsIndication->BufferSize,mcpsIndication->Port);
	printf("+REV DATA:");
	for(uint8_t i=0;i<mcpsIndication->BufferSize;i++)
	{
		printf("%02X",mcpsIndication->Buffer[i]);
	}
	printf("\r\n");
  if ( mcpsIndication->RxData )
  {
    decodeDownlinkMsg( mcpsIndication->Buffer, mcpsIndication->BufferSize, mcpsIndication->Port );
  }
}
ChirpStack subscribes to application/[ApplicationID]/device/[DeviceEUI]/command/down topics to receive data destined for the devices. The topic payload is similar to this:
{
  "devEui": "9ffa12f40000bcfa",
  "confirmed": true,
  "fPort": 4,
  "object": {
    "array": [
      {
        "channel": 4,
        "name": "digital_out",
        "value": 1
      }
    ]
  }
}
In Home Assistant, I defined an MQTT switch:
mqtt:
  switch:
    - name: "LoRa 1 Switch"
      unique_id: "9ffa12f40000bcfa-5"
      command_topic: "application/dcb1f7d7-9aa5-413c-a914-8c6f590c0447/device/9ffa12f40000bcfa/command/down"
      state_topic: "application/dcb1f7d7-9aa5-413c-a914-8c6f590c0447/device/9ffa12f40000bcfa/event/up"
      value_template: "{{ value_json.object.digital_out_4 | int }}"
      payload_on: "{ \"devEui\": \"9ffa12f40000bcfa\", \"confirmed\": true, \"fPort\": 4, \"object\": { \"array\": [{\"channel\": 4, \"name\": \"digital_out\", \"value\": 1}] }}"
      payload_off: "{ \"devEui\": \"9ffa12f40000bcfa\", \"confirmed\": true, \"fPort\": 4, \"object\": { \"array\": [{\"channel\": 4, \"name\": \"digital_out\", \"value\": 0}] }}"
      state_on: 1
      state_off: 0
The command is not delivered to the device until its next wakeup.
Results
I was able to get consistent data transfer within 200 meters of my house even with trees and other wooden structures obstructing the line of sight. Acknowledgments became more sporadic beyond 200 meters. The best I was able to achieve was about 1 km with a line of sight free of obstructions. Better antennas and an outdoor one at home would probably help. The LoRa 32’s battery connection was handy for making a portable test device.

I expect some enterprising developer will create a LoRaWAN integration at some point much like zwavejs or zigbee. ChirpStack has an extensive REST API but I haven’t explored that yet.
