Just (another) Big clock

I was asked to share the code on my big clean clock. :thinking: (somehow that sounded wrong)

Here it goes.

First make sure to create a few template sensors in your configuration.yaml.

- platform: template
  sensors:
    week_day:
      value_template: "{{ now().strftime('%A')}}"
    current_date:
      value_template: "{{ now().strftime('%d')}} {{ now().strftime('%B')}} {{ now().strftime('%Y')}}"

Then you create a Picture Element in Lovelace

elements:
  - entity: sensor.time
    style:
      font-family: ANY COOL COLOR
      color: '#EAC117'
      # WAIT WHAT? OPACITY? COOL!
      filter: opacity(60%)
      font-family: ANY COOL FONT
      font-size: 1000%
      left: 50%
      top: 56%
      pointer-events: none
      # USE THIS TO BRING THE ITEM FRONT OR MOVE IT BACK IN LAYERS.
      z-index: 0
    type: state-label
  - entity: sensor.week_day
    style:
      filter: opacity(30%)
      font-family: ANY FONT YOU LIKE AND UPLOADED IN RESOURCES
      font-size: 500%
      left: 43%
      pointer-events: none
      text-shadow: 0px 0px 80px black
      top: 20%
      z-index: 1
    type: state-label
  - entity: sensor.current_date
    style:
      filter: opacity(100%)
      font-family: ANY FONT YOU LIKE AND UPLOADED IN RESOURCES
      font-size: 280%
      left: 50%
      top: 33%
      pointer-events: none
      z-index: 2
    type: state-label
image: '/local/ANY_PICTURE_YOU_WANT_WITH_TRANSPARANCY.svg'
type: picture-elements

And to top it all off add this to your automation

automation:
  - alias: 'update template date sensors'
    trigger:
      - platform: time
        at: '00:01:00'
    action:
      - service: homeassistant.update_entity
        entity_id: sensor.current_date, sensor.week_day

This ensures your template sensor is updated every night one minute after twelve.

Aaaaaaand your done. That’s it.

Now you can also go and do stuff like add Temperature etc. etc. and shift that around with left and top.

  - entity: sensor.temperature_your_location
    style:
      color: '#FFFFFF'
      font-family: SOME COOL FONT
      font-size: 17px
      left: 87%
      pointer-events: none
      text-shadow: 0px 0px 40px black
      top: 11%
    type: state-label
  - conditions:
      - entity: weather.your_location
        state: sunny
    elements:
      - image: >-
          http://Local_IP:8123/local/lovelace/images/assets/weather/sunny.svg
        style:
          filter: opacity(100%)
          left: 76%
          pointer-events: none
          text-shadow: 0px 0px 40px black
          top: 12%
          width: 9%
          z-index: 0
        type: image
    type: conditional
  - image: >-
      http://local_IP/local/lovelace/images/assets/weather/thermometer.svg
    style:
      left: 95%
      pointer-events: none
      top: 18%
      width: 4%
    type: image

This you would simply add.

You can play around with things like Text Shadow, backgrounds and what not. Limit is your imagination really.

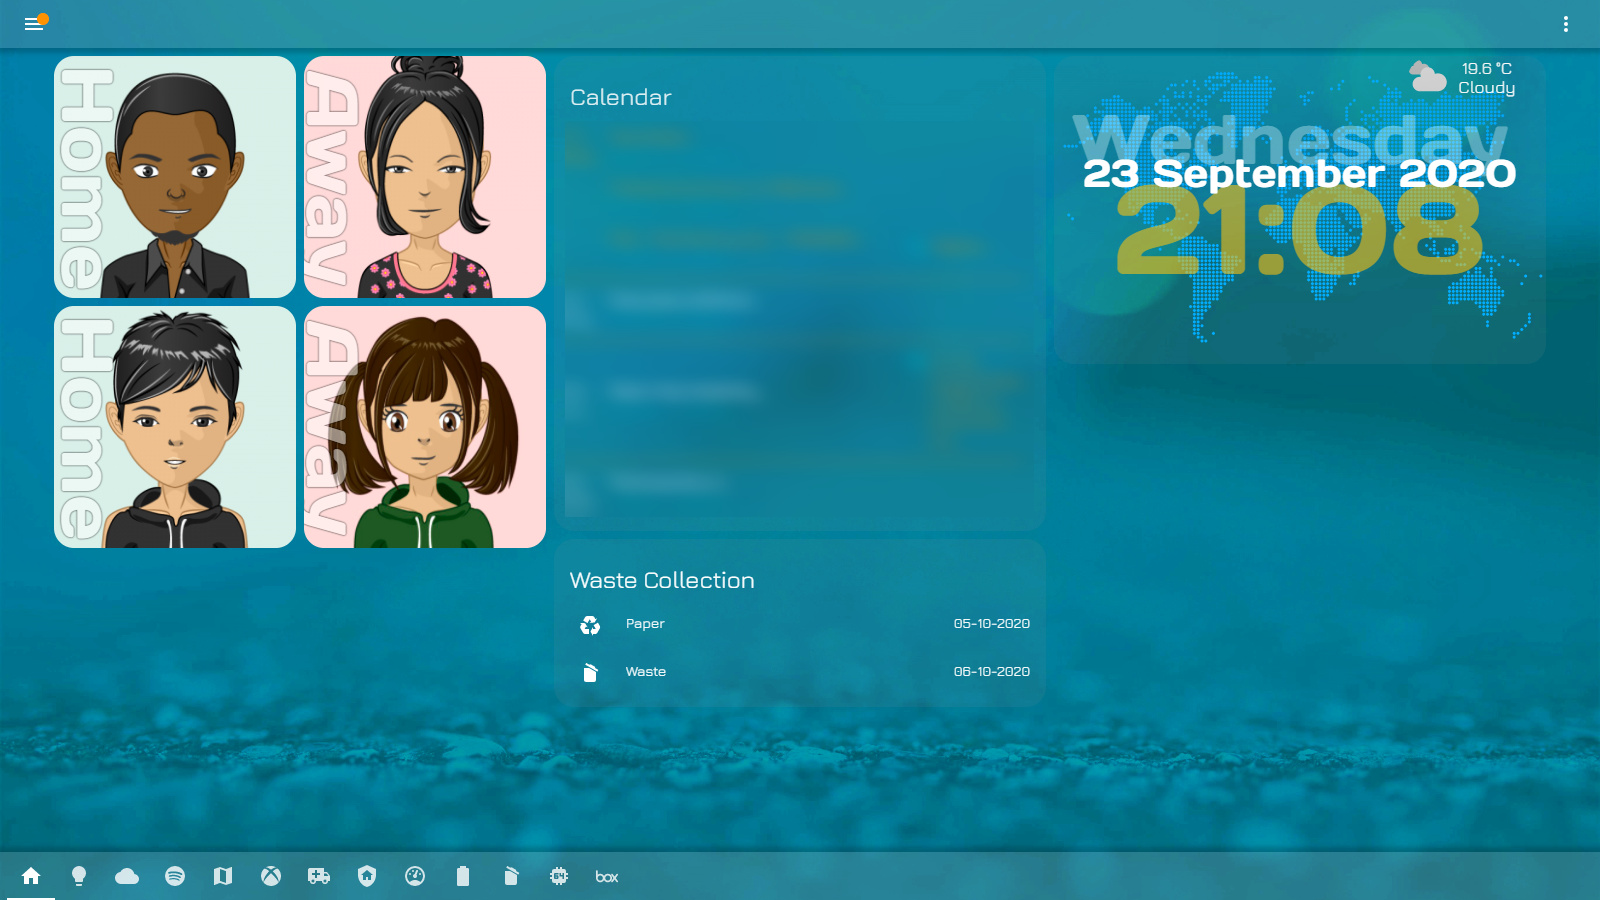
Here is what I have been playing around with.

You can also go big and do panel mode

elements:
  - entity: sensor.time
    style:
      color: '#EAC117'
      filter: opacity(60%)
      font-family: SOME COOL FONT
      font-size: 24vw
      left: 50%
      #THIS IS WHERE YOU PLAY WITH TEXT SHADOW
      text-shadow: 0px 0px 100px black
      pointer-events: none
      top: 50%
      z-index: 0
    type: state-label
  - entity: sensor.current_date
    style:
      filter: opacity(100%)
      font-family: SOME COOL FONT
      font-size: 6vw
      left: 50%
      #THIS IS WHERE YOU PLAY WITH TEXT SHADOW
      text-shadow: 0px 0px 0px black
      pointer-events: none
      top: 32%
      z-index: 2
    type: state-label
  - entity: sensor.week_day
    style:
      filter: opacity(30%)
      font-family: SOME COOL FONT
      font-size: 12.5vw
      left: 46%
      pointer-events: none
      #THIS IS WHERE YOU PLAY WITH TEXT SHADOW
      text-shadow: 0px 0px 80px black
      top: 22%
      z-index: 1
    type: state-label
image: 'ANY TRANSPARENT BACKGROUND IMAGE'
type: picture-elements
18 Likes

I love your huge clock (I see what you mean about that sounding wrong).

But seriously… that is awesome!

3 Likes

:rofl: Thanks

And seriously if I can help I will. That is what this forum is about. Sharing the knowledge and making awesome stuff.

2 Likes

I absolutely love your clock. Anyway to dumb it down for an HA noob that isn’t at all comfortable with the YAML configurations?

A worthy clock is the key thing missing from Lovelace…

It’s basically copy and paste work. You need help?

1 Like

Sorry, I guess I should look at some basic information on how the YAML works, but specifically the parts that I know I need to do myself are below. Perhaps if you shared more of your specific configuration (without editing out the variables that I change) it would help?

for the “SOME COOL FONT” and “ANY TRANSPARENT BACKGROUND IMAGE” - I am assuming I need to do these myself which I do not know how to do at this point. I can figure the other customizable parts out.

Ahh okay. Let’s see. The “SOME COOL FONT” part.

Say for instance you added “Days One” font in resources.

Then you could decide to use that cool font as…“SOME COOL FONT” like this :smiley:

  - entity: sensor.time
    style:
      color: '#EAC117'
      filter: opacity(60%)
      font-family: Days One
      font-size: 900%
      left: 50%
      pointer-events: none
      top: 56%
      z-index: 2

For the transparent background bit simply create a transparent background svg image file and name it…transparent.svg or use any svg image you like. Place that in the www folder of your HA instance and you can then add it in your picture-elements card.

image: '/local/ANY_PICTURE_YOU_WANT_WITH_TRANSPARANCY.svg'

1 Like

Awesome, thank you. This gave me a good starting point and looks like I’ll be learning a few things. Thank you, again.

No problem. I posted it so one can simply copy and paste changing it to one’s needs. Happy coding. :+1:

1 Like

Could you please share that background image you use for the clock? (the world map)

1 Like

I know this is slightly off topic but hopefully I get some pointers…
I have created a clock (thanks @dennisaion) and it looks great on a web browser / iPhone App, but when casted on a Nest Hub the font reverts to some boring default / standard.
Anyone has an idea on how to set the font on a nest hub?

1 Like

Here you go https://pbs.twimg.com/media/Dm5NXX7XoAAb7IN?format=png&name=4096x4096

1 Like

Do you work with themes in HA? If so are the fonts that are loaded with the Themes also reverted to standard?

Thanks for your reply.
Yes I use themes, but the fonts are defined on the lovelace card, not in the theme as I only use it for the clock, not as a generic . generic font
I also selected the fonts on the basis that they were supposed to be web safe (reference):

  • Candara
  • Brush Script MT
  • Cambria
    What am I missing?

Have looked at this

https://developers.google.com/cast/docs/web_receiver/basic

and this

https://developers.google.com/cast/docs/web_receiver/customize_ui

I think you should look at creating a copy of your dashboard and start refactoring it according to above guidelines. Then use that dashboard with seperate user account for your Nest Hub.

I will get one myslef to test this but looks to me like best solution.

Thanks. Had a quick look from my phone and I think I need a bigger screen to go through it in details :wink:

no problem :+1:

Thanks again for your help. Not had time to dig into this in detail. Just wondering why you suggest using a separate user?

Hi!
I have problems with adding the first templates in config.yaml. I really like this clock, but i just can’t add the coding :frowning:

I want to say thank you for providing this. This is a great clock and addition to my Home Assistant. :star_struck: