Klarstein Wonderwall integration

No conversion, but if you have the connector for the esp board it should be easy, depends if the green board with tuya mcu is the same

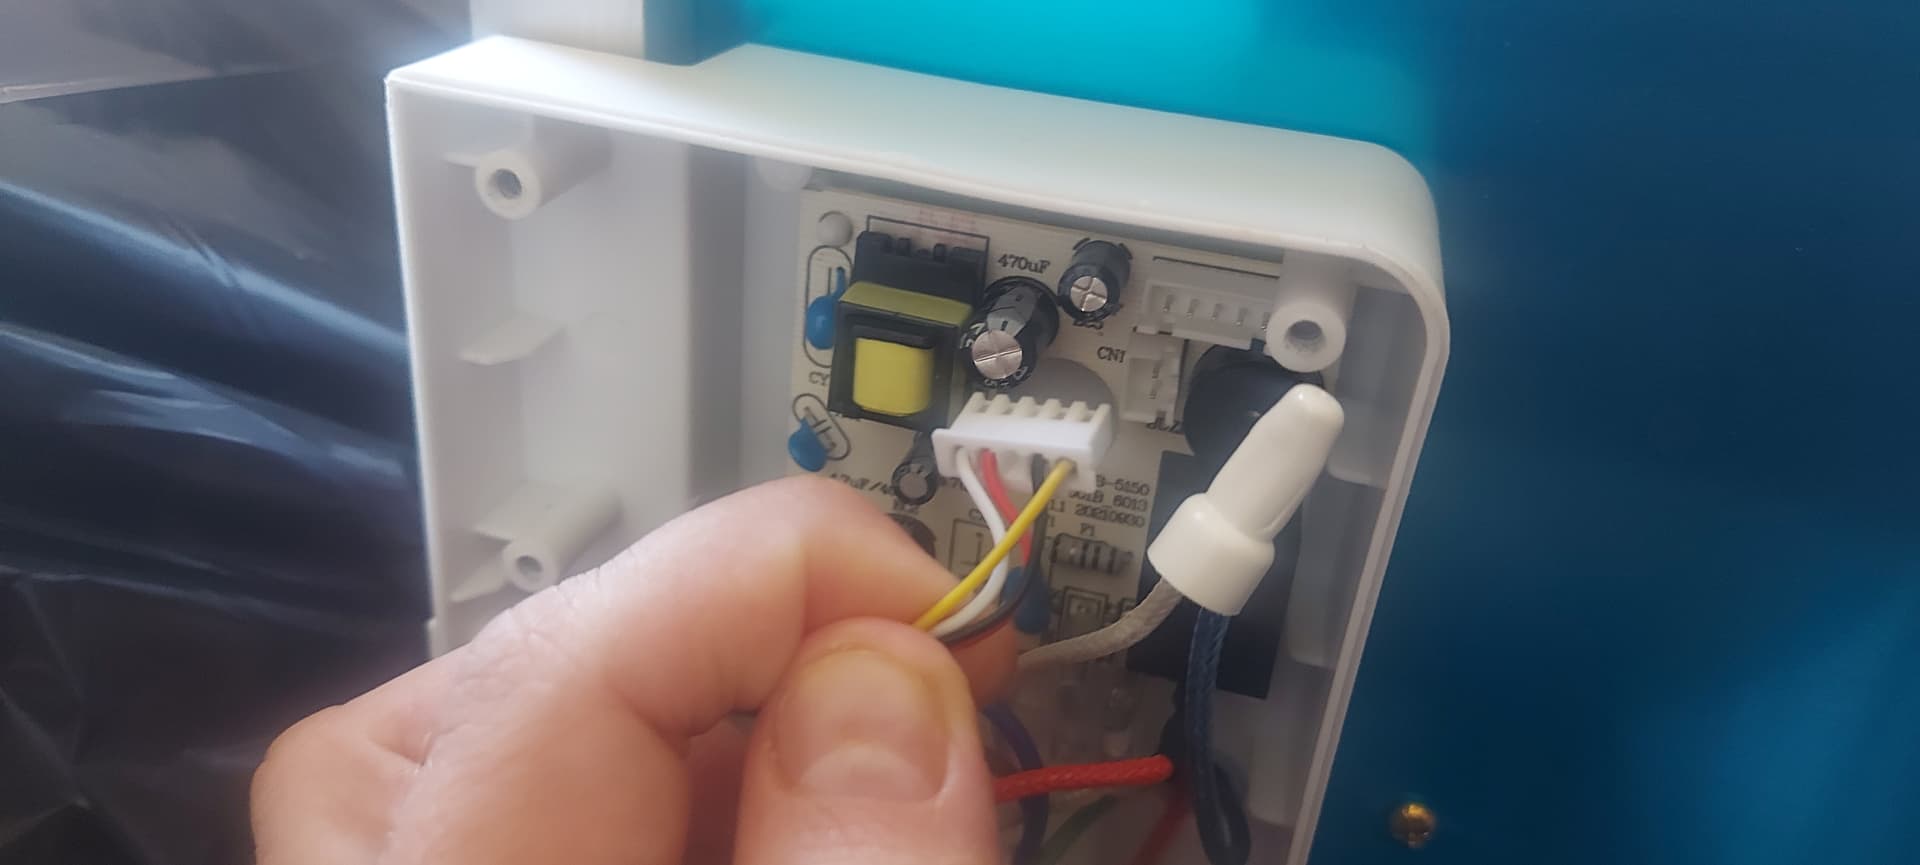
I’m posting this sou get the idea how wifi version insides look. Tuya board is just connected using UART to the green board IR and front panel is also connected to the green board.

No worries, thanks for responding!
Ihave managed to register it as a Tuya device in their app. So I should be able to pick it up in HA under the Tuya integration - It’s not working for me right now but I’ll get there.
That should allow me to automate the power on and leave it plugged in I guess.

The EspHome stuff looks difficult and scary to me :smiley:

Hey guys, did anyone manage to integrate the Wonderwall without using Tuya?

There might be a way by rewiring it with an ESP32.

I don’t have soldering iron so I don’t even try to look at the board

at a glance m5stack atom s3 lite seems to be pin compatible replacement

Not plug and play sadly,


same pitch, both JST based, but different connector

It is however possible to use connector included with athom s3 lite that plugs directly into the existing board, no soldering required

In the end to make the connection nicer I used smallest(?) molex connector to connect on the board side, still on the image above is easy non soldering solution

This is the config I used, kind of a mess, it would be perfect if someone skilled in c++ created PR for the enum eco datapoint klarstein uses

substitutions:
  hostname: eh
  device_id: eh
  device_name: eh
  comment:  M5Stack atom s3 lite, ESP32s3

esphome:
  name: ${hostname}
  comment: ${comment}
  platformio_options:
    board_build.flash_mode: dout
    board_build.extra_flags:
      - "-DARDUINO_USB_MODE=0"
      - "-DARDUINO_USB_CDC_ON_BOOT=1"
  # on_boot:
  #   priority: 300
  #   then:
  #     - light.turn_on:
  #         id: status_led
  #         brightness: 20%
  #         red: 0%
  #         green: 100%
  #         blue: 0%   

esp32:
  board: esp32-s3-devkitc-1
  framework:
    type: esp-idf
    #platform_version: 5.3.0
    #version: 4.4.3
    sdkconfig_options:
      CONFIG_BT_BLE_42_FEATURES_SUPPORTED: y
      CONFIG_BT_BLE_50_FEATURES_SUPPORTED: y
      
logger:
  level: VERBOSE
  logs:
    bluetooth_proxy: DEBUG
    esp32_ble: DEBUG
    tuya: VERBOSE
    json: DEBUG
    sensor: DEBUG

api:
ota:  

wifi:
  ssid: !secret wifi_ssid
  password: !secret wifi_password
  ap:
    ssid: "${hostname} Fallback"

button:
  - platform: restart
    name: "${device_name} Restart"
    icon: "mdi:restart"

sensor:
  - platform: wifi_signal
    name: "${device_name} WiFi Signal"
    update_interval: 10s
    id: wifi_signal_db
    icon: "mdi:wifi"
  - platform: uptime
    name: "${device_name} Uptime"
    update_interval: "600s"
    entity_category: "diagnostic"
    icon: "mdi:clock-outline"

text_sensor:
  - platform: version
    name: "${device_name} ESPHome Version"
    hide_timestamp: true
    icon: "mdi:numeric"
  - platform: wifi_info
    ip_address:
      name: "${device_name} IP Address"
      disabled_by_default: False
      icon: "mdi:wifi-settings"
    mac_address:
      name: "${device_name} MAC"
      icon: "mdi:wifi-marker"
    scan_results:
      name: "${device_name} last wifi scan"
      icon: "mdi:wifi-sync"
############################################################################

# https://github.com/esphome/esphome/blob/dev/esphome/components/tuya/climate/tuya_climate.cpp
# on power on if temp is 25 AND state is OFF set temp 15 [power on after power loss]
# when off and temp is changed = return previous temp (ignore temp change from HA when mode is off)
tuya:
  on_datapoint_update:
    - sensor_datapoint: 7
      datapoint_type: raw
      then:
        - lambda: |-
            ESP_LOGD("main", "tuya %s", format_hex_pretty(x).c_str());

uart:
  rx_pin: GPIO01
  tx_pin: GPIO02
  baud_rate: 9600
  debug:
    direction: BOTH
    dummy_receiver: false
    after:
      delimiter: "\n"
    sequence:
      - lambda: UARTDebug::log_hex(direction, bytes, '.');

external_components:
  - source: github://evlo/esphome-External-Components
    components: [tuyaClimateEcoEnum]
    refresh: 1s
  - source: github://pr#3500
    components:
      - web_server
      - web_server_idf
      - web_server_base
      - captive_portal
    refresh: 100days

climate:
  - platform: tuyaClimateEcoEnum
    supports_heat: true
    supports_cool: false
    name: eh-tuya
    switch_datapoint: 1
    target_temperature_datapoint: 3  # min 5 - max 40
    current_temperature_datapoint: 4
    eco_datapoint: 7 #Low, Hight
    #eco_temperature: 15 # °C
    visual:
      min_temperature: 5
      max_temperature: 40
      temperature_step: 1
#childlock datapoint 2
#timer datapoint 5

bluetooth_proxy:
  active: true

# light: 
#   - platform: neopixelbus
#     num_leds: 1
#     variant: WS2812B
#     pin: GPIO35
#     id: onboard_rgb
# light:
#   - platform: fastled_clockless
#     chipset: WS2812B
#     pin: 35
#     num_leds: 1
#     rgb_order: GRB
#     id: status_led
#     name: ${hostname} RGB LED

# binary_sensor:
#   - platform: gpio
#     pin:
#       number: 41
#       inverted: true
#     name: ${hostname} Button
#     on_press:
#       then:
#         - light.toggle: status_led


web_server:
1 Like

Hi guys. I have a Klarstein wonderwall 960 panel with wire thermostat. I would like to disassembly unlink the wire thermostat and controlling with 230v Ac smart connector or relay the panel direct. Anybody know the thermostat wire pinouts?

No, but in case of connection from “smart interface” to the control panel it is white RX, yellow TX, black GND and red 5v. Maybe thermostat works with the same connection using “tuya datapoints” protocol?

You can start by measuring voltages and then you can safely connected uart to usb interface, or esphome with uart component and look what traffic is going on.

Thanks. it’s a good informatikn for me. I will disassembly the thermostat box and check content.

@munkacsy2914 , any success allready to get this working? I have the same panel and would like to get better in control of it as well.
I’m known to ESPHome, not to Tuya unfortunately

I’m also keen to flash this device and make it a bit more useful. It is currently working “ok-ish” through Tuya but not where I want it to be. Does anyone have a wirte-up on how well it behaves with ESPhome and how complicated it would be to do? @evlo perhaps you can share a little more of your experiences?

(I think Tuya alone has done more harm than good to the smart home world with their platform tbh)

Not much more I can share
from what i remember even in iot.tuya.com i would see gibberish text, not json data

As you can see here I created hacky way to handle eco switch, it works, but throws warnings, it would be perfect if someone would create pullrequest that detects eco enum / bool data type.

but everything works, expect the timer integrated in device, which i did not care about Tuya Climate — ESPHome

I’m not sure whether I understand it correctly. This means that somehow you connect the Tuya chip physically to an ESP32 chip, eg Wemos?
I might be totally wrong, but I’m not familar in the Tuya environment, so for me it is a bit hard to grasp

Well tuya mcu is not tuya chip with wifi etc, it is just chip on the board, that communicates with tuya, and yes, to me it did not make much sense, I think easiest to think about tuya board / “chip” only as wifi interface.

So the wifi interface communicates with the board itself and for that protocol on UART called tuya mcu is used. Probably easiest to think about it like that.

So you replace tuya wifi interface with wemos.

Thanks for the guidance, I now understood that I can also integrate the panel using the Tuya cloud. For the ones that want to do the same with the Wunderwall Heat panel

  • Don’t use the Wunderwall app, but use the Tuya Smart app instead. Create an account
  • Follow the instructions to add the panel to the wifi, using the slow led blinking mode (long press the M button on the panel). I was not able to select a IR heating panel in the Tuya app, so I just choose another wifi heating device, and that worked
  • Create a Tuya IoT platform account (this is another account to be created) and link it to the tuya app and integrate to HA following these instructions: Tuya - Home Assistant

And there it is: my wunderwall panel to be controlled through the HA interface

I’m looking for the same product

I don’t have tools, I tried to open the remote but I guess it needs to be heated or broken to be opened.

I thought that there was a power line for the remote and a contractor on wired on the two other pins but it doesn’t seem to be the case.

I first thought that a jumper might put the heating in always on state then control it by a smart plug

I don’t seen any MCU on the board I can’t see the other side

If my guess is right the pins are (not in order)

  • +5V
  • GND
  • On state signal
  • Buzzer power

Hey, yes I did. Had to take a subscription to the HA cloud, but I saved some money in dumping the Homey account. Just follow the steps.
Shows up nicely on the dashboard but current temperature is incorrect. 1,6 °C instead of 16°C. Some solution?