@SpikeyGG can you share your config i tried to do the same with esphome but the sensors work for a minute or two and stop updating and i get error that i2c: is disconnected or did not communicate with the sensor
thank you
Sure thing, here’s the latest one I’m using I corrected it for the small offset seen in the washer plots above (I’m anal):
esphome:
  name: laundry
  platform: ESP8266
  board: nodemcuv2

wifi:
  ssid: "MySSID"
  password: "MyPASSWORD"
  domain: ".mydomain"

logger:
  level: DEBUG

api:
  password: 'apiPASSWORD'

ota:
  password: 'otaPASSWORD'

i2c:
  sda: 4
  scl: 5
  scan: True

sensor:
  - platform: mpu6050
    update_interval: 15s
    address: 0x68
    accel_x:
      name: "Dryer Accel X"
      filters:
        - offset: -0.55
        - or:
          - throttle: 60s
          - delta: 1.0
    accel_y:
      name: "Dryer Accel Y"
      filters:
        - offset: -9.62
        - or:
          - throttle: 60s
          - delta: 1.0
    accel_z:
      name: "Dryer Accel Z"
      filters:
        - offset: 0.38
        - or:
          - throttle: 60s
          - delta: 1.0
    gyro_x:
      name: "Dryer Gyro X"
      filters:
        - offset: 1.77
        - or:
          - throttle: 60s
          - delta: 1.0
    gyro_y:
      name: "Dryer Gyro Y"
      filters:
        - offset: -1.83
        - or:
          - throttle: 60s
          - delta: 1.0
    gyro_z:
      name: "Dryer Gyro Z"
      filters:
        - offset: 2.10
        - or:
          - throttle: 60s
          - delta: 1.0
    temperature:
      name: "Dryer Temperature"
      filters:
        - throttle: 60s
  - platform: mpu6050
    update_interval: 15s
    address: 0x69
    accel_x:
      name: "Washer Accel X"
      filters:
        - offset: -0.96
        - or:
          - throttle: 60s
          - delta: 1.0
    accel_y:
      name: "Washer Accel Y"
      filters:
        - offset: -1.04
        - or:
          - throttle: 60s
          - delta: 1.0
    accel_z:
      name: "Washer Accel Z"
      filters:
        - offset: -8.81
        - or:
          - throttle: 60s
          - delta: 1.0
    gyro_x:
      name: "Washer Gyro X"
      filters:
        - offset: 2.21
        - or:
          - throttle: 60s
          - delta: 1.0
    gyro_y:
      name: "Washer Gyro Y"
      filters:
        - offset: 2.75
        - or:
          - throttle: 60s
          - delta: 1.0
    gyro_z:
      name: "Washer Gyro Z"
      filters:
        - offset: 2.37
        - or:
          - throttle: 60s
          - delta: 1.0
    temperature:
      name: "Washer Temperature"
      filters:
        - throttle: 60s

binary_sensor:
  - platform: gpio
    device_class: door
    name: "Dryer Door"
    pin:
      number: D7
      inverted: True
      mode: INPUT_PULLUP
  - platform: gpio
    device_class: door
    name: "Washer Door"
    pin:
      number: D8
      inverted: True
      mode: INPUT_PULLUP
One thing I might do differently if I was doing this from scratch is not use the D8 pin. I’ve found that my device can be a bit finicky to power up sometimes and I think it’s because of the use of D8. According to “TheHookUp”: https://www.youtube.com/watch?v=7h2bE2vNoaY if you use D8 and it’s pulled high during boot, the ESP8266 will fail to boot. I think I’m experiencing this with the washer door. D6 or D5 would be better choices for that according to the video. Anyway, beside that, the device works FANTASTICALLY.
1 Like
I’ve built a sensor myself and stuck it to my washer and dryer, which are stacked on top of each other. I don’t care to differentiate them, just know that one is running. However, my values seem to drift over time. So after calibrating, the offset would have to be changed. I assumed that this could be related to temperature, but in that case I would also assume that it would return to normal after cooling off. Seen anything similar? Here’s a simple graph:

All sensors were aligned nicely around zero a couple hours prior.
Depending on how sensitive your accelerometer is, the vibrations from a washing/drying can cause the position of the appliance to change enough to change the readings. Additionally, accelerometers are not perfect.
Instead of focusing on calibration to exactly ZERO and getting it to stay there, I’d focus on getting close to zero and using BIGGER changes in X,Y,Z to suggest movement/vibration. The only time you’d need to know the actual X,Y,Z is if you were using this to detect a door opening or something.
Base your sensor on the idea that the X,Y,Z have changed since your last reading, as opposed to what they have changed to.
Yes, makes sense. So maybe it’s better to just look at the delta between current and previous reading, and use that as a value instead? In that case, calibrating to zero is more or less not needed too.
1 Like
thank you for you help im sorry i did not replay before i was out of the state for work
i have the sensor working thanks again
2 questions do you place the sensor on top of the dryer or on the side ?
do you use a template sensor to process the data that comes out on the mpu6050 sensor to know if it is on or off ?
if you dont mind posting the sensor config thanks again
i dont know anything about templates any help is greatly appreciated
Hi Kem, I have posted all the required config files onto this thread: Laundry Sensors with NodeMCU and Home Assistant - #19 by SpikeyGG. I did use template sensors to set the state of the washer/dryer, it’s also in the list of config files, called laundry_sensors.yaml.
I put both sensors on the back of the washer and dryer toward the top so I could easily reach the doors between the two units for the reed switches. I used caulking to adhere a piece of fridge magnet I cut to the bottom of the PCB. It wasn’t nearly strong enough to hold the device to the washer/dryer so I used more caulk to glue four neodymium magnets to the corners of that. They stick pretty good now.
Here are some photos I just snapped of my setup.


1 Like
awesome thank you again
SpikeyGG seriously thank you you made this really easy  i copy and pasted your esphome code and just changed D8 to something, as well as adjusted the offsets and it works great. i ended up using the gyro as the accel sensors weren’t working too well.
i used your templates too for the sensors and they worked great as well.
i did up a simple automation in node-red for the actual laundry stuff and it works fantastic. it basically waits for washer to turn on…once on it waits for 1 minute. if laundry sensor stays “on” for that entire minute it sets input boolean “stage1” to on. once laundry turns off (end of first rinse cycle), it waits again and when back on it sets stage2. once that turns off (if stage1 and 2 are on) it sends the notification and resets the booleans 
I can finally get rid of the last piece of my old smartthings setup!
1 Like
Thank you for sharing your project! Would you please answer the following questions?
Why is that you need to connect 3V from the MCU to the ADO of the second MPU-6050? Could you connect the 5V instead of the 3V?
Thank you in advance
If the mpu-6050 supports 5v then sure, you should be able to
Even thought I really like seeing all the raw stats for the washer and dryer solution, I didn’t like how all the decision making was pushed to Home Assistant. I always felt like this was a cop-out when I should have written the ESPHome solution to determine the state of the washer and dryer… so I did!
The benefit of this is that it’s independent of the position of the MPU6050. Previously, I had painstakingly calibrated all my dimensions (accel_x, accel_y, accel_z, gyro_x, gyro_y, gyro_z for both dryer and washer!!). Now the solution is independent of the actual value because it watches for a difference of 1 on accel (movement). I’ve tested it for the last few days and it works great.
This solution keeps all the raw accel and gyro values behind the scenes (saving on database size) but you can always send them out if you want to. I figure: as long as it’s working correctly, no need to send out the raw data.
I use a set of globals to temporarily store the difference from the current value of the accel to the last value. The vibration template binary sensor takes those deltas and checks them against the threshold (in my case 1.0). If they’re all less than the threshold: no vibration and the unit is idle. If any of them is more than the threshold: there is vibration and the unit is working.
The text sensor was added so I could set the state. I wanted to include the door in the calculation like I did previously but I haven’t been able to get it to work the way I want it to and it doesn’t appear that I need it. If you happen to play around with this and find a way to improve it, please share back.
globals:
  - id: dryer_delta_accel_x
    type: float
  - id: dryer_delta_accel_y
    type: float
  - id: dryer_delta_accel_z
    type: float
  - id: washer_delta_accel_x
    type: float
  - id: washer_delta_accel_y
    type: float
  - id: washer_delta_accel_z
    type: float

i2c:
  sda: 4
  scl: 5
  scan: True

sensor:
  - platform: mpu6050
    update_interval: 0.25s
    address: 0x68
    accel_x:
      accuracy_decimals: 1
      name: "Dryer Accel X"
      id: dryer_accel_x
      internal: true
      filters:
        - lambda: |-
            id(dryer_delta_accel_x) = fabsf(id(dryer_accel_x).state - x);
            return(x);
    accel_y:
      accuracy_decimals: 1
      name: "Dryer Accel Y"
      id: dryer_accel_y
      internal: true
      filters:
        - lambda: |-
            id(dryer_delta_accel_y) = fabsf(id(dryer_accel_y).state - x);
            return(x);
    accel_z:
      accuracy_decimals: 1
      name: "Dryer Accel Z"
      id: dryer_accel_z
      internal: true
      filters:
        - lambda: |-
            id(dryer_delta_accel_z) = fabsf(id(dryer_accel_z).state - x);
            return(x);
    temperature:
      name: "Dryer Temperature"
      filters:
        - heartbeat: 600s
  - platform: mpu6050
    update_interval: 0.25s
    address: 0x69
    accel_x:
      accuracy_decimals: 1
      name: "Washer Accel X"
      id: washer_accel_x
      internal: true
      filters:
        - lambda: |-
            id(washer_delta_accel_x) = fabsf(id(washer_accel_x).state - x);
            return(x);
    accel_y:
      accuracy_decimals: 1
      name: "Washer Accel Y"
      id: washer_accel_y
      internal: true
      filters:
        - lambda: |-
            id(washer_delta_accel_y) = fabsf(id(washer_accel_y).state - x);
            return(x);
    accel_z:
      accuracy_decimals: 1
      name: "Washer Accel Z"
      id: washer_accel_z
      internal: true
      filters:
        - lambda: |-
            id(washer_delta_accel_z) = fabsf(id(washer_accel_z).state - x);
            return(x);
    temperature:
      name: "Washer Temperature"
      filters:
        - heartbeat: 600s

binary_sensor:
  - platform: gpio
    device_class: door
    name: "Dryer Door"
    id: dryer_door
    pin:
      number: D7
      inverted: True
      mode: INPUT_PULLUP

  - platform: gpio
    device_class: door
    name: "Washer Door"
    id: washer_door
    pin:
      number: D8
      inverted: True
      mode: INPUT_PULLUP

  - platform: template
    device_class: vibration
    name: "Dryer Vibration"
    id: dryer_vibration
    lambda: |-
      if (isnan(id(dryer_delta_accel_x)) or isnan(id(dryer_delta_accel_y)) or isnan(id(dryer_delta_accel_z))) {
        id(dryer).publish_state("Idle");
        return {};
      }
      else if (abs(id(dryer_delta_accel_x)) > 1.0 or abs(id(dryer_delta_accel_y)) > 1.0 or abs(id(dryer_delta_accel_z)) > 1.0) {
        return(true);
      } else {
        return(false);
      }
    filters:
      - delayed_off: 120s
    on_press:
      then:
        - text_sensor.template.publish:
            id: dryer
            state: Drying
    on_release:
      then:
        - text_sensor.template.publish:
            id: dryer
            state: Idle

  - platform: template
    device_class: vibration
    name: "Washer Vibration"
    id: washer_vibration
    lambda: |-
      if (isnan(id(washer_delta_accel_x)) or isnan(id(washer_delta_accel_y)) or isnan(id(washer_delta_accel_z))) {
        id(washer).publish_state("Idle");
        return {};
      }
      else if (abs(id(washer_delta_accel_x)) > 1.0 or abs(id(washer_delta_accel_y)) > 1.0 or abs(id(washer_delta_accel_z)) > 1.0) {
        return(true);
      } else {
        return(false);
      }
    filters:
      - delayed_off: 120s
    on_press:
      then:
        - text_sensor.template.publish:
            id: washer
            state: Washing
    on_release:
      then:
        - text_sensor.template.publish:
            id: washer
            state: Idle

text_sensor:
  - platform: template
    icon: mdi:tumble-dryer
    name: Dryer
    id: dryer

  - platform: template
    icon: mdi:washing-machine
    name: Washer
    id: washer
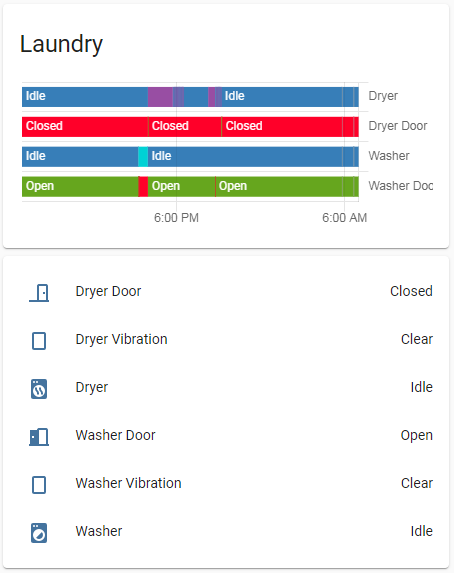
The simplified output looks like this (much less chaff going into the database):
4 Likes
@SpikeyGG THANK YOU!!! for sharing your updated ESPHome code. I’m running separate ESP8266 modules, one each for washer and dryer. Simple, straight-forward, and an absolute piece of CAKE.
1 Like
@SpikeyGG - I have a washer-related question for you. How do you account for the drain/re-fill cycle before rinse? During this time, there is typically no vibration from the washer, and in my case, drain/refill requires a few minutes. I don’t want the automation going off during these few minutes, only after it’s completely done with the spin cycle. Thank you!!
Hi Fred!
You really need to collect some empirical data on how long it might take and set the delayed off value appropriately. Also, I put my vibration sensors close to the water lines on the washer and I think it may be sensitive enough to pick up the vibration of the water flow because I don’t have that problem.
Okay, that’s what I thought I might have to do. I’ll try to relocate the sensor nearer the hose connections as you describe. Thanks!!
Okay, I think I’m going to have to extend the basic YAML a bit, include global variables for cycle 1 (wash), cycle 2 (rinse), and cycle 3 (spin) to nail this down. Has anyone here done anything similar, perhaps with a different device? Any and all suggestions greatly appreciated!!
I found keeping things simple vastly improved reliability.
My washer now only has two states: washing and idle.
I don’t particularly care whether it’s washing/rinsing/spinning, as long as I can consistently tell when it’s finished, I’m happy.
To this end I’ve recently moved from vibration to power sensing as I was unable to reliably temperature compensate the vibration sensor.
In my case, I want to alert the spouse the washer has completed a cycle. With no discernment, the three vibration cycles are all pretty much the same, only grouped together with segments of idle time between them. Adding a minor bit of intelligence to the ESPHome YAML would make it almost perfect for me. Just gotta think, ask, figure it out. It’s definitely possible, I’m just not experienced enough to toss a few lines into it and have it work. 
This works pretty sweet, had to change the sensitivity down on the washer (0.35 seemed to do the trick) and increased the time to 5 minutes. Thank you!
1 Like