Laundry Sensors with NodeMCU and Home Assistant

This is a guest post by Home Assistant user and contributor Nolan Gilley.

Today I’ll show you how I used Home Assistant, a NodeMCU (ESP8266), and a couple of accelerometers to automate our laundry room. This is a rewrite of an old post where I did the same thing using a Moteino & Raspberry Pi. This version only requires a NodeMCU.

We have an older washer and dryer which doesn’t have any form of notification when cycles complete. Home Assistant was the obvious solution, I just needed to create sensors for the washer and dryer. I tried using sound sensors but found them unreliable. I ended up using an accelerometer attached to the back of each appliance. I also added magnetic reed switches on the doors of the washer and dryer to detect whether they’re open or closed. I connected the accelerometers and reed switches to an NodeMCU which will relay the data to my MQTT broker.

![](upload://bnhPrOAumDvAGFR2bxP5FP6P7wy.png) Block diagram of schematic

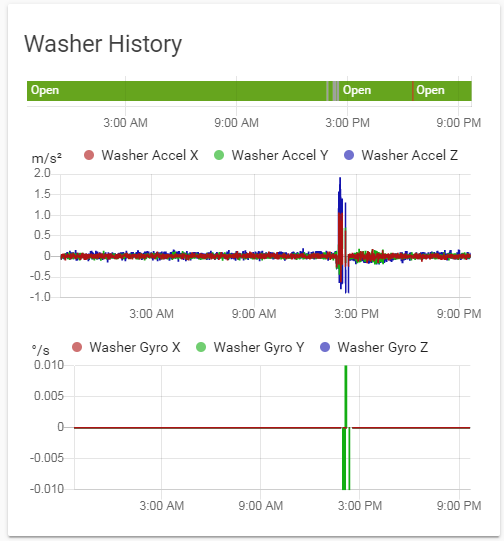
After taking some sample data from the accelerometers while each appliance was in operation, I decided to plot the data to help determine the proper thresholds of when the devices were running or off. I had to do this in order to get precise ranges so the dryer sensor wouldn’t get tripped by the washer or vice versa. In the plot below you can see the acceleration in each direction for the accelerometer connected to the dryer. It’s easy to see when the dryer is in operation here. I used the same technique for the washer’s accelerometer.

![](upload://y8GAfxfr98hlGpNywXFZWTt2cf7.png) Graph showing the accelerometer data

Next it was just a matter of integrating everything with Home Assistant. I was able to use the MQTT component to read the washer and dryer states from the Moteino and display it in Home Assistant.

![](upload://qhlgFfZsR5CkEnzRgdkyF6hcyGX.png) Status of the dryer and washer in Home Assistant

Next I wrote scripts that are run whenever the washer or dryer completes a load. This is triggered by the automation component. When the laundry is complete I have the lights in the house turn red and notify me via Join. Once the door is opened and laundry emptied another script runs that sets the lights back to normal. So far it has been very helpful and very reliable.

![](upload://jMH5r8k6ymXt8adL27HJu0DnJtx.jpeg) NodeMCU connected to MPU-6050 accelerometer.

Materials used:

Sketch for the NodeMCU is available here.

Home Assistant Configuration:

mqtt:
  broker: 192.168.1.100
  port: 1883
  keepalive: 60
  qos: 0
sensor:
  - platform: mqtt
    name: "Dryer Status"
    state_topic: "sensor/dryer"
    unit_of_measurement: ""
  - platform: mqtt
    name: "Washer Status"
    state_topic: "sensor/washer"
    unit_of_measurement: ""
automation:
  - alias: Washer complete
    trigger:
      platform: state
      entity_id: sensor.washer_status
      from: 'Running'
      to: 'Complete'
    action:
      service: script.turn_on
      entity_id: script.washer_complete
  - alias: Washer emptied
    trigger:
      platform: state
      entity_id: sensor.washer_status
      from: 'Complete'
      to: 'Empty'
    action:
      service: scene.turn_on
      entity_id: scene.normal
script:
  washer_complete:
    alias: Washer Complete
    sequence:
      - alias: Join Notification
        service: notify.join
        data:
          message: "The washing machine has finished its cycle, please empty it!"
      - alias: Living Room Lights Blue
        service: scene.turn_on
        data:
          entity_id: scene.blue

Resources used:


This is a companion discussion topic for the original entry at https://home-assistant.io/blog/2016/08/03/laundry-automation-update/
14 Likes

You sir are a legend, I am going to use a modified version of this to create a washing machine sensor.

If I only need one MPU6050 (got a washer/dyer combo unit) then do I only need to connect the 5V GND SCL SDA pins. The AD0 pin is only needed for an additional MPU6050.

Great trick! Just a question from my end; why not going for a solution that measures the absorbed electricity? That’s what I am using quite reliable.

3 Likes

I have this exact use case, a Sonoff Pow monitoring the power usage, with an automation that sends a push bullet when the wattage drops below 5 watts for 2 mins, then switches off the Sonoff Pow.

Works perfectly and reliably.

1 Like

Can you post your code from home assistant for me too look at, I got loads of pre-flashed Sonoffs boxes just laying around.

figured out the code needed for a POW Sonoff.

This is great. When the washer hits the soak cycle, does that report that it’s complete? I never would have thought of using an accelerometer, I’m going to have to try this.

May I know where and how do you attach the accelerometer? Do you need to open up the washing machine? A picture will definitely help.

1 Like

What did you use to monitor the x, y and z ranges in order to set the threshold values?

A couple of questions about this implementation:

  1. Looking at the NodeMCU pin-out it appears as though it does not have 5V, SCL and SDA pins. So, how do you hook the MPU-6050 to the NodeMCU?
  2. What are the resistor values used for the reed switches? Do you have an actual wiring diagram of this implementation?

Thanks,
-Greg

Greg,

SCL is D1 and SDA is D2 on the NodeMCU. At least from what I could find. Came to ask about the library for programming. I couldn’t figure out which #include “I2Cdev.h” to use. I found a rowberg on github but I couldn’t figure out how to get it to compile. I got it all together and programmed but it’s not responding to anything other than MQTT.

The reed switches I built I used 330k, no idea if that works though. I couldn’t get a single MPU6050 to respond to the program. I’m guessing it’s the library I used.

OP hasn’t responded ever in this thread so I’m guessing we’re on our own. If you find another setup that works with ESP & 6050’s come back and post it plz. I’ll do the same.

Have you thought about doing it in EspHome? The I2C bus is simple to set up, but I haven’t used it with one of these MPU sensors, only with a pressure sensor. It doesn’t seem like it would be too difficult, the data for individual axis’ would be available straight to HA and you could automate from there.
I just bought a couple on Aliexpress, so I’ll know in about 3-4 weeks…

Drew - absolutely keep me posted. I’m using ESPHome and for what it’s worth it looks easy, hard to tell because I haven’t been able to get a response out of the 6050’s. I’m only using one for now. I did read that adding 3v to the AD0 will give a secondary address for the i2c stuff so I think one esp will work for both. If you’d shoot me a message on here and let me know when you’re heading down that path I’d appreciate it. As I’m completely new to ESPHome. It seems easy but took me a while to figure out how to add the YAML entries, I’m still uncertain if I’ve selected everything that I should.

Great idea. I might try that first. I like the idea of having the sensor data available in HA for some reason. :stuck_out_tongue:

No worries, they shouldn’t be too far off now…:crossed_fingers:

Okay, I’ve got my NodeMCU and I’m playing around with ESPHome. I was able to get an ESPHome configuration file written up so that when I program the thing through USB, I can see the MQTT messages come through from all sensors (washer and dryer x/y/z/door). I’m actually floored that I was able to get this far, I’ve spent the majority of the day on it today.

EDIT:

However, when I unplug the device from the USB port on the raspberry pi after programming it and power it externally (either through USB on my computer or via a 12V wall wart) it never comes up. I don’t get any MQTT messages on my mosquitto instance and ESPHome only ever shows the device I created as ‘Offline’. I can ping the IP and it’s alive but I can’t figure out how to tell it to ‘go start working’.

How can I make the thing come up automatically and start working when the power goes out?? I’m so close!!

I was able to solve this by not using mqtt and instead using the Native Home Assistant API. It works very well but I had to remove all the stale MQTT data that I had created. Now I’m trying to get an accurate representation of the MPU6050 temperature sensor but I’m finding that their response is non-linear! Check this out:
image
This was generated from me experimenting by putting the prototype circuit inside my oven, then fridge, then the oven again. In my house at ~70F the sensors read somewhere in the vicinity of 219C. When I stuck the boards in the fridge, the temperature reading from the MPU6050 falls to around 200C. When I put it in the oven it raises up to around 229C, then immediately jumps to 36C as the temperature (in reality) rises above ~94F.

I’ve found that the values from the accel and gyros need to be calibrated as well since they’re giving me weird results (when I’m not actually moving the boards):

[22:28:02][D][sensor.mpu6050:134]: Got accel={x=0.610 m/s², y=38.914 m/s², z=5.420 m/s²}, gyro={x=3992.643 °/s, y=3995.265 °/s, z=0.366 °/s}, temp=46.601°C
[22:28:11][D][sensor.mpu6050:134]: Got accel={x=38.857 m/s², y=39.166 m/s², z=9.519 m/s²}, gyro={x=3993.375 °/s, y=1.707 °/s, z=3994.106 °/s}, temp=49.754°C
[22:28:12][D][sensor.mpu6050:134]: Got accel={x=0.572 m/s², y=38.869 m/s², z=5.305 m/s²}, gyro={x=3992.399 °/s, y=3995.326 °/s, z=0.793 °/s}, temp=46.742°C
[22:28:21][D][sensor.mpu6050:134]: Got accel={x=38.891 m/s², y=0.017 m/s², z=9.705 m/s²}, gyro={x=3993.009 °/s, y=1.707 °/s, z=3994.350 °/s}, temp=49.942°C
[22:28:22][D][sensor.mpu6050:134]: Got accel={x=0.560 m/s², y=38.883 m/s², z=5.372 m/s²}, gyro={x=3992.521 °/s, y=3995.387 °/s, z=0.793 °/s}, temp=46.883°C
[22:28:31][D][sensor.mpu6050:134]: Got accel={x=38.874 m/s², y=39.197 m/s², z=9.712 m/s²}, gyro={x=3993.192 °/s, y=1.463 °/s, z=3994.228 °/s}, temp=50.036°C
[22:28:32][D][sensor.mpu6050:134]: Got accel={x=0.608 m/s², y=38.833 m/s², z=5.343 m/s²}, gyro={x=3992.338 °/s, y=3995.265 °/s, z=0.610 °/s}, temp=46.883°C
[22:28:41][D][sensor.mpu6050:134]: Got accel={x=38.819 m/s², y=39.137 m/s², z=9.600 m/s²}, gyro={x=3993.314 °/s, y=1.646 °/s, z=3994.228 °/s}, temp=50.271°C
[22:28:42][D][sensor.mpu6050:134]: Got accel={x=0.627 m/s², y=38.831 m/s², z=5.439 m/s²}, gyro={x=3992.460 °/s, y=3995.326 °/s, z=0.671 °/s}, temp=47.071°C
[22:28:51][D][sensor.mpu6050:134]: Got accel={x=38.924 m/s², y=39.142 m/s², z=9.636 m/s²}, gyro={x=3993.253 °/s, y=1.463 °/s, z=3994.228 °/s}, temp=50.412°C
[22:28:52][D][sensor.mpu6050:134]: Got accel={x=0.601 m/s², y=38.862 m/s², z=5.386 m/s²}, gyro={x=3992.460 °/s, y=3995.265 °/s, z=0.671 °/s}, temp=47.212°C
[22:29:01][D][sensor.mpu6050:134]: Got accel={x=38.862 m/s², y=39.156 m/s², z=9.600 m/s²}, gyro={x=3993.253 °/s, y=1.341 °/s, z=3994.228 °/s}, temp=50.506°C
[22:29:02][D][sensor.mpu6050:134]: Got accel={x=0.656 m/s², y=38.850 m/s², z=5.398 m/s²}, gyro={x=3992.338 °/s, y=3995.448 °/s, z=0.671 °/s}, temp=47.354°C
[22:29:11][D][sensor.mpu6050:134]: Got accel={x=38.874 m/s², y=39.173 m/s², z=9.574 m/s²}, gyro={x=3993.192 °/s, y=1.585 °/s, z=3994.106 °/s}, temp=50.648°C
[22:29:12][D][sensor.mpu6050:134]: Got accel={x=0.608 m/s², y=38.857 m/s², z=5.441 m/s²}, gyro={x=3992.521 °/s, y=3995.326 °/s, z=0.366 °/s}, temp=47.354°C
[22:29:21][D][sensor.mpu6050:134]: Got accel={x=38.862 m/s², y=0.043 m/s², z=9.610 m/s²}, gyro={x=3993.314 °/s, y=1.585 °/s, z=3994.228 °/s}, temp=50.742°C
[22:29:22][D][sensor.mpu6050:134]: Got accel={x=0.560 m/s², y=38.876 m/s², z=5.381 m/s²}, gyro={x=3992.399 °/s, y=3995.448 °/s, z=0.671 °/s}, temp=47.636°C

EDIT2:

you can see from all this data that the accel and gyro values are all over the map. I had to include (after the last update) filters in ESPHome for offset and multiplier. That brings the values closer to what I’d want but I’m still seeing a few of the values “wig out”. Like they go from min to max without me touching the device. I’m not sure if I need to debounce them or something… more debug to do here.

This was a great project. I have it working now and it works well. The mpu6050 is sensitive enough to register the motion of the washer and dryer. Here’s an example of it from a capture today, my wife did some laundry in the washer from about 2pm to 2:40pm:

For reference and anyone who’s trying to do this with ESPHome here are the important parts of my implementation.

ESPHome yaml file:

esphome:
  name: laundry
  platform: ESP8266
  board: nodemcuv2

wifi:
  ssid: "MySSID"
  password: "MyPASSWORD"
  domain: ".mydomain"

logger:
  # level: WARN

api:
  password: 'apiPASSWORD'

ota:
  password: 'otaPASSWORD'

i2c:
  sda: 4
  scl: 5
  scan: True

sensor:
  - platform: mpu6050
    # update_interval: 10s
    address: 0x68
    accel_x:
      name: "Dryer Accel X"
      filters:
        - offset: -0.35
    accel_y:
      name: "Dryer Accel Y"
      filters:
        - offset: -39.17
    accel_z:
      name: "Dryer Accel Z"
      filters:
        - offset: -11.32
    gyro_x:
      name: "Dryer Gyro X"
      filters:
        - offset: -3990.15
        - multiply: 0.0025
    gyro_y:
      name: "Dryer Gyro Y"
      filters:
        - offset: -3995.86
        - multiply: 0.0025
    gyro_z:
      name: "Dryer Gyro Z"
      filters:
        - offset: -3994.43
        - multiply: 0.0025
    temperature:
      name: "Dryer Temperature"
      filters:
        - calibrate_linear:
          - 37 -> 34.7
          - 53 -> 53
          - 200 -> 4.3
          - 219 -> 21.1
          - 229 -> 33.4
  - platform: mpu6050
    # update_interval: 10s
    address: 0x69
    accel_x:
      name: "Washer Accel X"
      filters:
        - offset: -0.85
    accel_y:
      name: "Washer Accel Y"
      filters:
        - offset: -38.50
    accel_z:
      name: "Washer Accel Z"
      filters:
        - offset: -28.05
    gyro_x:
      name: "Washer Gyro X"
      filters:
        - offset: -3994.38
        - multiply: 0.0025
    gyro_y:
      name: "Washer Gyro Y"
      filters:
        - offset: -3993.51
        - multiply: 0.0025
    gyro_z:
      name: "Washer Gyro Z"
      filters:
        - offset: -3993.53
        - multiply: 0.0025
    temperature:
      name: "Washer Temperature"
      filters:
        - calibrate_linear:
          - 37 -> 34.7
          - 53 -> 53
          - 200 -> 4.3
          - 219 -> 21.1
          - 229 -> 33.4
      
binary_sensor:
  - platform: gpio
    device_class: door
    name: "Dryer Door"
    pin:
      number: D7
      inverted: True
      mode: INPUT_PULLUP
  - platform: gpio
    device_class: door
    name: "Washer Door"
    pin:
      number: D8
      inverted: True
      mode: INPUT_PULLUP

If you review the yaml, you’ll notice that I put a calibrate_linear for the temp sensors. I found that they were very disjointed but this makes them respond in a way that is more accurate to home assistant reporting. Also, I calculated offsets and multipliers for all the accel and gyro values to make them less awkward to determine (I can surround 0, see in the binary_sensor template below). So long as I don’t touch the physical devices, we’re good for a long time. :slight_smile:

I originally put those update_intervals at 10 seconds so I could see more data quicker but found that after a half day of that much recorded data the charts were slow to load. I saw that ESPHome has some pretty advanced filtering potentials that I’d like to play with, I bet I can make the usage detection pretty spot-on and quick by playing with those for a while. Currently the raw values work well and when the washer or dryer finally stops shaking for 5 minutes, the sonos speakers say:
“The washer is done washing” or “The dryer is done drying”

To do this, I made a binary_sensor template for the values:

laundry_sensors.yaml (binary_sensors directory)

- platform: template
  sensors:
    washer_washing:
      device_class: vibration
      friendly_name: Washer Washing
      value_template: "{{ states('sensor.washer_accel_x') | float > 0.5 or states('sensor.washer_accel_x') | float < -0.5 or states('sensor.washer_accel_y') | float > 0.5 or states('sensor.washer_accel_y') | float < -0.5 or states('sensor.washer_accel_z') | float > 0.5 or states('sensor.washer_accel_z') | float < -0.5 }}"
    dryer_drying:
      device_class: vibration
      friendly_name: Dryer Drying
      value_template: "{{ states('sensor.dryer_accel_x') | float < -0.5 or states('sensor.dryer_accel_x') | float > 0.5 or states('sensor.dryer_accel_z') | float > 0.5 or states('sensor.dryer_accel_z') | float < -0.5 }}"

You can see, I ignored the accel_y values on the dryer. I’ve purchased 5 of these mpu6050s and only one of them so far has had smooth X/Y/Z reporting. The one I chose for the dryer has 2/3 axes that work. Anyway, you really only need one to detect the movement.

I then created a holder for the state values:

configuration.yaml

input_select:
  washer_state:
    name: Washer
    options:
      - Idle
      - Loading
      - Washing
    initial: Idle
    icon: mdi:washing-machine
  dryer_state:
    name: Dryer
    options:
      - Idle
      - Loading
      - Drying
    initial: Idle
    icon: mdi:tumble-dryer

After that all I needed to do was enable the automation, it’s three parts for the three states (there’s probably a better way to do this, if you have one, please share):

laundry.yaml (automation directory)

# Washer no vibration for five minutes, washer is done!
- id: set_washer_to_idle
  alias: Set Washer to Idle
  initial_state: true
  trigger:
    platform: state
    entity_id: binary_sensor.washer_washing
    to: 'off'
    for: '00:05:00'
  action:
  - service: input_select.select_option
    data:
      entity_id: input_select.washer_state
      option: Idle

# Washer vibration and door is open means washing
- id: set_washer_to_washing
  alias: Set Washer to Washing
  initial_state: true
  trigger:
    platform: state
    entity_id: binary_sensor.washer_washing
    to: 'on'
  condition:
    condition: and
    conditions:
      - condition: state
        entity_id: binary_sensor.washer_door
        state: 'off'
  action:
  - service: input_select.select_option
    data:
      entity_id: input_select.washer_state
      option: Washing

# Washer vibration and door is open means loading
- id: set_washer_to_loading
  alias: Set Washer to Loading
  initial_state: true
  trigger:
    platform: state
    entity_id: binary_sensor.washer_washing
    to: 'on'
  condition:
    condition: and
    conditions:
      - condition: state
        entity_id: binary_sensor.washer_door
        state: 'on'
  action:
  - service: input_select.select_option
    data:
      entity_id: input_select.washer_state
      option: Loading

and finally, the sonos piece:

sonos_alerts.yaml (automation directory)

- id: sonos_alert_on_laundry_triggers
  alias: Sonos Alert on Laundry Triggers
  initial_state: true
  trigger:
    - platform: state
      entity_id: input_select.washer_state
      from: 'Washing'
      to: 'Idle'
    - platform: state
      entity_id: input_select.dryer_state
      from: 'Drying'
      to: 'Idle'
  action:
    - service: script.sonos_say
      data_template:
        sonos_primary: media_player.office_sonos
        volume: 0.5
        message: >
          The {{ trigger.to_state.attributes.friendly_name }} is done {{ trigger.from_state.state }}.
        delay: '00:00:05'
8 Likes

I want this kind of sensors, but I’m more inclined on trying out with an energy consumption plug.
I believe it might be easier to read and implement.

Sure, if you have a super old appliance, you will have a hard time finding a plug that will support the amperage. So this solution is still very much valid.

EDIT: Added conclusion.

1 Like

I enjoyed reading about your project.

I recently built a similar project but instead of using accelerometers I’m using some very inexpensive SW-420 vibration sensors.

Your voice feedback really takes it to the next level!

1 Like

I’d like to mention that with the new ESPHome release (1.13.6) there’s very little need to calibrate the sensors. Apparently, there was a data-type mismatch (https://github.com/esphome/esphome/pull/532) which was causing the poor correlation from X/Y/Z and Temp sensors and now the data looks pretty darn good:

I set my input_selects using all accel and gyro values and it’s is really representative of the actual washer/dryer state.

1 Like