LocalTuya: Stadler Form Eva Humidifier

Hello!

I wanted to share how I integrated a Stadler Form Eva humidifier in Homeassistant since I’ve struggled with it for a few weeks now and couldnt find anyone with a similar problem…

Stadler Form Eva is a humidifier controlled thorugh the “Smart Life” app, and Smart Life is owned/controlled by Tuya, so we start there.

  1. Follow the tutorial on how set up a Tuya project/link device by app.
  2. Download and install localtuya (When i used the “official” integration i only got a non-responsive device… which is why I had problems with integrating the humidifier)
  3. Get/Copy your “Device ID” from IoT Tuya → Development → your project → Devices
  4. Enter your device ID under API Explorer → Smart Home Management System → Device Management → Get Device details → Paste it here and hit “Submit Request” and your local_key should appear in the response

Next is the annoying thing, figuring out what to choose from the dropdown-menus for the different functions.

E.g: My humidifier has three switches:

  • Auto
  • Warm mode
  • Child Lock

So I had to select “Switch” and figure out what ID which is the corresponding entity, and create a new “entity” for each function i want.
image

I managed to map the values (they change based on, well, the current state of the entity/switch) so i ended up with this:

  • 13: Target Humidity / Hygrostat
  • 14: Current Humidity
  • 23: Current output speed
  • 26: Toggle Warm Mode
  • 29: Toggle Child lock
  • 102: Toggle Auto
  • 103: 0x00 = Normal, 0x01 = Dimmer, 0x02 = Light Off

This is what I ended up with:
image

And this is how it looks like:

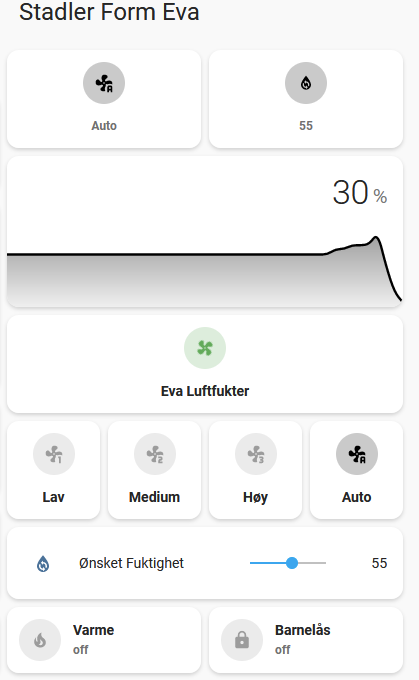
I got it fully functioning, but as many different devices, If anyone know how to configure it correctly I would be very happy to know how!

The main humidifier (Fan entity) only has 5 presets, speeds 1 - 5, I cannot manage to get Auto/Target humidity as a part of that entity… Which is why I had to make a separate controllable entity, number.target_humidity

3 Likes

Thanks for the great tips.
It works excellently for my EVA Humified.
The only challenge I have is that the process let me create only one switch (on - off) but I don’t know how to create more switches and all the sensors to read-set current values and target values.
Can you please help me please?
Thanks a lot in advance,
Alessandro

When I followed the official tutorial I also only got a on-off switch (Tuya - Home Assistant) , that is why i added it through localtuya.

When you set up your device in localtuya you can only use each “ID” value once, so for my actual fan it looks like this:
localtuya → fan (Platform) → “1” as ID and “23” as Fan Speed Control dps

Excellent, super clear! Thanks a lot again, it works super smoothly. Just a quick one, does the integration works even if internet is down? Does it need to look/check the key in the Tuya Smart development Center online for every request?

According to the official github repo it should work locally, so yes, it should work without internet! :smiley:

and i doubt it checks the key for every request…

Hey! I have a Tuya Dehumidifier too and have followed the same process to integrate to HA. However, each entity is a separate item, switch, sensor etc. Is there a way to consolidate all the Tuya entities into a standard ‘humidifier’ entity?

Yeah, the issue with separate entities annoys me as well, but I do not think its possible (as of now) to get the under the same “device”… I think that is a localtuya-problem

I see, LocalTuya cannot create a humidifier entity yet. I wonder if there is a way to create a template humidifier entity that integrates with the various LocalTuya entities directly?

Thanks for the instructions. I have a Stadler Form Karl humidifier, this are the mapped values I used:

ID platform Values
Humidity 14 Sensor
Power 1 Switch
Hygrostat 103 select 40;45;50;55;CO
Fan speed 101 Select level_1;level_2;level_3;level_4
Auto mode 102 Switch
Child lock 29 Switch
Lights - Normal, Dimmer, Lights off 34 Select Fully;Half;Close
Filter life 33 Sensor
Low water 22 binary sensor 0;1;
1 Like

Works perfect!
There is still option 104, no clue to what it is. Auto start is not responding to it…

104 is a read only binary sensor which indicates to change the filter

Hi, does the datapoint 22 works for you too?

I have a stadler karl big and everything works as expecteded. Except the low water datapoint. It is always 0.

Same here. Did you get it working?

no, I observed another behavior. If I block Internet for my humidifier, it is stopping providing data after some time. Sending commands are still accepted and working.

Got it working.
I have added the wrong values, true/false, when they should be 0/1. :slight_smile:

I also had to replace false / true with 1 and 0 to get the low water level detection to work.

Is it possible to make Home Assistant treat the (Karl) device as a Humidifier entity? Also the latest release has a really nice fan control UI, how would I go about using that?

Here’s the relevant bit from my dashboard card (including a low water “alert”, though that’s not pretty):

- type: entities
  entities:
    - entity: sensor.humidity
    - entity: select.fan_speed
      secondary_info: last-updated
      icon: mdi:fan
    - type: conditional
      conditions:
        - entity: binary_sensor.low_water
          state: 'on'
      row:
        entity: binary_sensor.low_water
        type: attribute
        attribute: binary_sensor.low_water
        icon: hass:water-off
  title: Stadler Form Karl
  show_header_toggle: true
  state_color: false

Interesting thread. I am Looking to buy a few stadler Oskars and wondering if they would work via the tuya integration … does anybody have tried this?

I found that we are able to get the list of codes and what is their meaning through the API.
With the IoT Core API > Device control > Query properties
For my Stadler Form Eva, it gave the following results:

{
  "result": {
    "properties": [
      {
        "code": "switch",
        "custom_name": "",
        "dp_id": 1,
        "time": 1707907505826,
        "value": true
      },
      {
        "code": "humidity_set",
        "custom_name": "",
        "dp_id": 13,
        "time": 1707911743578,
        "value": 50
      },
      {
        "code": "humidity_current",
        "custom_name": "",
        "dp_id": 14,
        "time": 1707907505826,
        "value": 25
      },
      {
        "code": "fault",
        "custom_name": "",
        "dp_id": 22,
        "time": 1707907505826,
        "value": 0
      },
      {
        "code": "level",
        "custom_name": "",
        "dp_id": 23,
        "time": 1707911721166,
        "value": "5"
      },
      {
        "code": "heat",
        "custom_name": "",
        "dp_id": 26,
        "time": 1707911728526,
        "value": true
      },
      {
        "code": "child_lock",
        "custom_name": "",
        "dp_id": 29,
        "time": 1707907505826,
        "value": false
      },
      {
        "code": "Auto",
        "custom_name": "",
        "dp_id": 102,
        "time": 1707911732046,
        "value": true
      },
      {
        "code": "BRIGHT",
        "custom_name": "",
        "dp_id": 103,
        "time": 1707911715565,
        "value": "0x01"
      }
    ]
  },
  "success": true,
  "t": 1707912976736,
  "tid": "da509c68cb3211ee9fb272b4dd63a2de"
}