
Recently bought one of these light (available for 10 euros at the Action stores in the Netherlands) and after jumping through all the hoops with tuya local i decided that’s not the way i want to go with these. Also read that tasmota is possible after replacing the chipset but thats too much trouble. Luckily a smart guy (also a member here) figured out how to flash these chips and i applied that to this device. My apologies if someone already did a writeup on these but i could not find it so here’s what i did.
The process to do this is fairly straight forward requiring only some light soldering and the use of a 3.3v TTL adapter.
Opening this light up is simple, just squish it like a kinder egg. The store that sells these also stocks a dedicated tool to do this process for you; a plastic clamp. Just put the clamp right over the seam and crank down, dont worry about deforming the light its completely hollow in the middle so the light will pop open before anything breaks and it bends back beautifully without leaving a trace so you can snap it back together.
Take the board out for easier access and solder some wires to it;
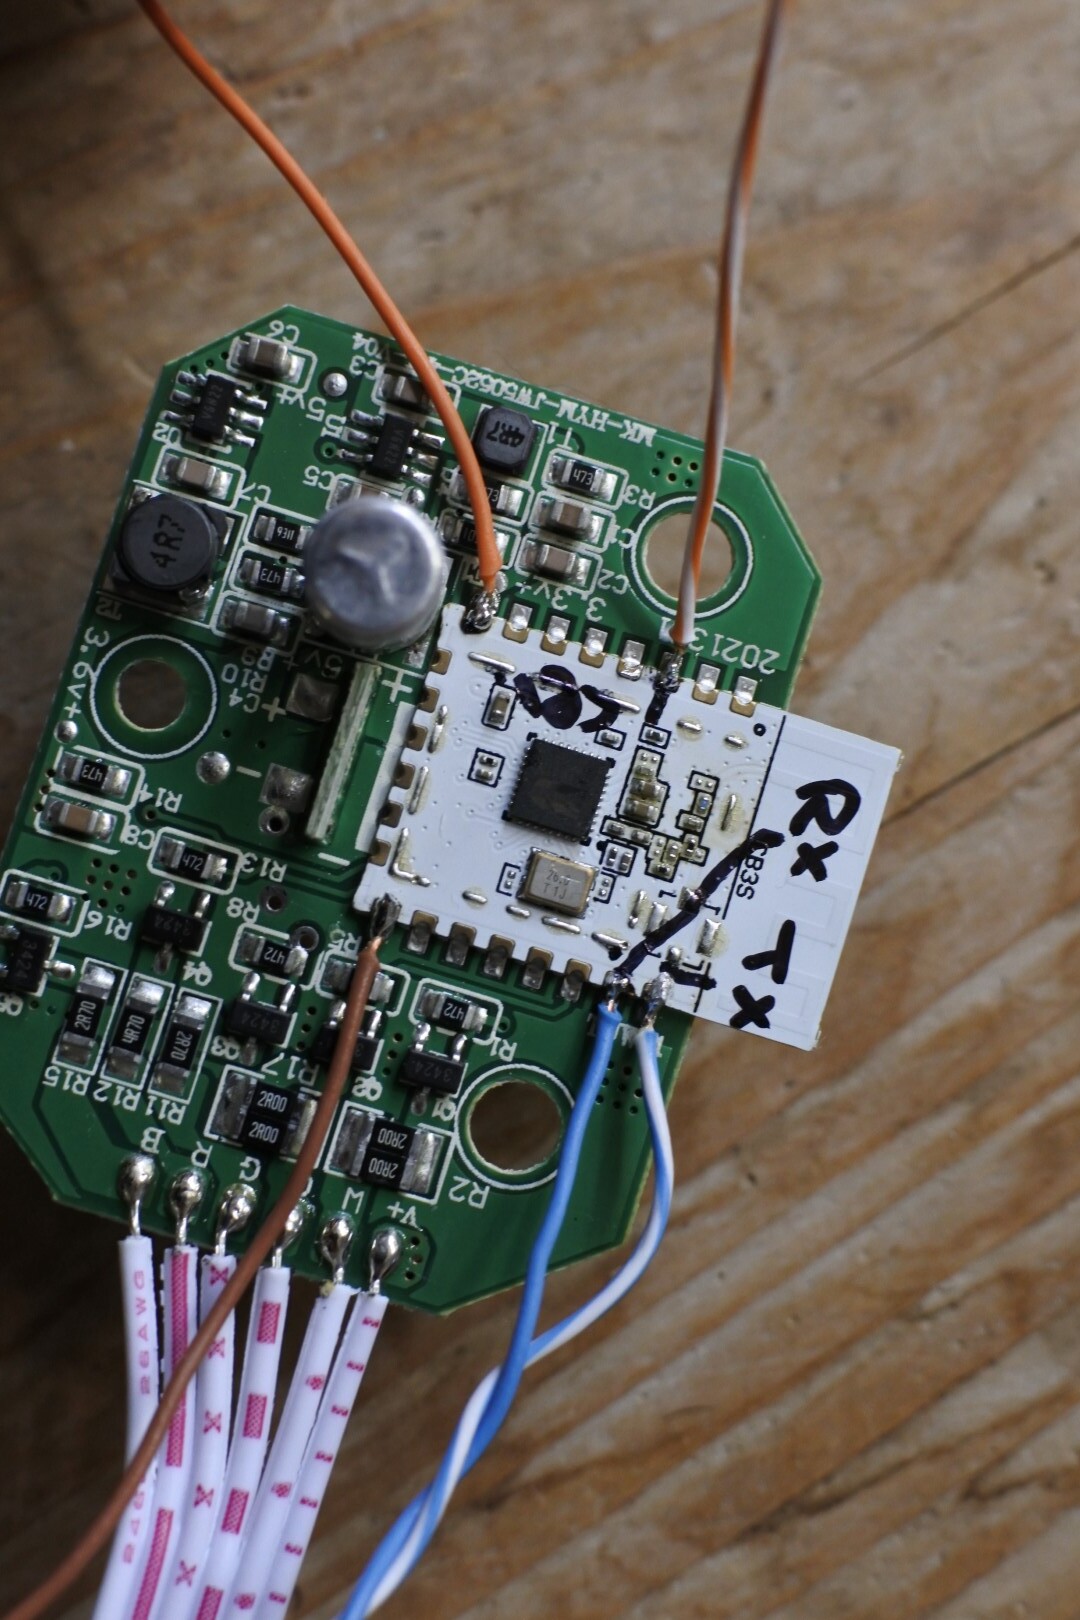
Ive marked Rx and Tx, orange is 3.3v, brown is gnd and orange/white is the cen or ‘reset’. Hook that up to you TTL converter.
Software:
First download hidapi and extract it in your windows %PATH%
Second, download the python Beken serial flasher tool from here (click ‘Code’ and ‘Download Zip’) and unpack it somewhere you can find it. Also get your bin file from here you want the BK7231N UART Flash one at whatever the latest version is (for me it was OpenBK7231N_QIO_1.12.60.bin)
Third, make sure your windows python stuff is up to date and create a virtual environment
-Open up a command prompt, go to a directory where you want to put everything and run ‘pip install virtualenv’ followed by a ‘virtualenv test1’ to create your environment
-Start you virtual environment by going into your newly created ‘test1’ directory and enter the Scripts folder, run the ‘activate’ command you see in there.
-In your virtual environment head on over to your unpacked Beken flasher software and run the install.bat file you find there.
Time to plug in your TTL converter, get the COM port from device manager and enter the following command;
python uartprogram OpenBK7231N_app_QIO_1.0.0.bin --unprotect -d com10 -w --startaddr 0x0
Obviously you will need to change the COM port to your own and you will also have to enter the full location of your bin file. When you see ‘Getting Bus’ you can quickly touch the cen/reset wire to ground to reboot your mood light and get the flashing going.
If succes type ‘deactivate’ to get out of your virtual environment and close up the command prompt.
After that is all said and done the device will reboot on its own and you can grab a mobile phone to connect to the access point it creates for you, once you are connected go to 192.168.4.1 and select configure/configure wifi to connect it to your home network. Connect to it through the newly setup wifi connection and set the following configuration

This will configure the connections to the colors and cold-white and warm-white leds. Going back to the main menu of the device you can now select all available colors and brightness

And from there you can just hook it up to your mqtt broker and use it in home assistant like any other mqtt device without needing to replace chips or using any weird cloud service.
")