I’m not always the best at remembering to brush my teeth before bed. To counter this forgetfulness, I had an NFC tag I used to tap when I did that, or else home assistant would remind me verbally (though a google speaker) to brush my teeth when I lay down in bed and turned the lights off. (Not going into the complexities of that today).
My toothbrush has a built in timer that makes sure you brush long enough, but I usually have google set a timer for when I’m using the mouthwash. This is awkward since the speaker is not in the bathroom, there is no way to see how much time is remaining (and you can’t ask with a mouth full of mouthwash).
So, I decided to consolidate a few things together, give myself a little project, and learn esphome while I was at it.
Originally, I was going to grab a smart button and an addressable light strip, then somehow convince my wife to let me add a light channel around the vanity (because wife approval factor is key), and have it do a clock countdown thing in a circle. I still think that would be cool, but that quickly became outside of my barely-there DIY skills. So, when I realized I already has something that could do both jobs at once in a form factor I didn’t hate, I switched tactics.
I’m not really much for hardware, so while I’m sure this would be easy to build, I chose to use an M5 Atom Matrix since it basically had everything in a tiny footprint that I wanted to do (and I happened to have one laying around, but they are like $15 after shipping, which is awesome). Here are the technical specs for it.
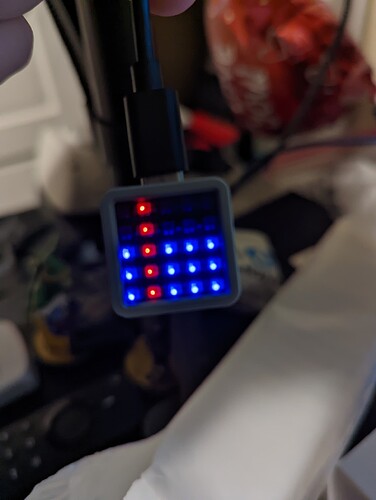
Now, what I wanted was to have a button I could hit that would count down visually when I pressed the button, and was readable ‘at a glance’. I went through a few iterations of how I was going to do this 60-second countdown on a 5x5 pixel grid. What I eventually landed on was to have it draw a 5 pixel wide by x-height tall bar to represent blocks of 10 seconds, and have a vertical 1-pixel wide by 5 pixel tall bar scroll across the screen as a sort of every-other-second counter, so I could quickly see how much time was left. It ends up looking like so while it is counting down:
(basically this would be either 33 or 34 seconds remaining)
When the counter hits 0, the device goes dark, since I don’t want light leaking from the bathroom into my bedroom when I’m trying to sleep. I also added a trigger in home assistant so that triggering this countdown flips my teeth brushed boolean, so I don’t need to bring my phone with me to brush my teeth any more, which is also nice.
Anyway, here is the code I used for this:
esphome:
  name: countdown-timer

esp32:
  board: m5stack-atom
  framework:
    type: arduino

# Enable logging
logger:

# Enable Home Assistant API
api:

ota:
  password: !secret wifi_password

wifi:
  ssid: !secret wifi_ssid
  password: !secret wifi_password

  # Enable fallback hotspot (captive portal) in case wifi connection fails
  ap:
    ssid: "Countdown-Timer Fallback Hotspot"
    password: !secret wifi_password

captive_portal:

sensor:
  - platform: wifi_signal
    id: wifi_value
    name: "WiFi Signal Sensor"

  - platform: template
    name: "Countdown Timer"
    unit_of_measurement: "seconds"
    icon: "mdi:timer"
    update_interval: 1s
    state_class: "measurement"
    accuracy_decimals: 0
    lambda: |-
      return id(countdown_timer).state;

number:
  - platform: template
    id: countdown_timer
    optimistic: true
    min_value: 0
    max_value: 60
    initial_value: 0
    step: 1
    on_value:
      - if:
          condition:
            number.in_range:
                id: countdown_timer
                below: 9
          then:
            - number.set:
                id: bar_height
                value: 5
      - if:
          condition:
            number.in_range:
                id: countdown_timer
                above: 10
                below: 19
          then:
            - number.set:
                id: bar_height
                value: 4
      - if:
          condition:
            number.in_range:
                id: countdown_timer
                above: 20
                below: 29
          then:
            - number.set:
                id: bar_height
                value: 3
      - if:
          condition:
            number.in_range:
                id: countdown_timer
                above: 30
                below: 39
          then:
            - number.set:
                id: bar_height
                value: 2
      - if:
          condition:
            number.in_range:
                id: countdown_timer
                above: 40
                below: 49
          then:
            - number.set:
                id: bar_height
                value: 1
      - if:
          condition:
            number.in_range:
                id: countdown_timer
                above: 50
          then:
            - number.set:
                id: bar_height
                value: 0
      - if:
          condition:
            lambda: |-
              //Check if countdown timer is currently even
              int countdown = id(countdown_timer).state;
              return countdown % 2 == 0;
          then:
            - number.set:
                id: ticker
                value: !lambda |-
                  // Return the current ticker value plus 1
                  return id(ticker).state + 1;

  - platform: template
    id: bar_height
    optimistic: true
    min_value: 0
    max_value: 5
    initial_value: 5
    step: 1

  - platform: template
    id: ticker
    optimistic: true
    min_value: 0
    max_value: 5
    initial_value: 5
    step: 1
    on_value:
      - if:
          condition:
            - number.in_range:
                id: ticker
                above: 5
            - number.in_range:
                id: countdown_timer
                above: 1
          then:
            - number.set:
                id: ticker
                value: 0

time:
  - platform: homeassistant
    id: homeassistant_time
    on_time:
      - seconds: '*'
        then:
          if:
            condition:
              number.in_range:
                id: countdown_timer
                above: 1
            then:
              - number.set:
                  id: countdown_timer
                  value: !lambda |-
                    // Return the current countdown value less 1
                    return id(countdown_timer).state - 1;

binary_sensor:
  - platform: gpio # btn
    name: "Timer Button"
    id: button1
    pin:
      number: 39
      inverted: true
    on_press:
      - logger.log: "Timer started"
      - number.set:
          id: countdown_timer
          value: 60
      - number.set:
          id: bar_height
          value: 0
      - number.set:
          id: ticker
          value: 0

light:
  - platform: neopixelbus
    type: GRB
    variant: WS2812x
    pin: 27
    num_leds: 25
    id: led_matrix_light
    color_correct: [30%, 30%, 30%]
    restore_mode: ALWAYS_OFF

display:
  - platform: addressable_light
    id: led_matrix_display
    addressable_light_id: led_matrix_light
    width: 5
    height: 5
    rotation: 180
    update_interval: 16ms
    lambda: |-
          // Count Down from 60
          Color red = Color(0xFF0000);
          Color green = Color(0x00FF00);
          Color blue = Color(0x0000FF);
          it.filled_rectangle(0, id(bar_height).state, 5, 5, blue);
          it.vertical_line(id(ticker).state, 0, 5, red);
Anywho, that’s what I came up with. I’m pretty happy with it for a first project. I’ve never worked in C++ before, and I’ve definitely never mixed C++ and yaml before, so this was an interesting one for me.

