For some reason it’s shows my WIFI QR code but your Password under this QR Code. Also is it possible to add more lights control and take out alarm, and some other stuff. I want to use that device in my bedroom, with 4 Ceiling recessed light groups(4 smart switches, Lutron), 1 wall light with color and brightness control, 1 fan (no light) and group of blinds, which I control together. I will play with esphome code, but I am really bad at this ![]() Thank you
Thank you
I’ve played a bit with the qr code and this is my solution to this:
substitutions:
  wifi_ssid: !secret wifi_ssid
  wifi_password: !secret wifi_password
...
display:
  - platform: ili9xxx
...
    pages:
      - id: WifiQRPage
        lambda: |-
          it.qr_code(45, 40, id(wifi_qr), Color(255,255,255), 4);
          it.printf(120, 200, id(roboto20), TextAlign::CENTER, "Password: ${wifi_password}");

qr_code:
  - id: wifi_qr
    value: "WIFI:S:${wifi_ssid};T:WPA;P:${wifi_password};;"
    ecc: HIGH
Thank you to point me to the right direction. I found where password is hard coded and removed. Not this part is working like a charm. TY
You can do whatever you like with it, the code is just an example of how you could use the device. Half the menu buttons don’t actually do anything, so you can add segments however you like.
I will probably be working on a fan controller page though, since I have a ceiling fan I might want to control at some stage.
Before playing around with this, I’d had very little real experience with esphome so there are probably a huge number of inefficiencies in the way things are being done.
So, after playing with QR code for a little bit, I decided to go easiest way. I generated my wifi credential qr code, put a qrcode.png file in images folder and
      - id: WifiQR
        lambda: |-
          it.image(120, 120, networkQR, ImageAlign::CENTER);
    ```
It's showing an image on QR code page, which is really easy to scan (png file is 200x200 px)So you can now define the touchscreen in esphome using an inbuilt component by defining the i2c address. Just replace the previous ft3267 definition with the below.
touchscreen:
  platform: ft5x06
  address: 0x38
This will remove the reliance on any external component, meaning one less thing that can break.
Will try tonight. TY
It works. TY
@dgaust what type of connector did you use for LD2410 on the M5 side? Bport, correct?
I couldn’t find any information on M5Stack website. Thank you
The annoying thing about m5stack devices is they use Grove connectors. So I had to cut up some of the proprietary connectors and add a 1.27mm connector to one end (because that matched the pitch of the connectors on my LD2410).


@dgaust , sorry for silly question, but which pins on the ld2410 go to which pins on Port B?

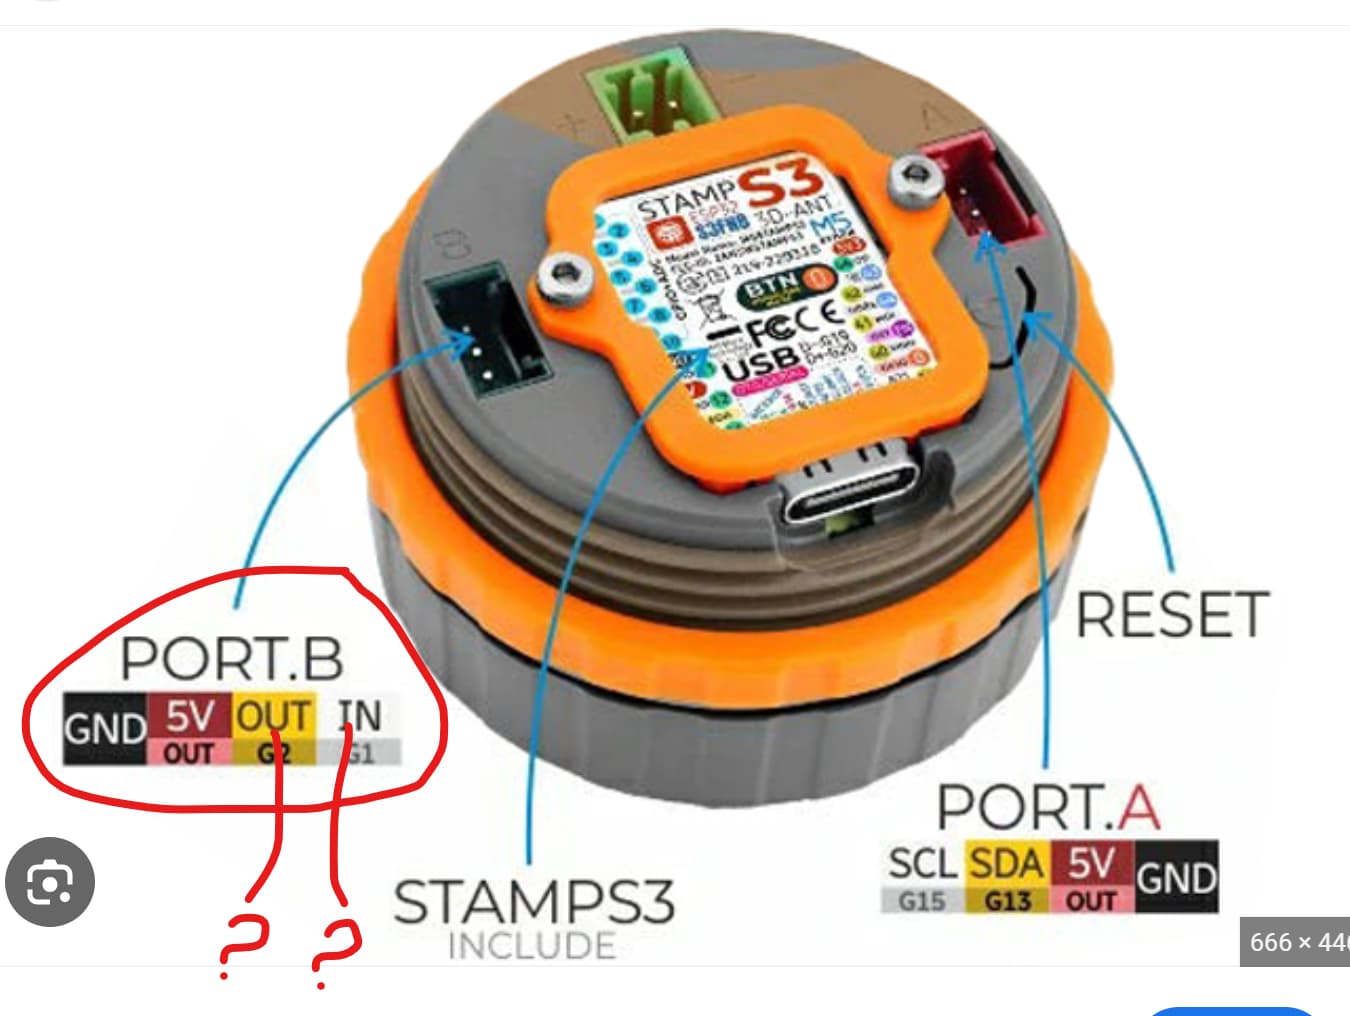
Thank you
RX on the LD2410 goes to G2, TX goes to G1, power is obvious. Then UART is defined as
uart:
  tx_pin: GPIO2
  rx_pin: GPIO1
  baud_rate: 256000
  parity: NONE
  stop_bits: 1

This is how I connected: black wire is a ground, red-5V, white is RX and Yellow - TX.
As soon as I connect LD2410 to M5 dial , display is go off and I hear a peach noise from M5.
I have few more LD2410 in my house and they are working great. Just don’t understand what is going on here, why it’s not working properly. TY
well, from that photo it looks like you’re running 5v to the LD2410 ground pin. The red and black wires need to be swapped on the LD2410
I am an IDIOT. You right, my mistake. Thank you again for your help. I still try to learn some coding to add fan and more lights to M5 dial, so far it’s not easy. If I want to add more lights, how I can add them to this area:
substitutions:
  # Add the ids of the devices you want to control here
  light_control: light.living_room_wall_lights
  climate_control: climate.sensi_08ae19
  cover_control: cover.shades_reversed
  script_delay: 1s
Also ceiling fan ?
Thank you
Really nice idea! I did not think of that, but I like it! ![]()
It has RTC, so you definitely can.

I have been wanting some sort of physical knob to control volume on my outdoor speakers in the back yard. This will not only do that but could maybe even show artist/track information (?), changing source, as well as many other things, I suppose. I think I will pick one up.
Thanks to everyone contributing to figuring this neat little device out!
This YouTuber ‘Volos Projects’ (video I linked above) seems to be quite good at designing UI and plays with a lot of small devices like this on his channel. His implementation seems to be much more responsive as well. I am sure I will study it at some point, I think he shares his code publicly.
Ha! Just came across this project which looks amazing: GitHub - scottbez1/smartknob: Haptic input knob with software-defined endstops and virtual detents and was thinking to dive down the rabbit hole and then I spotted the M5Dial and now, for 36 quid you can get something very similar off-the-shelf! ![]()
I’m working on a light control that can do brightness, color temp, color, and potentially more. Here’s a prototype demo and here’s the code.

I’m running into some problems using ESPHome for this though. The display takes >200ms to render, and it keeps rendering over and over in a loop no mater what I do. This makes it so clunky as to be almost unusable. If anyone knows what might be going on, please let me know.
As it is, I’ll probably abandon the ESPHome code in favor of some straight C++, and maybe even look into M5’s UI Flow.
