Oligarch
June 3, 2023, 10:48pm
1
Please help me convert my intercom into a smart one using ESP. This is my first project on ESP. Tell me which module is better for this purpose, what and where I need to connect… Below, I will provide you with photos of the handset and the schematic diagram.
nickrout
June 4, 2023, 1:58am
2
What are you actually trying to automate?
Oligarch
June 4, 2023, 11:38am
3
I want to receive notifications when someone rings the intercom and be able to open the door.
nickrout
June 4, 2023, 10:17pm
4
Opening the door, put a relay over the pins for open door and fire it from the esp.
Detecting speech, not sure.
I guess the reed switch is for detecting whether the handset is mounted? I assume there’s a handset?
Oligarch
June 5, 2023, 11:21am
6
Yes. This electronic circuit is inside the handset. A magnet is installed in the platform on which the handset is suspended.
And then does the person also need to press the button after they have picked up the handset to initiate communication?
for notification, measure the voltage spike when the intercom door button is pressed (when you hear the ring), step it down to 5 volts using a DC step down module, then you can have it in esphome, you can use the following code:
- platform: gpio
    pin:
      number: D2
      mode:
        input: true
        pullup: true
    name: "Building Doorbell"
    filters:
      # Small filter, to debounce the button press.
      - delayed_on: 100ms
      - delayed_off: 100ms
Oligarch
June 5, 2023, 9:11pm
9
The connection opens automatically after lifting the handset. The button must be pressed to open the door
Oligarch
June 9, 2023, 9:40pm
10
I suspect I need two relays. One for closing the reed switch, which simulates picking up the handset, and the other for the door opening button. I found such a ready-made module with two relays:
This module is based on ESP-01. Who can tell if it has an ADC input for voltage measurement?
nickrout
June 9, 2023, 11:03pm
11
Oligarch
June 9, 2023, 11:40pm
12
Are there any external ADC modules that can be connected to ESP-01? When an incoming call occurs, there is a voltage appearing on the line. I need to somehow capture this moment…
nickrout
June 9, 2023, 11:42pm
13
What voltage appears? Could be as simple as a transistor to a regular gpio?
Oligarch
September 12, 2024, 11:55pm
14
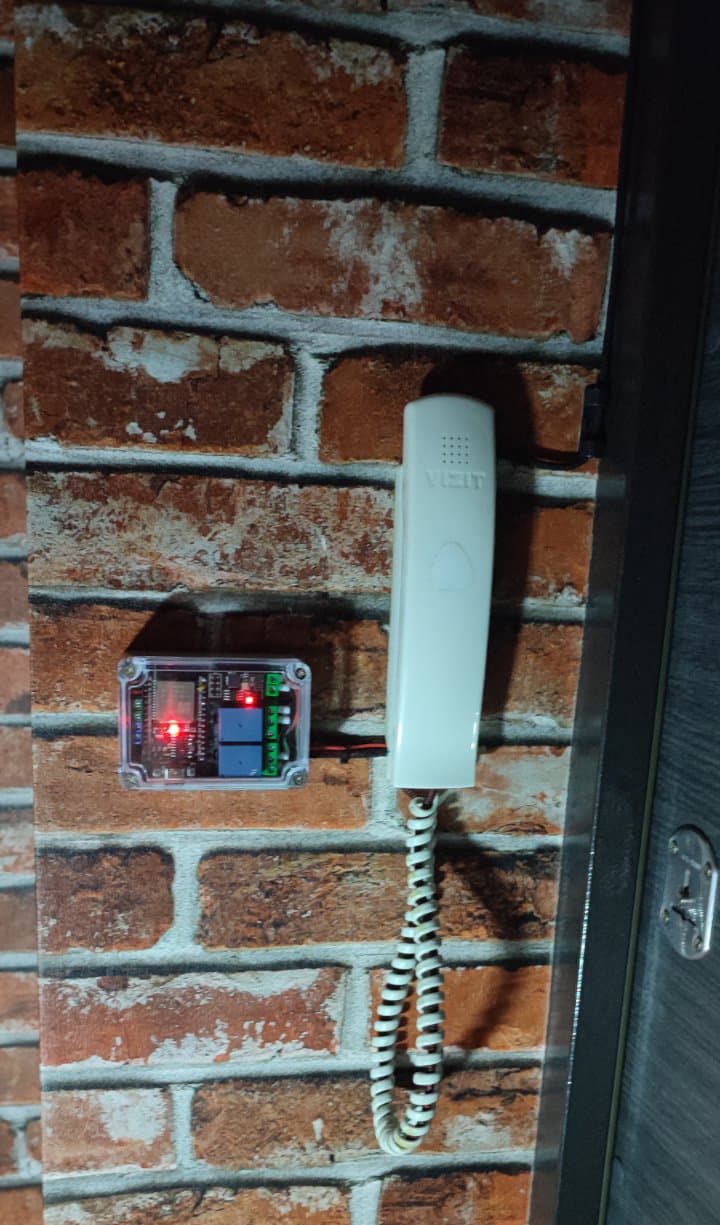
I finally had the chance to work on my project to integrate an old intercom into Home Assistant. This is my first ESP project, and I’m excited to share the results.
I’m pleased to report that the final result has been highly satisfying. The system works flawlessly and responds 100% of the time, meeting all my expectations.
Thanks for all the help and support in this topic.
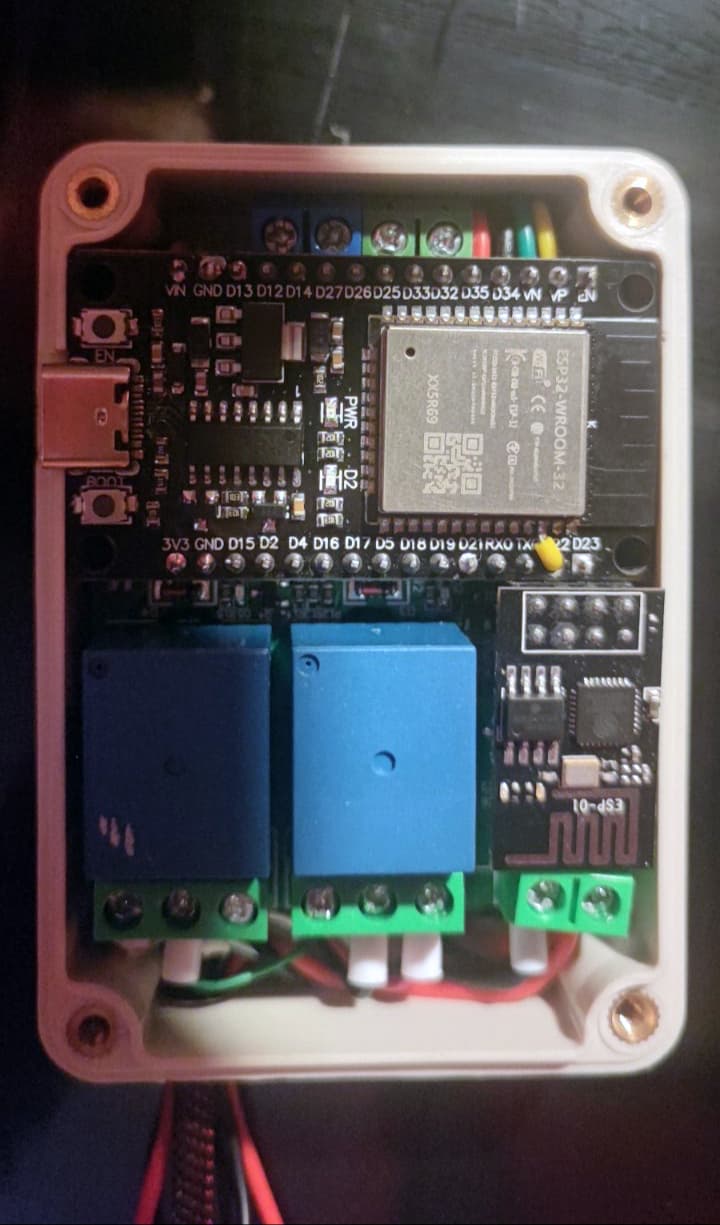
ESP_Relay_x2_V1.2 board with ESP-01-1M
ESP32 CH340 Dev board
INA226 module
Transparent plastic junction box
INA226 to ESP32:
SDA → ESP32 SDA (GPIO21)
SCL → ESP32 SCL (GPIO22)
VCC → 3.3V of the ESP32
GND → GND of the ESP32
INA226 Internal Connections:
VBUS** → LINE+ (Intercom)
GND** → LINE- (Intercom)
Relay Board Wiring:
Relay 1 (Handset Simulation):
NC → Reed Switch in Series
COM → Reed Switch Circuit
Relay 2 (Button Press):
NO → Button Circuit in Parallel
COM → Button Circuit
The INA226 module monitors the voltage on the intercom line to detect incoming call.
Home Assistant sends a actionable notification when a call is detected.
Notifications let you Open or Dismiss the call. Open simulates lifting the handset and pressing the door button. Dismiss breaks the line to end the call.
ESP32 Configuration:
esphome:
  name: intercom-calltracker
  friendly_name: Intercom CallTracker

esp32:
  board: esp32dev
  framework:
    type: arduino

logger:

api:
  encryption:
    key: "***"

ota:
  - platform: esphome
    password: "***"

wifi:
  ssid: !secret wifi_ssid
  password: !secret wifi_password

  ap:
    ssid: "Intercom-Calltracker"
    password: "***"

web_server:

captive_portal:

i2c:
  sda: GPIO21
  scl: GPIO22
  scan: true
  id: bus_a

sensor:
  - platform: wifi_signal
    name: "WiFi signal strength"
    id: wifi_signal_strength
    update_interval: 60s
    entity_category: "diagnostic"
    device_class: signal_strength
  - platform: internal_temperature
    name: "Internal Temperature"
  - platform: ina226
    address: 0x40
    shunt_resistance: 0.01 ohm
    max_current: 3.2A
    adc_time: 140us
    adc_averaging: 128
    update_interval: 3s
    bus_voltage:
      name: "INA226 Bus Voltage"
      id: ina226_bus_voltage

binary_sensor:
  - platform: status
    name: "Status"
  - platform: template
    name: "IncomingCall"
    device_class: sound
    lambda: |-
      if (id(ina226_bus_voltage).state > 1) {
        return true;
      } else {
        return false;
      }

button:
  - platform: restart
    name: "Restart"
ESP-01 Configuration:
esphome:
  name: intercom-controlunit
  friendly_name: Intercom ControlUnit

esp8266:
  board: esp01_1m

logger:

api:
  encryption:
    key: "***"

ota:
  - platform: esphome
    password: "***"

wifi:
  ssid: !secret wifi_ssid
  password: !secret wifi_password

  ap:
    ssid: "Intercom-Controlunit"
    password: "***"

web_server:

captive_portal:

binary_sensor:
  - platform: status
    name: "Status"

sensor:
  - platform: wifi_signal
    name: "WiFi signal strength"
    id: wifi_signal_strength
    update_interval: 15s
    entity_category: "diagnostic"
    device_class: signal_strength

button:
  - platform: restart
    name: "Restart"

switch:
  - platform: gpio
    id: handset_pickup
    name: 'Handset pick up'
    pin:
      number: GPIO0
      inverted: true

  - platform: gpio
    id: button_press
    name: 'Button press'
    pin:
      number: GPIO2
      inverted: true
    on_turn_on:
    - delay: 500ms
    - switch.turn_off: button_press
Automation Code:
alias: Notify_Action
description: >-
  Sends a notification when an incoming intercom call is detected. If the
  input_boolean.intercom_open_once is enabled, the door opens automatically and
  a confirmation notification is sent. Otherwise, the user receives a
  notification with options to either open or dismiss the call.
trigger:
  - platform: state
    entity_id:
      - binary_sensor.incomingcall
    to: "on"
action:
  - choose:
      - conditions:
          - condition: state
            entity_id: input_boolean.intercom_open_once
            state: "on"
        sequence:
          - action: script.control_intercom
            data:
              do_action: open
          - action: input_boolean.turn_off
            data: {}
            target:
              entity_id: input_boolean.intercom_open_once
          - domain: mobile_app
            type: notify
            device_id: your_device_id
            title: |
              <b>Intercom</b>
            message: |
              <b><span style="color: #F07857">Automatically Opened</span></b>
            data:
              tag: Intercom_IncomingCall
              sticky: "true"
              color: "#87CEEB"
              channel: IntercomNotification
              ledColor: blue
              notification_icon: mdi:deskphone
    default:
      - variables:
          action_open: "{{ 'OPEN_' ~ context.id }}"
          action_dismiss: "{{ 'DISMISS_' ~ context.id }}"
      - domain: mobile_app
        type: notify
        device_id: your_device_id
        title: |
          <b>Intercom</b>
        message: |
          <b><span style="color: #006400">Incoming Call</span></b>
        data:
          tag: Intercom_IncomingCall
          sticky: "true"
          color: "#87CEEB"
          channel: IntercomCall
          ledColor: blue
          notification_icon: mdi:deskphone
          actions:
            - action: "{{ action_open }}"
              title: Open
            - action: "{{ action_dismiss }}"
              title: Dismiss
      - wait_for_trigger:
          - platform: event
            event_type: mobile_app_notification_action
            event_data:
              action: "{{ action_open }}"
          - platform: event
            event_type: mobile_app_notification_action
            event_data:
              action: "{{ action_dismiss }}"
          - platform: state
            entity_id:
              - binary_sensor.incomingcall
            to: "off"
            from: "on"
            for:
              seconds: 1
        timeout:
          minutes: 1
          seconds: 5
        continue_on_timeout: true
      - choose:
          - conditions:
              - condition: state
                entity_id: binary_sensor.incomingcall
                state: "off"
                for:
                  seconds: 1
            sequence:
              - domain: mobile_app
                type: notify
                device_id: your_device_id
                title: |
                  <b>Intercom</b>
                message: "<b><span style=\"color: red\">Call Interrupted</span></b>"
                data:
                  tag: Intercom_IncomingCall
                  sticky: "true"
                  color: "#87CEEB"
                  channel: IntercomNotification
                  ledColor: blue
                  notification_icon: mdi:deskphone
              - stop: Call Interrupted
          - conditions:
              - condition: template
                value_template: "{{ wait.trigger.event.data.action == action_dismiss }}"
            sequence:
              - action: script.control_intercom
                data:
                  do_action: dismiss
          - conditions:
              - condition: template
                value_template: "{{ wait.trigger.event.data.action == action_open }}"
            sequence:
              - action: script.control_intercom
                data:
                  do_action: open
      - domain: mobile_app
        type: notify
        device_id: your_device_id
        message: clear_notification
        data:
          tag: Intercom_IncomingCall
mode: single
Script Code:
alias: Control_Intercom
sequence:
  - choose:
      - conditions:
          - condition: template
            value_template: "{{ do_action == \"open\" }}"
        sequence:
          - action: switch.turn_on
            metadata: {}
            data: {}
            target:
              entity_id: switch.intercom_controlunit_handset_pick_up
          - delay:
              hours: 0
              minutes: 0
              seconds: 2
              milliseconds: 0
          - action: switch.turn_on
            metadata: {}
            data: {}
            target:
              entity_id: switch.intercom_controlunit_button_press
          - delay:
              hours: 0
              minutes: 0
              seconds: 2
              milliseconds: 0
          - action: switch.turn_off
            metadata: {}
            data: {}
            target:
              entity_id: switch.intercom_controlunit_handset_pick_up
      - conditions:
          - condition: template
            value_template: "{{ do_action == \"dismiss\" }}"
        sequence:
          - action: switch.turn_on
            metadata: {}
            data: {}
            target:
              entity_id: switch.intercom_controlunit_handset_pick_up
          - delay:
              hours: 0
              minutes: 0
              seconds: 0
              milliseconds: 500
          - action: switch.turn_off
            metadata: {}
            data: {}
            target:
              entity_id: switch.intercom_controlunit_handset_pick_up
description: ""
1 Like
sviat_d
August 20, 2025, 7:45am
15
Hello, @Oligarch . Thank you for sharing your experience. Can you tell how your project was powered? As I understood the intercom handset isn’t powered all the time so you can’t get power from there. Have you used batteries or is there some other useful advice?
Oligarch
August 20, 2025, 8:37am
16
In my case I couldn’t draw power from the intercom itself since it didn’t provide enough current. Instead, I had a 220V cable coming out of the wall from an old doorbell installation near the front door. I disassembled a regular 2A phone charger, soldered a USB cable to the charger board and the 220V leads, and placed everything inside a small enclosure from AliExpress.