Good Morning,
I have been dealing with the stresses of tuya integration (Tuya, Local-Tuya, Tuya-Local) disconnecting from the lights, so theres only 3 options:
- Flash custom firmware to the tuya lights; Risky may brick device(s).
- Purchases another brand lights preferably based zigbee lights.
- Use smart switch or smart relay to control lights.

I went with option 3 as i actually do love the tuya lights but i don’t like their connectivity to come assistant which is another conversational piece.
So here’s my solutions:
-
Gather Equipment
Purchase ZBMINIL2, this one does not require an additional neutral to your light switch.
Purchase Sonoff Zigbee USB Dongle, this will be how home assistant talks to the smart relays. -
Install & Connect To Home Assistant
Install the relay behind your light switch as per instruction, then connect via USB Dongle in home assistant. Both are very straight forward. -
Create A Light Entity
If your like me and don’t want your switch to appear as a switch in homekit, we can create a fake light entity which state is linked to the state of the smart relay. To achieve this you cant do it by creating a helper via setting > devices>helpers etc. as this will create a binary sensor which we don’t want for homekit. We will need to do it in the config yaml. So open you config yaml and past this in :
light:
  - platform: template
    lights:
      kitchen_light:
        friendly_name: "Kitchen Light Proxy"
        unique_id: "kitchen_light_proxy"
        value_template: "{{ 'on' if states('switch.YOUR-RELAY-ENTITY-HERE') == 'on' else 'off' }}"
        turn_on:
          service: switch.turn_on
          target:
            entity_id: switch.kitchen_relay
        turn_off:
          service: switch.turn_off
          target:
Be sure to update the friendly name, unique id, and your relay’s entity id in the code.
Save & Restart Home Assistant!
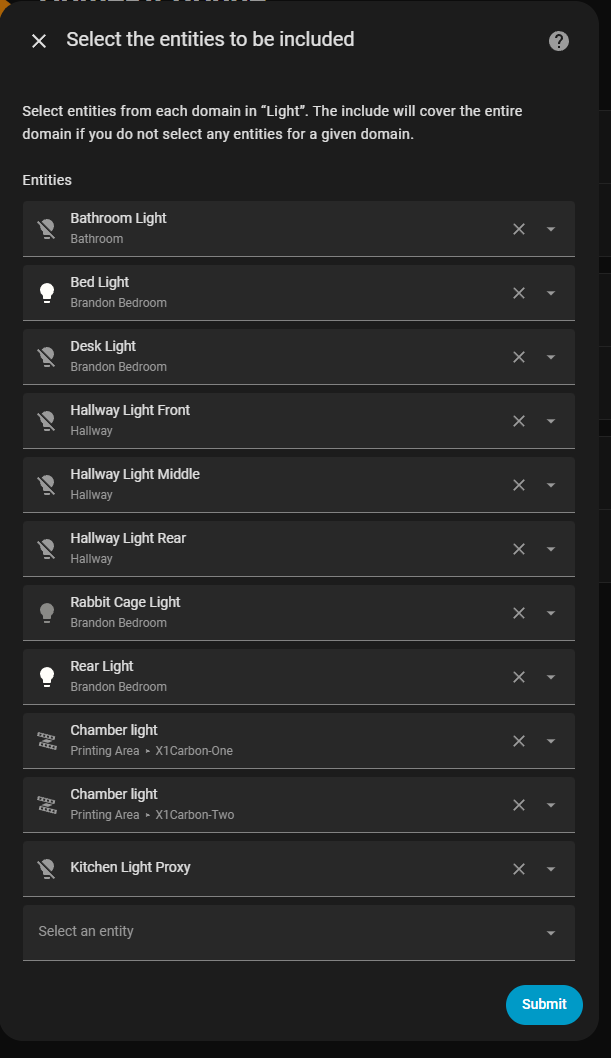
- Add To HomeKit Bridge
Once added and submitted your device will appear in HomeKit as a light with basic on/off functionality. Quite foolish apple doesn’t let us select what our device should be shown as in homekit so this is the work around.
Notes:
The smart relay i mentioned earlier is multi-useful you can use it to make your light switches smart or you can use it as a relay. I have an additional one of these setup on my bathroom fan functioning as a simple relay and paired to homekit as a fan. Also note please read the instruction to the of the smart relay carefully, when wired correctly your physical light switch become a state toggle meaning regardless if the relay is off or switch is off either fully function. Think of it as a 3-way switch between your light switch and the smart relay in a sense, but the smart relay is is behind your light switch and can be remotely controlled ![]() .
.
Optionally you can do more with the code above, in this instance i have the imaginary light we created in yaml setup to only control basic on/off functions which are linked to smart relay’s state value. But additionally you can technically return the color changing functionality and embed them in the mock light we created. I did not do this because you’ll fall back into the same pit this tutorial pulled you up from when the tuya integration disconnects from the tuya lights, tho you’ll still be able to turn on/off the lights because the mock light controls on/off via the smart relay. Im currently still working on that code and currently got the color wheel to appear in homekit just needs to be properly coded so it grabs the value from one and applies it both real lights.
Edit
# Create a template light entity paired to switch.kitchen_relay for on/off and Tuya lights for color/brightness/temp
light:
  - platform: template
    lights:
      kitchen_light:
        friendly_name: "Kitchen Light"
        unique_id: "kitchen_light_mock"
        value_template: "{{ 'on' if states('switch.kitchen_relay') == 'on' else 'off' }}"
        level_template: "{{ state_attr('light.kitchen_light_rear', 'brightness') | default(255) }}"
        temperature_template: "{{ state_attr('light.kitchen_light_rear', 'color_temp') | default(153) }}"
        color_template: "{{ state_attr('light.kitchen_light_rear', 'hs_color') | default([0, 100]) }}"
        turn_on:
          - service: switch.turn_on
            data:
              entity_id: switch.kitchen_relay
          - service: light.turn_on
            data:
              entity_id:
                - light.kitchen_light_rear
                - light.kitchen_light_rear_2
              hs_color: "{{ state_attr('light.kitchen_light_rear', 'hs_color') | default([0, 100]) }}"
              brightness: "{{ state_attr('light.kitchen_light_rear', 'brightness') | default(255) }}"
              color_temp: "{{ state_attr('light.kitchen_light_rear', 'color_temp') | default(153) }}"
        turn_off:
          - service: switch.turn_off
            data:
              entity_id: switch.kitchen_relay
        set_level:
          - service: light.turn_on
            data:
              entity_id:
                - light.kitchen_light_rear
                - light.kitchen_light_rear_2
              brightness: "{{ brightness }}"
        set_temperature:
          - service: light.turn_on
            data:
              entity_id:
                - light.kitchen_light_rear
                - light.kitchen_light_rear_2
              color_temp: "{{ mireds }}"
        set_color:
          - service: light.turn_on
            data:
              entity_id:
                - light.kitchen_light_rear
                - light.kitchen_light_rear_2
              hs_color: ["{{ h }}", "{{ s }}"]
this code does the aformentioned, but does not switch back from color mode to temp mode still needs fixing.but the on/off via smart relay is spot on ![]()
