Meltem WRG II integration via Meltem Gateway and Modbus

Hi everyone,

I’d like to share my experience integrating my Meltem WRG II units (M-WRG-II E-T-FC) into HA utilizing the Meltem Gateway.

This guide deals specifically with the integration of WRG II devices which are connected to the Meltem Gateway (M-WRG-GW) into Home Assistant. Not any other versions they offer!

Setup

After talking to the Meltem support they told me that their gateway exposes a Modbus COM RTU interface via the Micro-USB interface. There is no need to enable anything. You can also still use their app in parallel in combination with HA if you want or switch completely to HA.

First pair all your WRG devices to the gateway using the official app.If that worked you can continue with the HA integration. Then connect a MicroUSB cable to the gateway and plug it into your computer, RPi or whatever you are running HA on. The gateway is then powered via USB and your HA computer should recognize a new COM interface you can connect to. On my Pi4 with Hass.io it is /dev/ttyACM0. You can also check dmesg output via terminal what got recognized by the kernel.

If that works you must setup the modbus RTU integration according to Modbus - Home Assistant.

My config now looks like this:

- name: modbus_hub
  type: serial
  port: /dev/ttyACM0
  baudrate: 19200
  bytesize: 8
  method: rtu
  parity: E
  stopbits: 1

  sensors:
# Lüftung SZ
    - name: "Lüftung SZ Modus"
      slave: 3
      address: 41100
      data_type: int16   
      scan_interval: 3
    - name: "Lüftung SZ Modus Zuluft"
      slave: 3
      address: 41101
      data_type: int16   
      scan_interval: 3
    - name: "Lüftung SZ Ablufttemperatur"
      slave: 3
      address: 41000   
      data_type: float32
      device_class: temperature
      unit_of_measurement: "°C"      
      scan_interval: 60      
      precision: 1
      swap: word
    - name: "Lüftung SZ Außenlufttemperatur"
      slave: 3
      address: 41002      
      data_type: float32
      device_class: temperature
      unit_of_measurement: "°C"
      precision: 1
      scan_interval: 60      
      swap: word
    - name: "Lüftung SZ Fortlufttemperatur"
      slave: 3
      address: 41004
      data_type: float32
      device_class: temperature
      unit_of_measurement: "°C"      
      scan_interval: 60      
      precision: 1
      swap: word
    - name: "Lüftung SZ Feuchte Abluft"
      slave: 3
      address: 41006
      data_type: int16
      device_class: humidity
      unit_of_measurement: "%"    
      scan_interval: 60      
    - name: "Lüftung SZ CO² Abluft"
      slave: 3
      address: 41007
      data_type: int16
      device_class: carbon_dioxide
      unit_of_measurement: "ppm"      
      scan_interval: 60
    - name: "Lüftung SZ Zulufttemperatur"
      slave: 3
      address: 41009
      data_type: float32
      device_class: temperature
      unit_of_measurement: "°C"      
      scan_interval: 60
      precision: 1
      swap: word
    - name: "Lüftung SZ Feuchte Zuluft"
      slave: 3
      address: 41011
      data_type: int16
      device_class: humidity
      unit_of_measurement: "%"    
      scan_interval: 60      
    - name: "Lüftung SZ Lüfterstufe Abluft"
      slave: 3
      address: 41020      
      data_type: int16
      device_class: volume_flow_rate
      unit_of_measurement: "m³/h"      
      scan_interval: 3
    - name: "Lüftung SZ Lüfterstufe Zuluft"
      slave: 3
      address: 41021   
      data_type: int16
      device_class: volume_flow_rate
      unit_of_measurement: "m³/h"      
      scan_interval: 3
    - name: "Lüftung SZ Zeit bis Filterwechsel"
      slave: 3
      address: 41027
      data_type: int16
      device_class: duration
      unit_of_measurement: "d"      
      scan_interval: 60
    - name: "Modus SZ"
      slave: 3
      address: 41120
      data_type: int16
      #device_class: duration
      #unit_of_measurement: "d"      
      scan_interval: 3600
    - name: "Lüftung SZ Rel. Feuchte Startpunkt"
      slave: 3
      address: 42000
      data_type: int16
      device_class: humidity
      unit_of_measurement: "%"      
      scan_interval: 3

Writing register ^= changing modes, fan speeds etc

To change fan speeds, modes etc. you must basically write 3 register after another. E.g. this script sets the mode to “Auto”

alias: Ventilation - SZ - Auto
sequence:
  - service: modbus.write_register
    metadata: {}
    data:
      hub: modbus_hub
      slave: 3
      address: 41120
      value: 2
  - service: modbus.write_register
    metadata: {}
    data:
      hub: modbus_hub
      slave: 3
      address: 41121
      value: 16
  - service: modbus.write_register
    metadata: {}
    data:
      hub: modbus_hub
      slave: 3
      address: 41132
      value: 0
mode: single

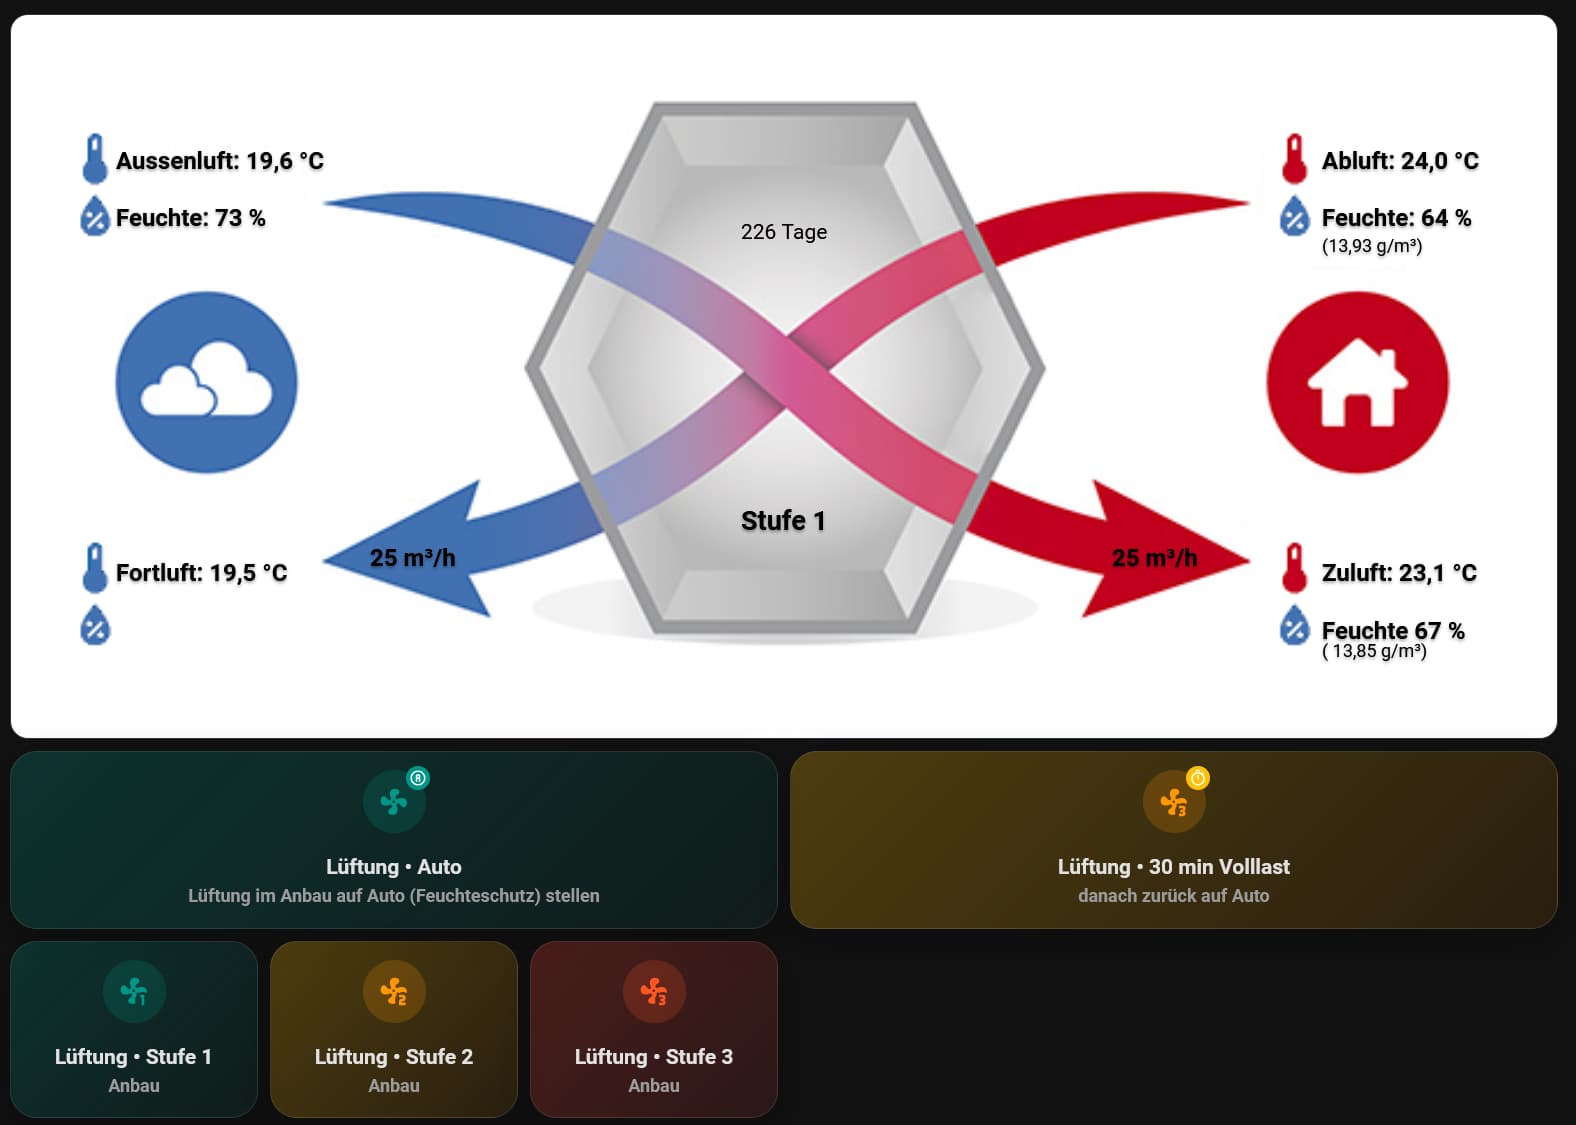
To get the values for the current state and calculate the absolute humidity I’ve created those sensor templates:

    # Schlafzimmer
    luftung_sz_feuchte_zuluft_absolut:
      unit_of_measurement: 'g/m³'
      value_template: >
        {% set h, t = states('sensor.luftung_sz_feuchte_zuluft') | float, states('sensor.luftung_sz_zulufttemperatur') %}
           {% if not h or t == 'unknown' -%}
             'unknown'
           {%- else %}
            {% set t = t | float %}
            {{ (h*6.112*2.1674*e**((t*17.67)/(t+243.5))/(t+273.15))|round(2) }}
           {% endif %}
    luftung_sz_feuchte_abluft_absolut:
      unit_of_measurement: 'g/m³'
      value_template: >
        {% set h, t = states('sensor.luftung_sz_feuchte_abluft') | float, states('sensor.luftung_sz_ablufttemperatur') %}
           {% if not h or t == 'unknown' -%}
             'unknown'
           {%- else %}
            {% set t = t | float %}
            {{ (h*6.112*2.1674*e**((t*17.67)/(t+243.5))/(t+273.15))|round(2) }}
           {% endif %}
    luftung_sz_modus_string:
      value_template: >
            {% if is_state('sensor.luftung_sz_modus', '1')  %}
              Standby
            {% elif is_state('sensor.luftung_sz_modus', '2') and is_state('sensor.luftung_sz_modus_zuluft', '112') %}
              Feuchte-Regelung
            {% elif is_state('sensor.luftung_sz_modus', '2') and is_state('sensor.luftung_sz_modus_zuluft', '176') %}
              CO²-Regelung
            {% elif is_state('sensor.luftung_sz_modus', '2') and is_state('sensor.luftung_sz_modus_zuluft', '48') %}
              Auto
            {% elif is_state('sensor.luftung_sz_modus', '3') and is_state('sensor.luftung_sz_modus_zuluft', '228') %}
              Stufe 1
            {% elif is_state('sensor.luftung_sz_modus', '3') and is_state('sensor.luftung_sz_modus_zuluft', '229') %}
              Stufe 2
            {% elif is_state('sensor.luftung_sz_modus', '3') and is_state('sensor.luftung_sz_modus_zuluft', '230') %}
              Stufe 3
            {% elif is_state('sensor.luftung_sz_modus', '3') %}
              Manuell
            {% elif is_state('sensor.luftung_sz_modus', '4') %}
              Manuell - unbalanciert
            {% endif %}

For all other options please have a look into the documentation of their Modbus versions. See chapter 16 in https://www.meltem.com/fileadmin/downloads/documents/Meltem%20BA-IA_M-WRG-II_P-M_E-M%20EN.pdf

REMARKS

  • On the Gateway the Modbus register 41000 and 41004 are reversed. That’s why those differ in my config to the documentation. Meltem confirmed this when talking to them that the registers are different here.
  • The first slave ID being used is 2 and then increment in the sequence you’ve added your devices via the app to the gateway.
  • thanks to yoziru for providing this great example for Zehnder systems and some nice graphics I borrowed GitHub - yoziru/esphome-zehnder-comfoair: Interact with Zehnder Comfoair Q using ESPHome and Home Assistant
4 Likes

Sounds great Anton, exactly what i was looking for!
Have some Meltem M-WRG with Gateway here as well.
Any idea how to map the serial connection via Ethernet into the docking container?
NAS is in the ground floor, so not the right place for the Gateway - but i have another NAS that runs Docker in the 2nd floor, possibly there are solutions?
Or - even simpler, is there a way to connect the Gateway also via Ethernet?

1 Like

I have no idea how to do this unfortunately. But maybe GitHub - custom-components/remote_homeassistant: Links multiple home-assistant instances together would be an option. Never tried it but it sounds promising.

Hi Anton,
Thanks for your example. Based on your work I’am also trying to integrate my Meltem App into HA, but unfortunatly it seems, that my Meltem gateway ist not recognized by my Home Assistant. And I don’t know why. I’ve tried three different USB ports, but non seems to recognize the gateway.
I have tried different commands in the terminal, dmseg and so on, but no USB device… Can you remember, if you have activated anything special?!

Thanks in advance,
Mathias

Hi Mathias,

I first tried it under Windows with GitHub - ClassicDIY/ModbusTool: A modbus master and slave test tool with import and export functionality, supports TCP, UDP and RTU. with no Ethernet connected before I changed to HA. Windows recognized a new device when I connected the gateway via USB. Other than that I did nothing special. It worked out of the box for me.

On my hass.io Pi4 dmesg shows this:

[15415427.135088] usb 1-1.3: new full-speed USB device number 65 using xhci_hcd
[15415427.246378] usb 1-1.3: New USB device found, idVendor=10ac, idProduct=010a, bcdDevice= 1.00
[15415427.246407] usb 1-1.3: New USB device strings: Mfr=1, Product=2, SerialNumber=3
[15415427.246413] usb 1-1.3: Product: Modbus
[15415427.246417] usb 1-1.3: Manufacturer: Honeywell
[15415427.246420] usb 1-1.3: SerialNumber: 4807869E0
[15415427.253843] cdc_acm 1-1.3:1.0: ttyACM0: USB ACM device

Hi Mathias,

I have the same issue, connected Meltem Gateway to HA Raspi via USB, but device is not recognized. dmesg log shows no related entries.

Did you find a solution in the meantime?

Thanks for great info @da_anton . I’m aware this documents integration making use of the gateway, but I was wondering if there was a specific reason why you used the GW. Did you consider directly connecting the unit to HA, as it seems it also exposes ModBus RTU. Anyone else any experience there?

Planning my own integration, so looking for input on all the options, would love to learn form your experience!

My WRG II units got installed after we renovated. I found it the easiest way to just buy the GW box to connect mine without having to deal with cables etc… Maybe an eps32 connected to the unit directly could do the same. But I have no time testing this out. The GW works perfectly for me and in case I would need a remote connection I can still just use the official Meltem app.

@da_anton I’m also looking into installation as renovation, ESP32 has crossed my mind, but didn’t really found an out of the box solution (or at least with limited thinkering required :wink: ) The option for the GW will indeed be easiest / fastest.

I did just notice the link you added above no longer works, I assume it is the same info as in https://www.meltem.com/fileadmin/downloads/documents/Meltem%20BA-IA_M-WRG-II_P-M_E-M%20EN.pdf

1 Like

Hi Hoschi!
Sorry for my late reply, but no, I could not fix it so far. Have been investing many hours, but I could not find out, why the Meltem Gateway is not recognized… Are you still having the same problem?

Hi Anton,
Thank you for your great work, works like a charm

Majo

Hi, I had the same problem. I tried a different USB cable and it worked.

if youre Meltem Device has the Modbus Option you can also use Waveshare RS485 Ethernet Adapter, also works great (many thanks to this Post)

Hi, thanks a lot for this very helpful thread!
I’m considering installing a new Meltem WRG-II and I want to connect it to my HA as well. Based on the brochure (page 26), it looks like there are two versions of the WRG-II: One that works with the app and one with modbus (M-WRG-II E-T and M-WRG-II E-M; there are more variations, of course but I’m concerned about the T vs M versions here). As the wiring is not an issue I would rather directly connect the HA via modbus to the Meltem instead of the Gateway. Still I like to be able to use the app as backup in case HA is down. Can I do that with the modbus version? Can someone verify? Thank you!

Question, did you try via IP iso micro USB? It has the same modbus tables/addresses.

If you also want to use the Meltem app you need the version that works with the Gateway and you connect the modbus to the HA via that Gateway.

Hello and thank you very much for this! The supplied gateway USB cable only transfers power, not data. The USB cable must definitely be replaced with a fully functional cable that includes data lines. I run my HA in a Hyper-V VM, so i am not able to connect the gateway via USB directly to my HA. So i used a Raspberry Pi as a “bridge”. - the Meltem Gateway is connected via USB to the RPI, and on the RPI runs “ser2net” whichs exposes the Serial Modbus to HA. On HA i have added the following to the configuration.yaml:

modbus:
  - name: meltem
    type: rtuovertcp
    host: 192.168.178.147
    port: 5020
    delay: 1
    timeout: 2

    sensors:
      # Lüftung SZ
      - name: "Lüftung SZ Modus"
        slave: 2
        address: 41100
        data_type: int16
        scan_interval: 3

      - name: "Lüftung SZ Modus Zuluft"
        slave: 2
        address: 41101
        data_type: int16
        scan_interval: 3

      - name: "Lüftung SZ Ablufttemperatur"
        slave: 2
        address: 41000
        data_type: float32
        device_class: temperature
        unit_of_measurement: "°C"
        scan_interval: 60
        precision: 1
        swap: word

      - name: "Lüftung SZ Außenlufttemperatur"
        slave: 2
        address: 41002
        data_type: float32
        device_class: temperature
        unit_of_measurement: "°C"
        scan_interval: 60
        precision: 1
        swap: word

      - name: "Lüftung SZ Fortlufttemperatur"
        slave: 2
        address: 41004
        data_type: float32
        device_class: temperature
        unit_of_measurement: "°C"
        scan_interval: 60
        precision: 1
        swap: word

      - name: "Lüftung SZ Feuchte Abluft"
        slave: 2
        address: 41006
        data_type: int16
        device_class: humidity
        unit_of_measurement: "%"
        scan_interval: 60

      - name: "Lüftung SZ CO² Abluft"
        slave: 2
        address: 41007
        data_type: int16
        device_class: carbon_dioxide
        unit_of_measurement: "ppm"
        scan_interval: 60

      - name: "Lüftung SZ Zulufttemperatur"
        slave: 2
        address: 41009
        data_type: float32
        device_class: temperature
        unit_of_measurement: "°C"
        scan_interval: 60
        precision: 1
        swap: word

      - name: "Lüftung SZ Feuchte Zuluft"
        slave: 2
        address: 41011
        data_type: int16
        device_class: humidity
        unit_of_measurement: "%"
        scan_interval: 60

      - name: "Lüftung SZ Lüfterstufe Abluft"
        slave: 2
        address: 41020
        data_type: int16
        device_class: volume_flow_rate
        unit_of_measurement: "m³/h"
        scan_interval: 3

      - name: "Lüftung SZ Lüfterstufe Zuluft"
        slave: 2
        address: 41021
        data_type: int16
        device_class: volume_flow_rate
        unit_of_measurement: "m³/h"
        scan_interval: 3

      - name: "Lüftung SZ Zeit bis Filterwechsel"
        slave: 2
        address: 41027
        data_type: int16
        device_class: duration
        unit_of_measurement: "d"
        scan_interval: 60

      - name: "Modus SZ"
        slave: 2
        address: 41120
        data_type: int16
        scan_interval: 3600

      - name: "Lüftung SZ Rel. Feuchte Startpunkt"
        slave: 2
        address: 42000
        data_type: int16
        device_class: humidity
        unit_of_measurement: "%"
        scan_interval: 3

UPDATE to my prev. post:

i bought an ESP32 S3 DevKit (with USB-C OTG Connector) and build a ESP32 DevKit based “WiFi to Modbus RTU” Bridge for my Meltem Gateway and replaced the Raspberry Pi with this.

Here is my code for the ESP32 with a short How-To:

https://github.com/ThomboSupergott/ESP

i think the benefit from a ESP32 to a RPI is the smaller formfactor, and for me a microcontroller (like ESP32) is more robust than a device with a SD Card. And cheaper.

For now i am happy that i can control my Meltem Device via my HA (which is running as VM).

Many many Thanks to da_anton for all his great work and this thread!!

ESP32-S3 DevKitC-1

Hello, i have managed to connect the Meltem Gateway via a “WIFI to Meltem Bridge” into my virtual running HA instance.