I have wanted to set up multi-floor maps when using Valetudo for some time, and have finally gotten round to it. All the pieces of the puzzle exist already, it is just a matter of wiring them together correctly. Big thanks to all the hard work the various authors have put in which makes this possible.
I have included below my configs (or excerpts from them). I assume you are already familiar with some or all of these, so I have not explained too much here.
Overall the experience for me is good, but the time taken to switch a map is slow (about 1 minute). This is due to a delay in the mqtt vacuum camera getting the updated map from valetudo. If I watch the valetudo frontend, it sees the changed map over 30 seconds before the camera image updates in homeassistant to the new map. I would really appreciate any input here which could speed the process up.
I hope this helps somebody. Any feedback on how I could improve this is welcome
Software used
- Valetudo itself: https://valetudo.cloud/
- Maploader for Valeduto/Dreame GitHub - pkoehlers/maploader: Map loader for Dreame robot vacuums running Valetudo · GitHub
- The awesome vacuum map card from GitHub - PiotrMachowski/lovelace-xiaomi-vacuum-map-card: This card provides a user-friendly way to fully control map-based vacuums in Home Assistant. Supported brands include Xiaomi (Roborock/Viomi/Dreame/Roidmi/Valetudo/Valetudo RE), Neato, Wyze, Roomba, Ecovacs (and probably more). · GitHub
- The vacuum map camera addon: GitHub - sca075/mqtt_vacuum_camera: Camera Integration for Home Assistant to export and render all Vacuums connected via MQTT( including Valetudo Hypfer, Congaduto and RE(rand256)) Maps. · GitHub
- Possibly needed: GitHub - mundschenk-at/ha-valetudo-blueprints: Blueprints for using Valetudo with Home Assistant · GitHub
How it looks
Note that the video above has been sped up 4x since it actually takes a full minute for the process to complete ![]()
Setup
Maploader
First step is to set up Maploader, following the instructions there.
Important: It is not officially supported by Dreame or Valetudo. It’s recommended to back up your map before using the maploader.
My maploader launch script in /data/_root_postboot.sh is:
VALETUDO_CONFIG_PATH=/data/valetudo_config.json DEFAULT_MAP_NAME=attic MAPLOADER_RESTART_VALETUDO=1 WAV_FILE_MAP_LOADED=/data/map-loaded.wav /data/maploader-binary > /dev/null 2>&1 &
This restarts valetudo after changing the map, as this gave me more stability in getting the updated map to reflect in homeassistant.
Next, set up homeassistant to interact with maploader. I created packages/maploader.yaml containing the following (this is based on the maploader documentation):
mqtt:
  sensor:
    - state_topic: valetudo/CrookedEagerDonkey/maploader/status
      name: vacuum_maploader_status
      unique_id: "valetudo_crookedeagerdonkey_maploader_status"
      device:
        manufacturer: Dreame
        model: L10 Pro
        identifiers:
          - CrookedEagerDonkey
        name: Valetudo L10 Pro CrookedEagerDonkey
    - state_topic: valetudo/CrookedEagerDonkey/maploader/map
      name: vacuum_maploader_map
      unique_id: "valetudo_crookedeagerdonkey_maploader_map"
      device:
        manufacturer: Dreame
        model: L10 Pro
        identifiers:
          - CrookedEagerDonkey
        name: Valetudo L10 Pro CrookedEagerDonkey

  select:
    - command_topic: valetudo/CrookedEagerDonkey/maploader/map/set
      state_topic: valetudo/CrookedEagerDonkey/maploader/map
      name: vacuum_maploader_set
      unique_id: "valetudo_crookedeagerdonkey_maploader_set"
      options:
        - "attic"
        - "first_floor"
        - "ground_floor"
        - "basement"
      device:
        manufacturer: Dreame
        model: L10 Pro
        identifiers:
          - CrookedEagerDonkey
        name: Valetudo L10 Pro CrookedEagerDonkey
    - command_topic: valetudo/CrookedEagerDonkey/maploader/map/save
      name: vacuum_maploader_save
      unique_id: "valetudo_crookedeagerdonkey_maploader_save"
      options:
        - "attic"
        - "first_floor"
        - "ground_floor"
        - "basement"
      device:
        manufacturer: Dreame
        model: L10 Pro
        identifiers:
          - CrookedEagerDonkey
        name: Valetudo L10 Pro CrookedEagerDonkey
    - command_topic: valetudo/CrookedEagerDonkey/maploader/map/load
      name: vacuum_maploader_load
      unique_id: "valetudo_crookedeagerdonkey_maploader_load"
      options:
        - "attic"
        - "first_floor"
        - "ground_floor"
        - "basement"
      device:
        manufacturer: Dreame
        model: L10 Pro
        identifiers:
          - CrookedEagerDonkey
        name: Valetudo L10 Pro CrookedEagerDonkey
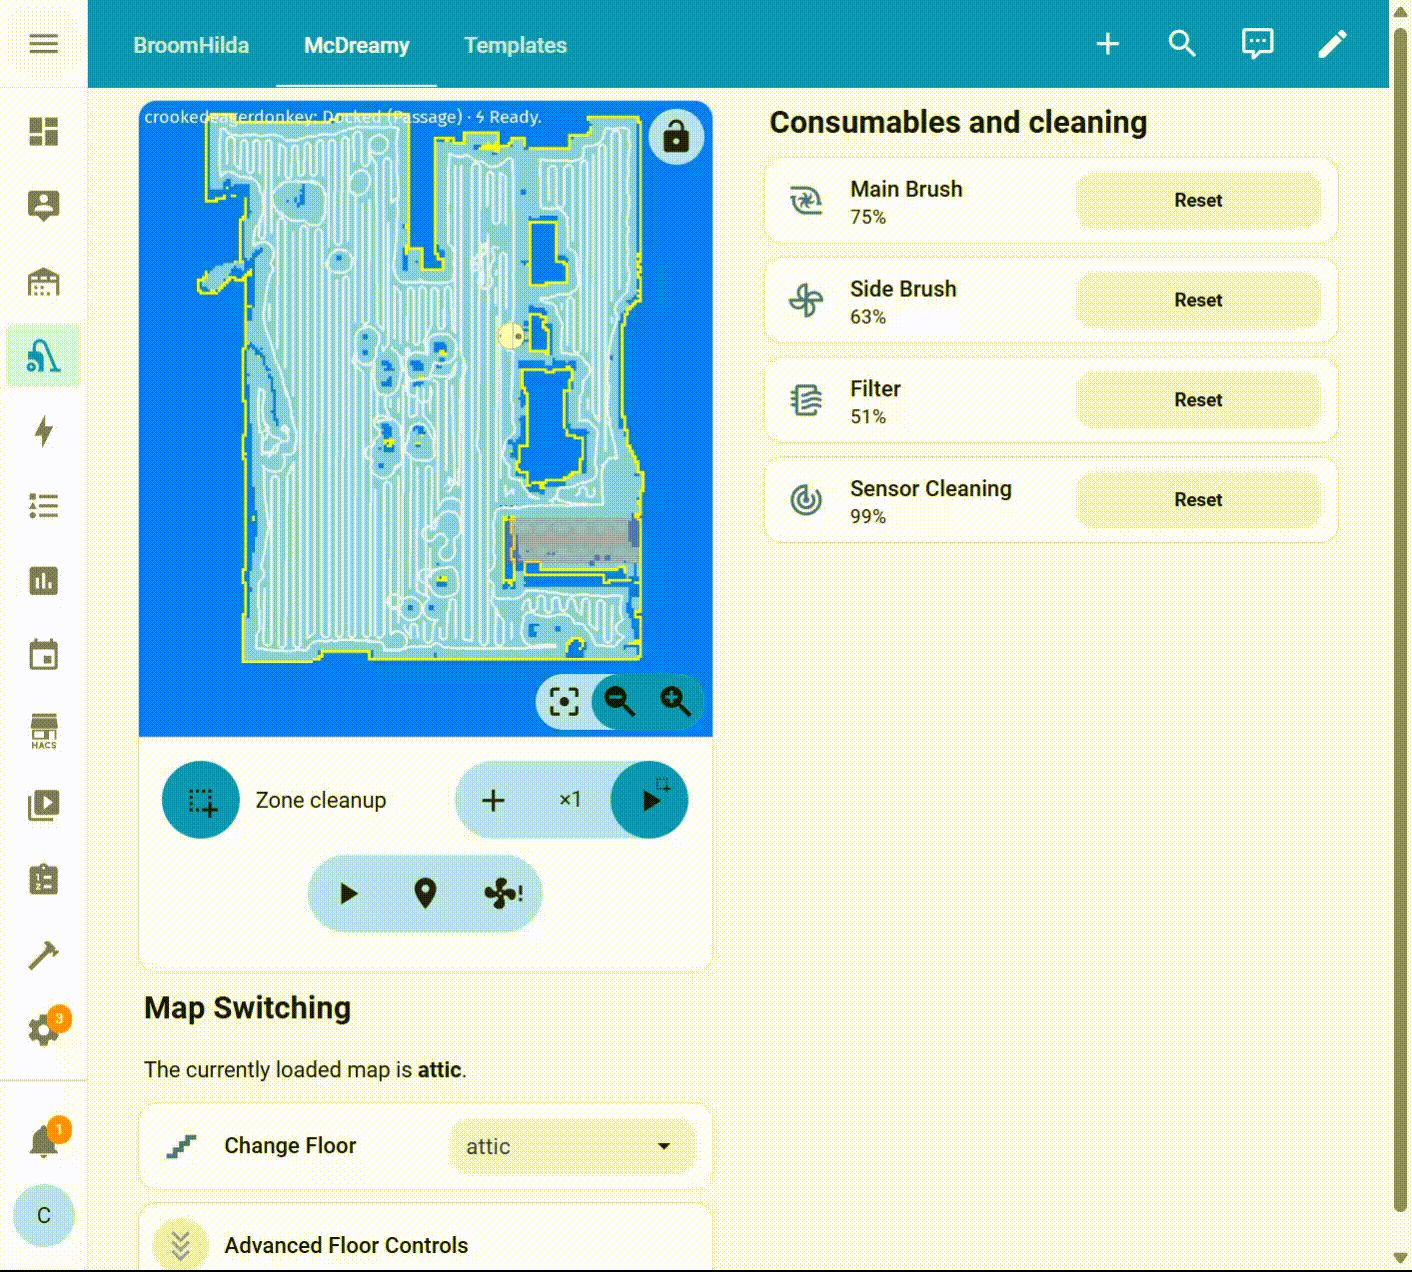
I added a few controls to my dashboard to assist with switching maps:
A tile card to select a new map:
  - features:
      - type: select-options
    type: tile
    entity: select.valetudo_l10_pro_crookedeagerdonkey_vacuum_maploader_load
    features_position: inline
    vertical: false
    name: Change Floor
    hide_state: true
    icon: mdi:stairs
A tile card per floor which exposes the Load/Save/Set actions. I am using custom-card-features to create multiple inline buttons in a single tile card. These cards are hidden by default, as I don’t need to use them often.
  - type: tile
    features:
      - type: custom:service-call
        entries:
          - type: button
            entity_id: select.valetudo_l10_pro_crookedeagerdonkey_vacuum_maploader_load
            label: Load
            tap_action:
              action: perform-action
              perform_action: select.select_option
              target:
                entity_id:
                  - >-
                    select.valetudo_l10_pro_crookedeagerdonkey_vacuum_maploader_load
              data:
                option: first_floor
              confirmation:
                text: Do you want to Load the first_floor map?
          - type: button
            entity_id: >-
              sensor.valetudo_l10_pro_crookedeagerdonkey_vacuum_maploader_map_save
            label: Save
            tap_action:
              action: perform-action
              perform_action: select.select_option
              target:
                entity_id:
                  - >-
                    select.valetudo_l10_pro_crookedeagerdonkey_vacuum_maploader_save
              data:
                option: first_floor
              confirmation:
                text: Do you want to Save the current map as first_floor?
          - type: button
            entity_id: >-
              sensor.valetudo_l10_pro_crookedeagerdonkey_vacuum_maploader_map_set
            label: Switch
            tap_action:
              action: perform-action
              perform_action: select.select_option
              target:
                entity_id:
                  - >-
                    select.valetudo_l10_pro_crookedeagerdonkey_vacuum_maploader_set
              data:
                option: first_floor
              confirmation:
                text: Do you want to Save the current map and Load first_floor?
    entity: sensor.valetudo_l10_pro_crookedeagerdonkey_vacuum_maploader_map
    features_position: inline
    vertical: false
    name: First Floor
    hide_state: true
    visibility:
      - condition: state
        entity: input_boolean.crookedeagerdonkey_showmapcontrols
        state: "on"
Now, you can create your maps. You probably already have a map on the robot, so use the Save action to save that map to a specific name in Maploader
- Validate on the robot itself that it has saved - it will create a new
$MAP_NAME.tar.gzfile in/data/maploader. If it has not done this, first troubleshoot to find out why - read the maploader logs/etc. - If the map save was successful, take your robot to a new floor, and through the valetudo UI, start mapping a new map. Important: dreame vacuums only store a new map once they return to their base station, which means you may need to move the base station to the new floor to map it correctly.
- Once the floor is mapped, use the Save action again to save the new map to a different name.
- Repeat for all floors you want to have mapped.
- Validate by Loading a previous map, and watching the Valetudo web UI - it should show the loaded map after a few seconds.
MQTT Vacuum Camera
The MQTT Vacuum Camera addon (among other things) exposes your map as a homeassistant camera entity, allowing it to be streamed in a dashboard
Install this addon and configure it for your vacuum (if you haven’t already done so)
Lovelace Vacuum Map card
This card provides almost all you need to control your vacuum through homeassistant. Crucially, it provides Presets which can present a different room config depending on the selected preset, and also can conditionally show presets. I use this to only show the preset related to the currently loaded floor map.
The start of my config (not showing all rooms) is as follows. I have added inline comments for the important bits. You will need to follow the card’s installation instructions, and create room configs for each floor by loading the floor, waiting for the camera to catch up, and generating the static room configs. Then indent these configs into a preset for the floor. This takes a bit of manual effort to get right.
type: custom:xiaomi-vacuum-map-card
map_source:
  # This is the camera created by MQTT Vacuum Camera
  camera: camera.valetudo_l10_pro_crookedeagerdonkey_camera
calibration_source:
  camera: true
# This is the valetudo vacuum entity
entity: vacuum.valetudo_crookedeagerdonkey
# The platform is used to run actions against the vacuum.
vacuum_platform: Hypfer/Valetudo
internal_variables:
  topic: valetudo/CrookedEagerDonkey
# I have set the "main" preset to an undefined map
# If a known is not loaded, it will default to this preset.
preset_name: Unknown Map
conditions:
  - entity: sensor.valetudo_l10_pro_crookedeagerdonkey_vacuum_maploader_map
    value_not: attic
  - entity: sensor.valetudo_l10_pro_crookedeagerdonkey_vacuum_maploader_map
    value_not: first_floor
# additional_presets hold the actual maps
additional_presets:
    # This preset has very little configuration for me.
    # It has no rooms, as it is actually a single large room.
  - preset_name: Attic
    entity: vacuum.valetudo_crookedeagerdonkey
    map_source:
      camera: camera.valetudo_l10_pro_crookedeagerdonkey_camera
    calibration_source:
      camera: true
    # Only show this preset if the appropriate floor is selected
    conditions:
      - entity: sensor.valetudo_l10_pro_crookedeagerdonkey_vacuum_maploader_map
        value: attic
  - preset_name: First Floor
    entity: vacuum.valetudo_crookedeagerdonkey
    map_source:
      camera: camera.valetudo_l10_pro_crookedeagerdonkey_camera
    calibration_source:
      camera: true
    conditions:
      - entity: sensor.valetudo_l10_pro_crookedeagerdonkey_vacuum_maploader_map
        value: first_floor
    # This preset has multiple map modes
    # See the card's documentation for more details
    map_modes:
         # The vacuum_clean_segment is room cleaning.
      - template: vacuum_clean_segment
        # This vacuum (L10 Pro) needs additional config.
        # A different vacuum (X40 Ultra) does not need this service_call_schema stanza
        service_call_schema:
          # This script is created from
          # https://github.com/mundschenk-at/ha-valetudo-blueprints
          service: script.dreame_clean_rooms_l10pro
          service_data:
            segments: "[[selection_unwrapped]]"
            iterations: "[[repeats]]"
            entity_id: "[[entity_id]]"
        # Now into the individual rooms:
        predefined_selections:
          - id: Bedroom
            icon:
              name: mdi:bed-double-outline
              x: 2747
              "y": 2962
            label:
              text: Bedroom 1
              x: 2747
              "y": 2962
              offset_y: 35
            outline:
              - - 2570
                - 2690
              - - 2920
                - 2690
              - - 2920
                - 3210
              - - 2570
                - 3210
        # etc etc.