Trigger an alert based on the state of a given sensor’s state. The Alert is sent to a mobile app device and repeats as long as the sensor is in the alerting state or until a max amount was reached.
Get started
Click the badge to import this Blueprint: (needs Home Assistant Core 2021.3 or higher)
Inspired by the alert integration but now easier to use as a blueprint automation
By design, this blueprint only handles very simple criteria for firing. That is, it only checks if a single entity’s state is equal to a value. Possibly, when a battery percentage falls below a threshold. Maybe you want to disable the alert on certain days. Maybe the alert firing should depend on more than one input. For all of these situations, it is best to use the alert in conjunction with a Template Binary Sensor . The following example does that.
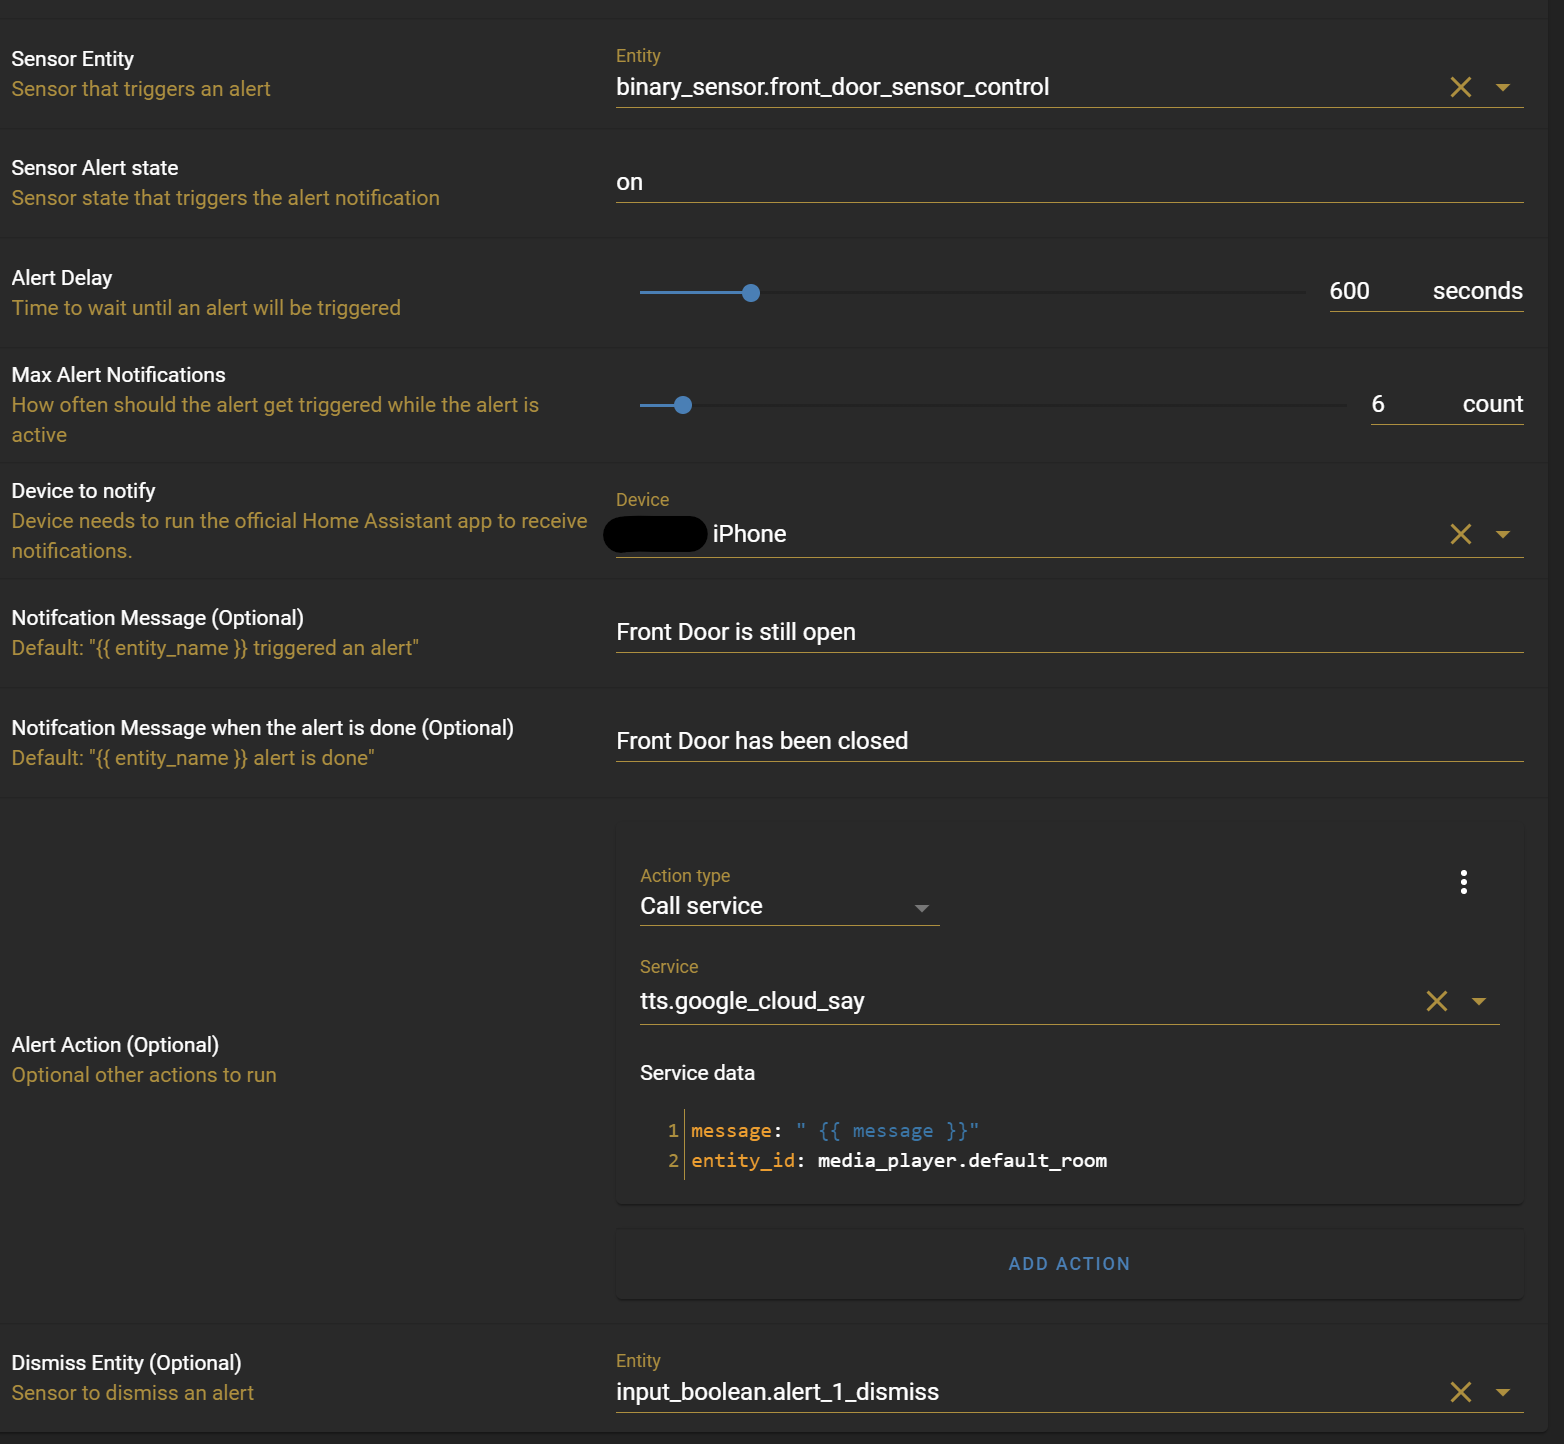
An additional action can be specified. This is useful to hook in your favorite tts service action
Specify a max_amount to have a fallback should you not be able to resolve an alert by yourself and don’t want to get spammed.
The dismiss_entity must be an input_boolean helper that can be used to dismiss an alarm. This is useful if there is an alert, but you are not at home to resolve it.
If the Alert automation is running and home-assistant is restarted, the alert will start again (counting from 0). But not after automations have been reloaded
Changelog
2021-03-28: Added the optional condition_entity to ignore an alert. This is handy if you only want to get an alert for example when you are at home
2021-01-22: Breaking: Added an Input for a initial_delay and repeat_delay. To update your existing automation based on this blueprint replace the alert_delay with initial_delay and add a repeat_delay`
I really wish alerts were UI-configurable, they’re one of my favorite features. I appreciate the effort to make them UI-configurable via an automation blueprint lol.
For the dismiss thing you could probably just prompt for an input_boolean to use as “dismissed state”. So you set it to on when the automation begins, set it to off at the end and stop looping if the user ever manually sets it to off.
Also, one of the reasons I like the alerts feature so much is that since they are fully state-driven they survive restarts. Currently your automation won’t do that. If a restart occurs while that loop is running then its just going to stop. When HA starts back up again the entity you’re watching will just be in the bad state, it won’t have changed to the bad state which is what triggers the automation.
I think you can get around this if you also trigger on home assistant start up and add a condition checking if the watched entity is in the bad state. The condition will be redundant for the state trigger but it will allow the automation to restart after a shutdown while running. It will start the loop over so you’ll end up with more then the expected number of max tries. That could be fixed by introducing another helper but that seems like overkill.
With those two changes I think you’ve basically made a ui-configurable alert as a blueprint.
@CentralCommand thanks a lot for your feedback! I updated the blueprint to allow a dismiss_entity. I also updated the blueprint to make it aware of restarts. As there is no unit test support available yet for blueprints, I cannot guarantee that all the cases work but feel free to test it.
PS: Yes, I also like the Alerts, but it always bothered me, that they are not well known (since they are not available in the UI) - The goal of this Blueprint is to lower the barrier for beginners to create Alert Notifications as they are quite usefull and common in other smart home hubs.
Would love to see the duration be set to time between alerts or number, i.e. alert me when the door is open every 10 minutes until it is closed or I cancel. Also, what would be the possibility of using a different notification method, like Pushover. I tried using the Alert Action to notify but couldn’t get the message to format correctly in the service data field.
Great work on this. I appreciate all the hard work.
That sounds like my use-case at home. Send me an alert if the front-door has been opened for 10minutes. Continue to nag me about this until i close the front-door or I dismiss the alert using the input_boolean
Thanks for the quick response. I will give that a try. Just to make sure I am clear, the 600 second delay will be enforced on the repeats so your rule would notify you every 10 minutes for an hour?
Your description is fine I think. I just have always looked at this type of rule as a time based thing instead of number of iterations. I have always used a rule in Hubitat to do these. Mine have a longer initial period before the first alert (door open 15 minutes before an alert but then every 5 minutes after that). so that was my confusion.
I was literally just starting to write this exact sort of blueprint to replace the alert components I’m using, glad I thought to check here first. You just saved me a solid hour of my life! Thank you sir!
yes, it is. As mentioned in my initial post you need to define a separate binary_sensor template and then reference this new binary_sensor in the alert blueprint
binary_sensor:
  - platform: template
	sensors:
	  my_temperature_too_high:
		value_template: "{{ states('sensor.my-temperature')|float > 25.0 }}"
		friendly_name: 'My Temperature too high'
Mhhh… The expected state should be “on” - First, I’d make sure that your binary_sensor is working as expected. Go to the “Developer Tools” Menu and in the “States” register tab filter for your binary_sensor.xxx sensor. The “State” column should show you the value that is also expected in the blueprint’s “Sensor Alert State”. In my case it’s going to be “on” if temperature is higher than 25.0
Hint: In the “Developer Tools” there is also a “Template” register tab. Paste your value_template that you used to define the binary_sensor template there to test it live.
If that should not resolve your problem, feel free to paste the yaml content of your blueprint-based automation here. To do so, open your automation and in the upper right corner select the three dots and choose “Edit as yaml”
Thank you for the blueprint! If you’re taking suggestions, I would like to be able to have subsequent notifications at a different duration than the initial one. For example, alert at five minutes that the door is open and then an alert every 30 minutes after that until it is closed. A bonus would be to add the amount of time in each alert, e.g. “The door has been opened for 60 minutes”, etc.


 but feel free to test it.