The essence of the problem and why is it necessary?
On Synology, usb and upscmd interact with upsd using a client/server model. Unfortunately, pscd is not available in the Synology Disk Station Manager (DSM) operating system. Reading Synology NAS Beep or Problems with the UPS server after updating DSM 6.2.4-25556.
To use such a command, connecting with OS Home Assistant to NAS Synology, we will not be able to call the command. We will be notified of the error.
ssh [email protected] -p 330 upscmd -u hassmon -p 12345678 ups@localhost:3493 beeper.enable
You can only get the sensor status
ssh [email protected] -p 330 upsc ups@localhost
If you try in OS Home Assistant, run upsc via SSH [email protected], then you will receive a similar message that there is no such command

When you try to install the net package apc add nut, you will receive a message that there is no such package

A solution to the problem
In order to install the nut client, you need to open repositories at the path /etc/apt/repositories and add links to test and edge repositories
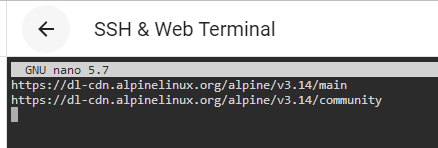
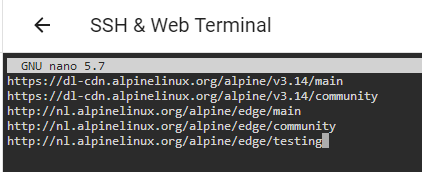
http://nl.alpinelinux.org/alpine/edge/main
http://nl.alpinelinux.org/alpine/edge/community
http://nl.alpinelinux.org/alpine/edge/testing
After the links have been added, you can now install the NUT package with the apt add nut command

Important! After you add the links to '/etc/apt/repositories` and install the 'nut' package, then it will work until you completely restart the OS Home Assistant. For understanding: when we completely reboot OS Home Assistant, OS Home Assistant restores everything to the original and all our settings and packages will be erased and deleted, and we will have to perform the procedure again. The problem can be solved by running the script, but we will run the script not using shell_command, but using the SSH & Web Terminal addon itself.
Let's create a script that will check the repositories file along the path /etc/apk/repositories and if there are no links from the extreme version, then it will add 3 links to the extreme and test versions for downloading and installing the `nut' package, and also check whether the 'nut' package is installed, if the 'nut' package is installed, the script will skip this step and will not install the 'nut' package. This script should be placed in automation when loading Home Assistant. He will check it every time and if the Home Assistant will overwrite everything, then the script will install everything.
1) Create the scripts folder in the config folder
mkdir /config/scripts
2) Create a file with the name install_nut.sh
touch /config/scripts/install_nut.sh
3) Open the file install_nut.sh
nano /config/scripts/install_nut.sh
4) Add the following to the file
#!/bin/bash

FILENAME=/etc/apk/repositories
if [ `grep -l "nl.alpinelinux.org" $FILENAME` ]; then
  echo "Everything is fine. There is no need to add links to the repository"
else
  echo "Oops. Home Assistant deleted everything. Now we will add links to the repository"
  sleep 2
cat <<_EOF_ >> /etc/apk/repositories
http://nl.alpinelinux.org/alpine/edge/main
http://nl.alpinelinux.org/alpine/edge/community
http://nl.alpinelinux.org/alpine/edge/testing
_EOF_
  echo "Done"
fi


apk -e info nut > /etc/apk/packages.txt
FILENAME=/etc/apk/packages.txt
if [ `grep -w "nut" $FILENAME` ]; then
  echo "Everything is fine. You do not need to install the NUT package"
else
  echo "Oops. Home Assistant deleted everything. Now we will install the NUT package"
  apk add nut
  echo "Done"
fi
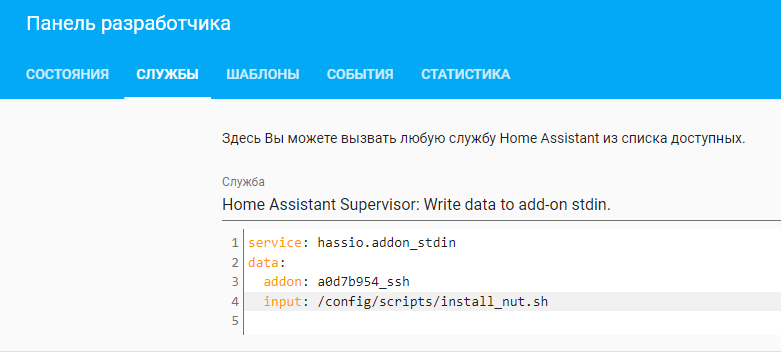
5) Let's create a script to run the script install_nut.sh using the SSH & Web Terminal addon
alias: Installing NUT
sequence:
  - service: hassio.addon_stdin
    data:
      addon: a0d7b954_ssh
      input: /config/scripts/install_nut.sh
mode: single
Before creating a script, you can check the script launch install_nut.sh through the service using the addon SSH & Web Terminal
Sound alert switch
Examples of how to use these services to turn on or off the sound
Turn on the sound
service: hassio.addon_stdin
data:
  addon: a0d7b954_ssh
  input: upscmd -u hassmon -p 12345678 [email protected]:3493 beeper.enable
Turn off the sound
service: hassio.addon_stdin
data:
  addon: a0d7b954_ssh
  input: upscmd -u hassmon -p 12345678 [email protected]:3493 beeper.disable
Example of a switch using integration Template Switch
switch:
  - platform: template
    switches:
      ups_beeper:
        friendly_name: 'Sound notification'
        value_template: '{{ is_state("sensor.ups_beeper_status","enabled") }}'
        turn_on:
          service: hassio.addon_stdin
          data:
            addon: a0d7b954_ssh
            input: upscmd -u hassmon -p 12345678 [email protected]:3493 beeper.enable
        turn_off:
          service: hassio.addon_stdin
          data:
            addon: a0d7b954_ssh
            input: upscmd -u hassmon -p 12345678 [email protected]:3493 beeper.disable
        icon_template: >-
          {% if is_state("sensor.ups_beeper_status","enabled") %}
            mdi:volume-high
          {% else %}
            mdi:volume-off
          {% endif %}
Let's add a card to Lovelace
I created this card for the UPS using several custom integrations

type: entities
entities:
  - type: custom:fold-entity-row
    head:
      entity: sensor.ups_cyberpower_livingroom
      name: UPS
      type: custom:multiple-entity-row
      secondary_info:
        attribute: Charge level
        name: Battery
        unit: '%'
      state_header: Status
      entities:
        - entity: group.livingroom_ups
          name: Sensors
          icon: mdi:information-outline
        - entity: sensor.ups_load
          name: Load
        - entity: sensor.ups_load_watts
          name: Load
    entities:
      - entity: switch.ups_beeper
        secondary_info: last-changed
        icon: mdi:volume-high
      - entity: switch.ups_test_battery_quick
        secondary_info: last-changed
        icon: mdi:battery
      - entity: switch.ups_test_battery_deep
        secondary_info: last-changed
        icon: mdi:battery
Let's create sensors
Important! These sensors as an addition and are not mandatory, we do it at our discretion
- The first sensor UPS Load Watts shows the load in watts, instead of %
- The second sensor was created with the battery level attribute to display in the card as an attribute using custom integration Home Assistant. Multiple Entity Row
To understand what attribute we are talking about
  - type: custom:fold-entity-row
    head:
      entity: sensor.ups_cyberpower_livingroom
      name: ИБП
      type: custom:multiple-entity-row
      secondary_info:
        attribute: Charge level
        name: Battery
        unit: '%'
The sensors themselves
Important! In the line
value_template: "{{ states('sensor.ups_load') | float(default=0) / 100 * 720 | round(0) }}"there is a figure720.This figure means the power of your UPS. See the lineups.realpower.nominal: 720
To find out the power of the UPS, you can use the command
upsc [email protected] ups.realpower.nominal
Check the load sensor readings, for example, with the program WinNUTClient. You can download the WinNUTClient here

sensor:
  - platform: template
    sensors:
      ups_load_watts:
        friendly_name: UPS Load Watts
        unit_of_measurement: "W"
        value_template: "{{ states('sensor.ups_load') | float(default=0) / 100 * 720 | round(0) }}"

  - platform: template
    sensors:
      ups_cyberpower_livingroom:
        friendly_name: 'Room: UPS'
        icon_template: mdi:battery
        value_template: "{{ states('sensor.ups_status') }}"
        attribute_templates:
          Уровень заряда: "{{ states('sensor.ups_battery_charge') }}"
Let's create a group of sensors
This group of sensors will be used in the UPS card, where it is enough to tap on the sensors icon and a list of UPS sensors will be displayed, which is very convenient.
livingroom_ups:
  name: "Room: UPS. Sensors"
  icon: mdi:battery
  all: false
  entities:
    - sensor.ups_battery_charge
    - sensor.ups_status
    - sensor.ups_beeper_status
    - sensor.ups_load
    - sensor.ups_load_watts
    - sensor.ups_nominal_real_power
    - sensor.ups_low_battery_setpoint
    - sensor.ups_warning_battery_setpoint
    - sensor.ups_input_voltage
    - sensor.ups_output_voltage
    - sensor.ups_low_voltage_transfer
    - sensor.ups_high_voltage_transfer
    - sensor.ups_battery_voltage
    - sensor.ups_nominal_battery_voltage
    - sensor.ups_nominal_input_voltage
    - sensor.ups_ups_shutdown_delay
    - sensor.ups_load_restart_delay
    - sensor.ups_battery_runtime
    - sensor.ups_self_test_result
    - sensor.ups_low_battery_runtime
    - sensor.ups_load_start_timer
    - sensor.ups_load_shutdown_timer
    - sensor.ups_battery_chemistry
    - sensor.ups_status_data
    - sensor.ups_battery_manuf_date
Текст на русском (Text in Russian)
Network UPS Tools. Как запустить в OS Home Assistant клиент NUT
Суть проблемы и зачем это нужно?
На Synology upsc и upscmd взаимодействуют с upsd, используя модель клиент/сервер. К сожалению, upsmcd недоступен в операционной системе Synology DiskStation Manager (DSM). Читаем Synology NAS beeper или Problems with UPS Server after DSM 6.2.4-25556 update.
Использовать такую команду, подключившись с OS Home Assistant к NAS Synology, у нас не получится вызвать команду. Нам сообщат об ошибке.
ssh [email protected] -p 330 upscmd -u hassmon -p 12345678 ups@localhost:3493 beeper.enable
Можно получить только статус сенсора
ssh [email protected] -p 330 upsc ups@localhost
Если попытаетесь в OS Home Assistant, через SSH запустить upsc [email protected], то получите подобное сообщение, что такой команды нет
При попытке установить пакет nut apk add nut получите сообщение, что такого пакета нет
Вариант решения проблемы
Для того, чтобы установить клиента nut, необходимо открыть repositories по пути /etc/apk/repositories и добавить ссылки на тестовые и крайние репозитории
http://nl.alpinelinux.org/alpine/edge/main
http://nl.alpinelinux.org/alpine/edge/community
http://nl.alpinelinux.org/alpine/edge/testing
После того как добавили ссылки, можно теперь установить пакет NUT командой apk add nut
Важно! После того, как вы добавите ссылки в
/etc/apk/repositoriesи установите пакетnut, то это будет работать до тех пор, пока вы полностью не перезагрузите OS Home Assistant. Для понимания: когда мы полностью перезагружаем OS Home Assistant, то OS Home Assistant восстанавливает все к исходному и все наши настройки и пакеты будут стерты и удалены, и придется по новой выполнять процедуру. Проблему можно решить запуском скрипта, но, скрипт будем запускать не с помощью shell_command, а с помощью самого аддона SSH & Web Terminal.
Создадим скрипт который будет проверять файлик repositories по пути /etc/apk/repositories и если там не будут ссылки с крайней версии, то добавит добавит 3 ссылки на крайние и тестовые версии для скачивания и установки пакета nut, а также проверит установлен ли пакет nut, если пакет nut установлен, то скрипт пропустит этот шаг и не будет ставить пакет nut. Этот скрипт нужно поместить в автоматизацию при загрузке Home Assistant. Он будет каждый раз сверять и если Home Assistant все затрет, то скрипт все установит.
1) Создадим папку scripts в папке config
mkdir /config/scripts
2) Создадим файлик и именуем install_nut.sh
touch /config/scripts/install_nut.sh
3) Откроем файлик install_nut.sh
nano /config/scripts/install_nut.sh
4) Добавим в файлик следующее
#!/bin/bash

FILENAME=/etc/apk/repositories
if [ `grep -l "nl.alpinelinux.org" $FILENAME` ]; then
  echo "Все отлично. Ссылки в репозитории добавлять не нужно"
else
  echo "Упс. Home Assistant все удалил. Сейчас добавим ссылки в репозитории"
  sleep 2
cat <<_EOF_ >> /etc/apk/repositories
http://nl.alpinelinux.org/alpine/edge/main
http://nl.alpinelinux.org/alpine/edge/community
http://nl.alpinelinux.org/alpine/edge/testing
_EOF_
  echo "Готово"
fi


apk -e info nut > /etc/apk/packages.txt
FILENAME=/etc/apk/packages.txt
if [ `grep -w "nut" $FILENAME` ]; then
  echo "Все отлично. Cтавить пакет NUT не требуется"
else
  echo "Упс. Home Assistant все удалил. Сейчас установим пакет NUT"
  apk add nut
  echo "Готово"
fi
5) Создадим скрипт на запуск скрипта install_nut.sh используя аддон SSH & Web Terminal
alias: Установка NUT
sequence:
  - service: hassio.addon_stdin
    data:
      addon: a0d7b954_ssh
      input: /config/scripts/install_nut.sh
mode: single
Перед созданием скрипта, можно проверить запуск скрипта install_nut.sh через службу, используя аддон SSH & Web Terminal
Выключатель звукового оповещения
Примеры как использовать данные службы для включения или выключения звука
Включаем звук
service: hassio.addon_stdin
data:
  addon: a0d7b954_ssh
  input: upscmd -u hassmon -p 12345678 [email protected]:3493 beeper.enable
Выключаем звук
service: hassio.addon_stdin
data:
  addon: a0d7b954_ssh
  input: upscmd -u hassmon -p 12345678 [email protected]:3493 beeper.disable
Пример выключателя с помощью интеграции Template Switch
switch:
  - platform: template
    switches:
      ups_beeper:
        friendly_name: 'Звуковое оповещение'
        value_template: '{{ is_state("sensor.ups_beeper_status","enabled") }}'
        turn_on:
          service: hassio.addon_stdin
          data:
            addon: a0d7b954_ssh
            input: upscmd -u hassmon -p 12345678 [email protected]:3493 beeper.enable
        turn_off:
          service: hassio.addon_stdin
          data:
            addon: a0d7b954_ssh
            input: upscmd -u hassmon -p 12345678 [email protected]:3493 beeper.disable
        icon_template: >-
          {% if is_state("sensor.ups_beeper_status","enabled") %}
            mdi:volume-high
          {% else %}
            mdi:volume-off
          {% endif %}
Добавим карточку в Lovelace
Данную карточку для ИБП я создал с использованием нескольких пользовательских интеграции
type: entities
entities:
  - type: custom:fold-entity-row
    head:
      entity: sensor.ups_cyberpower_livingroom
      name: ИБП
      type: custom:multiple-entity-row
      secondary_info:
        attribute: Уровень заряда
        name: Батарея
        unit: '%'
      state_header: Статус
      entities:
        - entity: group.livingroom_ups
          name: Сенсоры
          icon: mdi:information-outline
        - entity: sensor.ups_load
          name: Нагрузка
        - entity: sensor.ups_load_watts
          name: Нагрузка
    entities:
      - entity: switch.ups_beeper
        secondary_info: last-changed
        icon: mdi:volume-high
      - entity: switch.ups_test_battery_quick
        secondary_info: last-changed
        icon: mdi:battery
      - entity: switch.ups_test_battery_deep
        secondary_info: last-changed
        icon: mdi:battery
Создадим сенсоры
Важно! Данные сенсоры как дополнение и не являются обязательными, делаем на свое усмотрение
- Первый сенсор UPS Load Watts показывает нагрузку в ваттах, вместо %
- Второй сенсор создал с аттрибутом уровня заряда батареи, чтобы вывести в карточке как аттрибут, используя пользовательскую интеграцию Home Assistant. Multiple Entity Row
Для понимания о каком аттрибуте идет речь
  - type: custom:fold-entity-row
    head:
      entity: sensor.ups_cyberpower_livingroom
      name: ИБП
      type: custom:multiple-entity-row
      secondary_info:
        attribute: Уровень заряда
        name: Батарея
        unit: '%'
Сами сенсоры
Важно! В строке
value_template: "{{ states('sensor.ups_load') | float(default=0) / 100 * 720 | round(0) }}"есть цифра720. Это цифра означает мощность вашего ИБП. Смотрите строкуups.realpower.nominal: 720
Узнать мощность ИБП можно командой
upsc [email protected] ups.realpower.nominal
Сверяйте показания сенсора нагрузки, например с программой WinNUT-Client. Скачать WinNUT-Client можно здесь
sensor:
  - platform: template
    sensors:
      ups_load_watts:
        friendly_name: UPS Load Watts
        unit_of_measurement: "W"
        value_template: "{{ states('sensor.ups_load') | float(default=0) / 100 * 720 | round(0) }}"

  - platform: template
    sensors:
      ups_cyberpower_livingroom:
        friendly_name: 'Гостиная: ИБП'
        icon_template: mdi:battery
        value_template: "{{ states('sensor.ups_status') }}"
        attribute_templates:
          Уровень заряда: "{{ states('sensor.ups_battery_charge') }}"
Создадим группу сенсоров
Это группа сенсоров будет применяться в карточке для ИБП, где достаточно тапнуть на иконку сенсоры и будет отображаться список сеноров ИБП, что очень удобно.
livingroom_ups:
  name: "Гостиная: ИБП. Сенсоры"
  icon: mdi:battery
  all: false
  entities:
    - sensor.ups_battery_charge
    - sensor.ups_status
    - sensor.ups_beeper_status
    - sensor.ups_load
    - sensor.ups_load_watts
    - sensor.ups_nominal_real_power
    - sensor.ups_low_battery_setpoint
    - sensor.ups_warning_battery_setpoint
    - sensor.ups_input_voltage
    - sensor.ups_output_voltage
    - sensor.ups_low_voltage_transfer
    - sensor.ups_high_voltage_transfer
    - sensor.ups_battery_voltage
    - sensor.ups_nominal_battery_voltage
    - sensor.ups_nominal_input_voltage
    - sensor.ups_ups_shutdown_delay
    - sensor.ups_load_restart_delay
    - sensor.ups_battery_runtime
    - sensor.ups_self_test_result
    - sensor.ups_low_battery_runtime
    - sensor.ups_load_start_timer
    - sensor.ups_load_shutdown_timer
    - sensor.ups_battery_chemistry
    - sensor.ups_status_data
    - sensor.ups_battery_manuf_date


