Nimbus Weather Card

:sun_behind_rain_cloud: Nimbus Weather Card

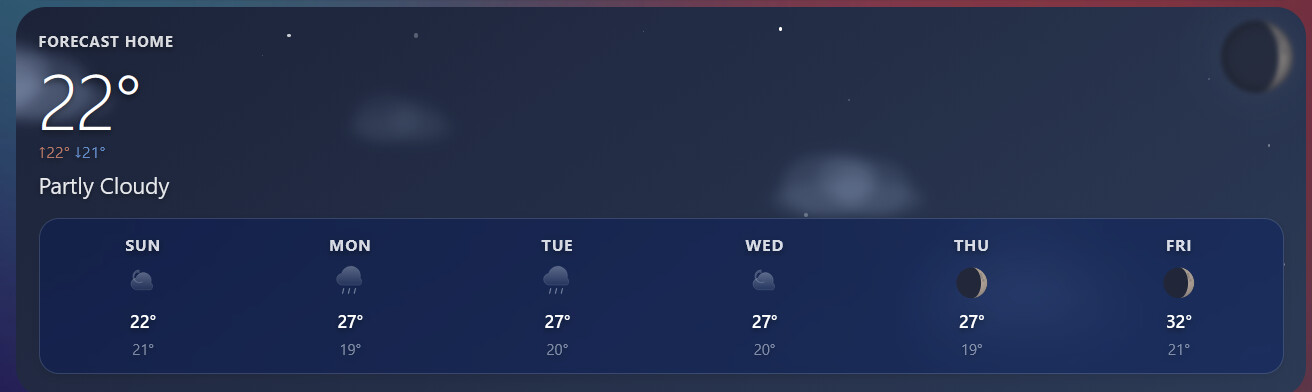
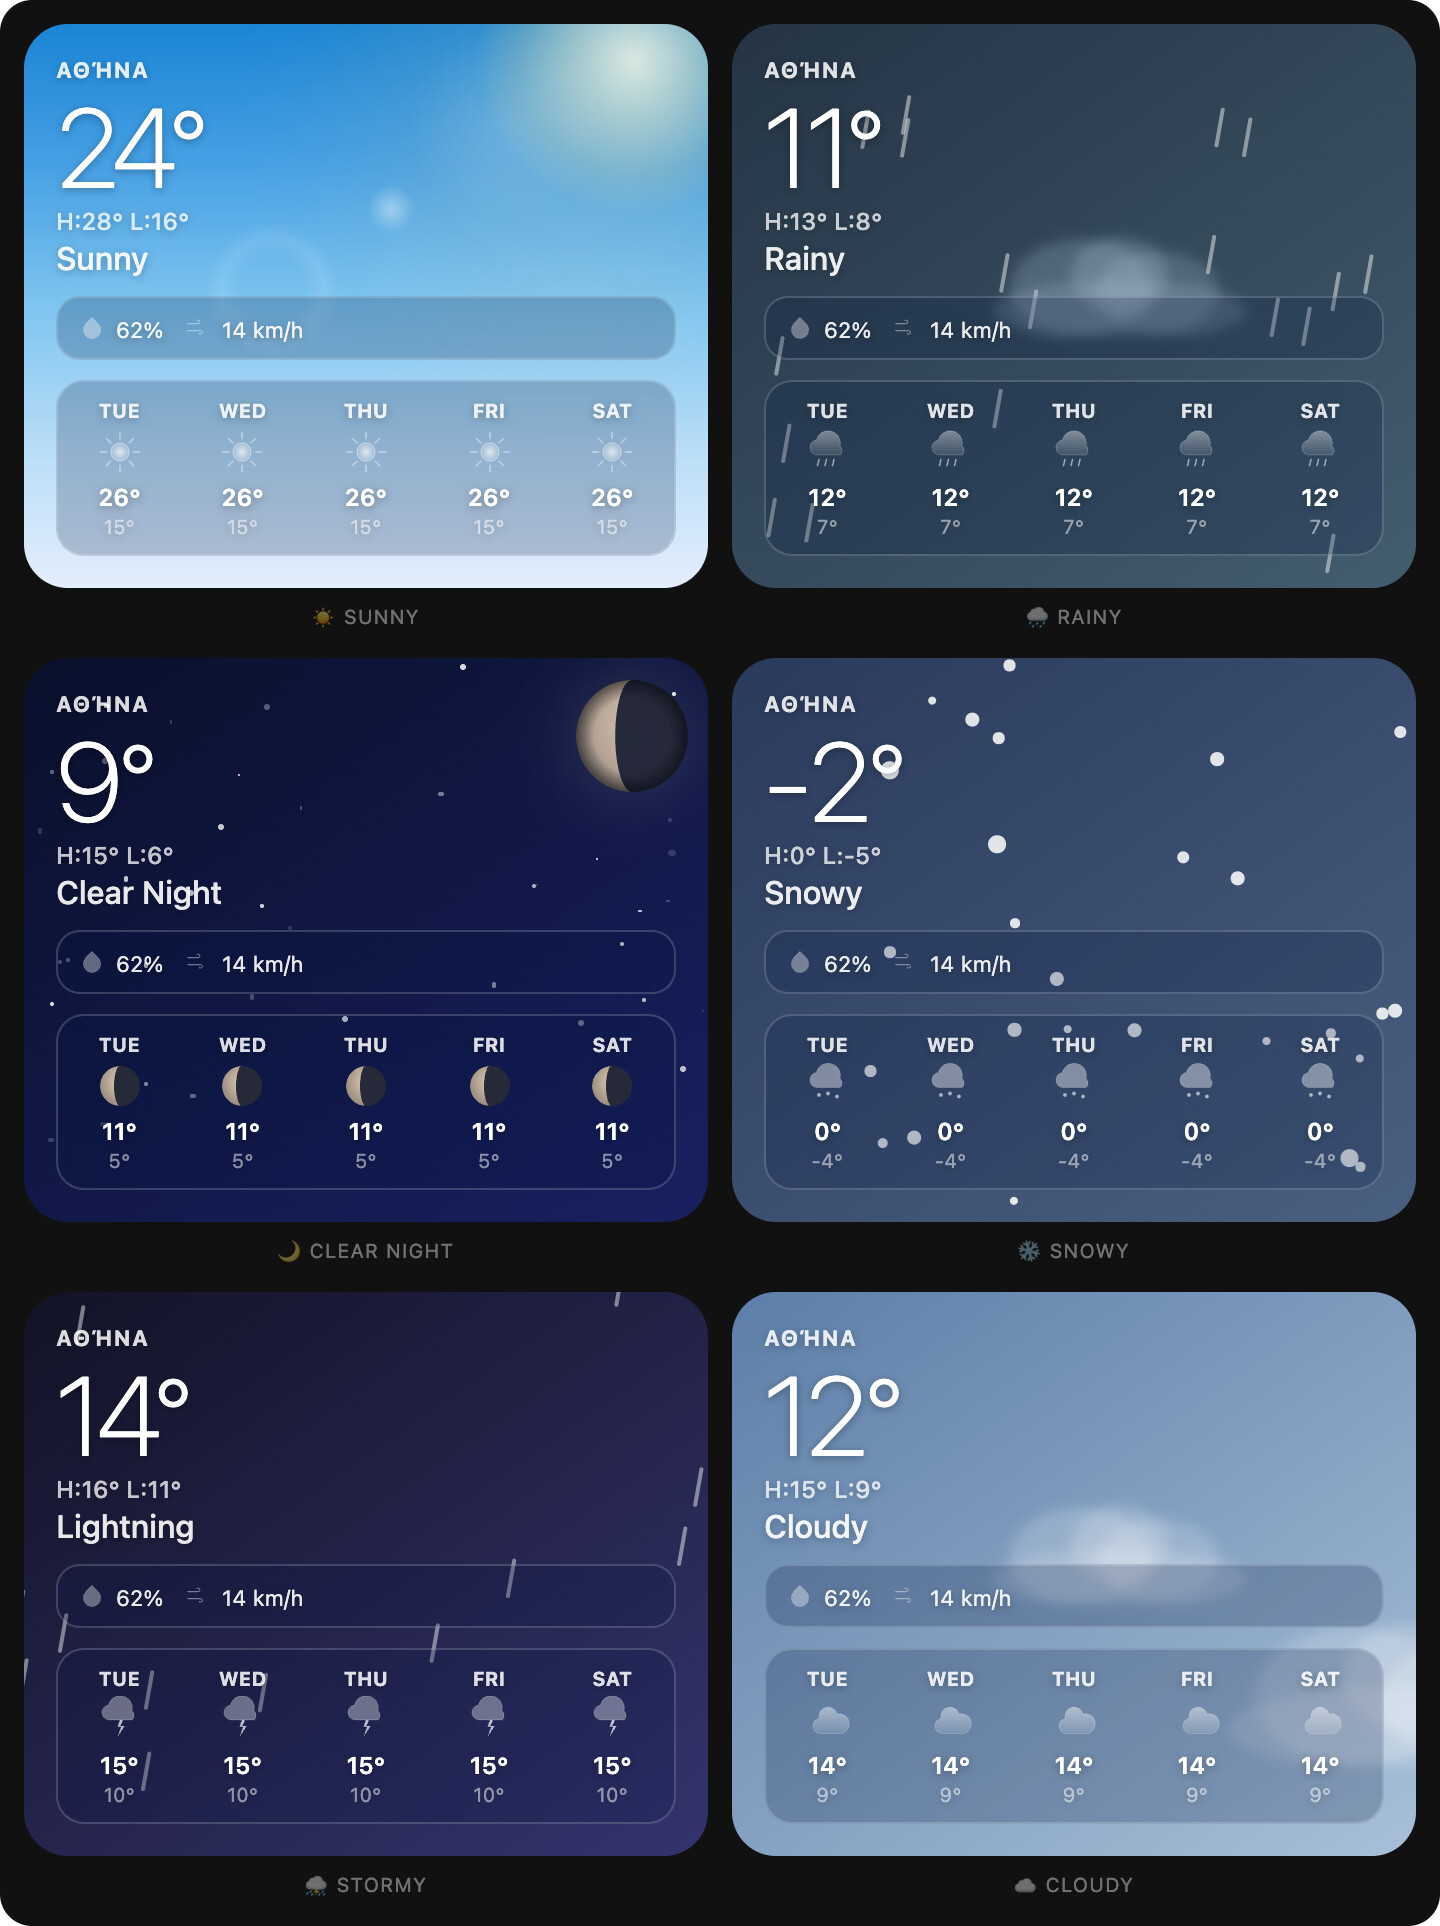
A beautiful, Apple Weather‑inspired custom card for Home Assistant with smooth particle effects, dynamic backgrounds, and full moon phase support.


:sparkles: Features

  • Stunning visuals – gradient backgrounds, floating particles (rain, snow, fog, clouds, wind, lightning)
  • Dynamic day/night – automatically switches between sun/moon, starry sky, and colour‑shifting gradients
  • Moon phases – renders realistic waxing/waning moons with craters (requires moon_entity)
  • Feels‑like temperature – shows apparent temperature when available
  • Smart units – automatically converts wind speed (mph, m/s → km/h) and temperature (°C / °F)
  • Accessible – ARIA label, keyboard focus, high‑contrast text shadows
  • Optimised performance – debounced updates, icon caching, hardware‑accelerated animations

:package: Installation

Manual

  1. Download nimbus-weather-card.js
  2. Place it in your www/community/nimbus-weather-card/ folder
  3. Add the following to your Lovelace resources:
resources:
  - url: /local/community/nimbus-weather-card/nimbus-weather-card.js
    type: module

:gear: Configuration

Minimal

type: custom:nimbus-weather-card
entity: weather.home

Full options

type: custom:nimbus-weather-card
entity: weather.home                      # required
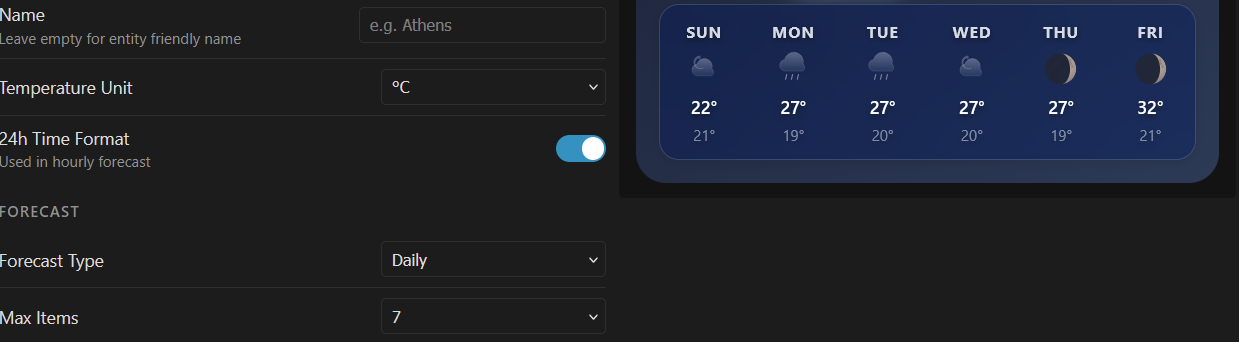
name: "Athens"                            # optional – display name
forecast_type: daily                      # "daily" or "hourly"
max_items: 7                              # number of forecast days/hours
show_forecast: true                       # show/hide forecast strip
show_details: true                        # show/hide humidity/wind/pressure
show_feels_like: true                     # show/hide feels‑like temp
temperature_unit: C                       # "C" or "F"
use_24h: true                             # 24h format for hourly forecast
animation_speed: 1                        # multiplier (0 = off, 2 = double speed)
sun_entity: sun.sun                       # for precise day/night detection
moon_entity: sensor.moon_phase            # for realistic moon phases

Detailed options table

Option Type Default Description
entity string required Your weather entity ID
name string friendly_name Custom header text
forecast_type string daily daily or hourly
max_items number 5 Max forecast items
show_forecast boolean true Show forecast strip
show_details boolean true Show humidity, wind, pressure
show_feels_like boolean true Show “Feels like” temperature
temperature_unit string C C or F
use_24h boolean true 24h time for hourly forecast
animation_speed number 1 Speed factor for all animations
sun_entity string null e.g. sun.sun for accurate day/night
moon_entity string null e.g. sensor.moon_phase for moon phases

:crescent_moon: Moon entity

For beautiful moon phases you need a moon sensor.
Install the Moon Integration and set:

moon_entity: moon.moon

The card expects phase names like new_moon, waxing_crescent, first_quarter, full_moon, etc.


:sunny: Sun entity

To get exact sunrise/sunset times and elevation‑based sun colours, add:

sun_entity: sun.sun

If omitted, the card falls back to a simple hour‑based day/night detection.


:iphone: Examples

Simple daily forecast

type: custom:nimbus-weather-card
entity: weather.openweathermap
max_items: 5

Night‑optimised with moon

type: custom:nimbus-weather-card
entity: weather.home
sun_entity: sun.sun
moon_entity: moon.moon
show_details: false

Fahrenheit + mph wind

type: custom:nimbus-weather-card
entity: weather.weatherkit
temperature_unit: F
# wind speed will automatically use mph if the weather entity provides it

:brain: Notes

  • The card automatically respects your Home Assistant unit system for wind speed (mph, m/s, km/h) – no extra config needed.
  • Lightning bolts and screen droplets appear only during rainy/stormy conditions.
  • Star count and cloud opacity adapt to the weather condition.
  • All animations can be slowed down or disabled with animation_speed: 0.

:lady_beetle: Troubleshooting

Issue Solution
No moon shown Add a moon_entity (see above)
Feels like missing Check if your weather provider supplies feels_like or apparent_temperature
Forecast not updating Verify forecast_type matches your weather platform (some only support daily)
Particles too heavy Set animation_speed: 0 to disable all animations

:pray: Credits

Inspired by Apple Weather and the amazing Home Assistant community.
Moon crater SVG originally from Vecteezy, adapted for dynamic sizing.


:star: If you like this card, consider giving it a star on GitHub!


:coffee: Support

If you enjoy Nimbus Weather Card, you can buy me a beer!

Buy Me A Beer

or scan:

5 Likes

Pretty neat looking card. Is there any chance to get local temperature measurement instead of forecast in some future release?

I’m open to new ideas, trying always to make the card better and better.
Firstly I’m glad you liked it, it took me some time to make it happen and it’s my biggest project so far.
Ιf I’m not mistaken what you ask is to integrate the configuration of a local sensor like:

local_temperature_sensor: sensor.bedroom_temperature
local_temperature_label: “Bedroom”

My plan is to add a new option local_temperature_sensor . When set, and if show_forecast is false , the card will display your local temperature in place of the forecast strip – keeping the main temperature from the weather entity untouched.
Enjoy!

Your installation instructions for HACS are wrong. The card is not there. Presumably, we need to add a custom repository first?

Edit: and having done that, then installed the card and hit Ctrl-F5, it is not available when adding a card to a dashboard.

Needs some time to be reviewed and come up to HACS, so till then only by custom repository.
Just copy any configuration meets your needs and then add a manual card

That´s exactly what I meant :blush:

That doesn’t work:

using:

type: custom:nimbus-weather-card
entity: weather.home

The resource are listed:
image

:sun_behind_rain_cloud: Nimbus Weather Card v1.3.x

A beautiful, Apple Weather‑inspired card for Home Assistant with smooth particle effects, dynamic backgrounds, moon phases and local sensor display.


:sparkles: Features

  • Stunning visuals – gradient backgrounds, floating particles (rain, snow, fog, clouds, wind, lightning)
  • Dynamic day/night – automatically switches between sun/moon, starry sky, and colour‑shifting gradients
  • Moon phases – renders realistic waxing/waning moons with craters — auto‑calculated from date, no sensor required
  • Local sensor panel – display up to 4 local sensors with custom MDI icons, shown instead of the forecast strip
  • Visual config editor – full UI editor, no YAML needed — appears in the Add Card menu automatically
  • Hourly forecast – shows actual hours (14:00, 15:00…) instead of day names
  • Smart units – auto converts wind speed & temperature units

:package: Installation

:hourglass_flowing_sand: Pending inclusion in HACS default store — add as a custom repository for now:

  1. HACS → Frontend → ⋮ → Custom repositories
  2. Add https://github.com/maxfok/nimbus-weather-card — category Lovelace
  3. Search Nimbus Weather Card → Download
  4. Hard refresh browser (Shift+Reload)

Or add a Manual card and paste any config below.


:gear: Minimal config

yaml

type: custom:nimbus-weather-card
entity: weather.home

Full config

yaml

type: custom:nimbus-weather-card
entity: weather.home
name: "Athens"
forecast_type: daily        # daily or hourly
max_items: 5                # 1-7
show_forecast: true         # false = show local sensors instead
show_details: true
show_feels_like: true
temperature_unit: C         # C or F
use_24h: true
animation_speed: 1          # 0=off, 2=fast
sun_entity: sun.sun         # optional
moon_entity: sensor.moon_phase  # optional — auto-calculated if not set
local_sensors:
  - entity: sensor.bedroom_temperature
    icon: mdi:thermometer
    name: Bedroom
  - entity: sensor.living_room_humidity
    icon: mdi:water-percent
    name: Humidity

:thermometer: Local sensors panel

Set show_forecast: false to replace the forecast strip with a sensor panel. Up to 4 sensors, each with a custom MDI icon — all HACS icon packs supported.

The visual editor lets you add sensors with a + button and disable them by turning forecast back on — settings are preserved.


:link: Links

Hi! The resource URL in your installation shows hacstag=1186447829100 which means HACS downloaded an older version of the card that doesn’t register the custom element properly.

Please try:

  1. Go to HACS → Frontend → Nimbus Weather Card
  2. Click Redownload (or remove and reinstall)
  3. Hard refresh your browser (Shift+Reload)

If it still doesn’t work, you can install manually:

  1. Download nimbus-weather-card.js from GitHub releases
  2. Place it in config/www/community/nimbus-weather-card/
  3. Add to resources:

yaml

url: /local/community/nimbus-weather-card/nimbus-weather-card.js
type: module

Let me know if it works! :blush:

Thank you. Weirdly, none of the more recent releases were being offered by default, but when I went to the Need a different version? drop down, there were loads there so I manually chose the most recent and it is now working as expected :+1: .

Integrated local.sensor capability instead of forecast, up to 4 sensors. Hope that works well for you.

I think I have found a bug. When I change the card width via the Layout tab:

the card increases in width but upon the next edit, the associated yaml:

grid_options:
  columns: 24
  rows: auto

is being deleted and the card width resets.

And a couple of feature requests.

  1. Is it possible to add a width parameter to the forecast? I’d like to see it at around 75% of the card width when I’m using a wider card:

  1. Can the size and position of the sun/moon be configurable?

And one more bug. Choosing 7 for Max Items still renders only 6 days of forecast:

@Orange-GT3 Thanks for the detailed feedback!

The max_items setting defines the maximum — if your weather provider only returns 6 forecast items, that’s what you’ll see regardless of the setting. This is a limitation of the weather integration, not the card. Update to 1.3.2 :blush:

1 Like

Hmmm, weirdly, 7 days are showing up now!

I’ve been trying to use the DOM inspector in Firefox to get the keys to apply some UIX styling to the card but every time I select <div class="fc"> in order to test some CSS out, the card appears to re-render and the selection jumps up a level to <div id="ct" class="ct">.

Is there a re-render happening, or is it something else?

The card re-renders every time the hass state updates, which causes the entire innerHTML of #ct to be rebuilt — so any DOM reference you’ve selected gets destroyed and recreated.

To freeze the re-render temporarily while you inspect/test CSS in the DOM inspector, run this in the Firefox console:

const card = document.querySelector('nimbus-weather-card');
const originalSet = Object.getOwnPropertyDescriptor(Object.getPrototypeOf(card), 'hass').set;
Object.defineProperty(card, 'hass', { set: () => {}, get: () => card._hass });

This stops the hass setter from triggering re-renders. When you’re done, reload the page to restore normal behavior.

Alternatively, you can test CSS directly in the Firefox Style Editor or add a <style> block via console:

const style = document.createElement('style');
style.textContent = '.fc { background: red; }'; // your CSS here
document.querySelector('nimbus-weather-card').shadowRoot.appendChild(style);

Note: because the card uses Shadow DOM, regular CSS injected into the page won’t affect it — you need to inject into the shadowRoot as shown above.

This just throws an error:

and I still can’t select the relevant element to test style changes.

Sorry about that! The error happens because const card is already declared in the console scope from a previous run. Wrap it in an IIFE to avoid the conflict:

(() => {
  const c = document.querySelector('nimbus-weather-card');
  const orig = Object.getOwnPropertyDescriptor(Object.getPrototypeOf(c), 'hass').set;
  Object.defineProperty(c, 'hass', { set: () => {}, get: () => c._hass });
})();

To inject CSS into the shadow DOM without re-render interference:

(() => {
  const shadow = document.querySelector('nimbus-weather-card').shadowRoot;
  const style = document.createElement('style');
  style.textContent = '.fc { background: red; }'; // your CSS here
  shadow.appendChild(style);
})();

Reload the page to restore normal behavior.

ezgif-827b1c63e2946f67

:wind_face: Wind-aware rain

Raindrops now angle dynamically based on your weather entity’s `wind_bearing`. No extra config needed, it just works.

:cyclone: Beaufort scale

Toggle between km/h and Beaufort in the visual editor.

:clock1: Clock option

Add `show_clock: true` to show date & time inside the details panel as a row over details.

:thermometer: Smart °C/°F conversion

The card now reads your entity’s native unit and converts only when needed. No more double conversion for US users with Fahrenheit entities.

:eye: Hi/Lo visibility fix

Added text-shadow to the ↑↓ temperatures so they’re readable on light backgrounds.

:broom: Performance

Proper `cancelAnimationFrame` cleanup so the card doesn’t run in the background when you switch tabs.


Install via HACS custom repository: `https://github.com/maxfok/nimbus-weather-card\`"