I have a Nous A1T socket this is already flashed with Tasmota.
Is it possible to flash this socket with ESPHome?
I can not upload the .bin file (.bin.gz) via the firmware upgrader in Tasmota. It always comes the message “Not enough space”.
My ESPHome.yaml
substitutions:
  devicename: "smartplug"
  # Higher value gives lower watt readout
  current_res: "0.00280"
  # Lower value gives lower voltage readout
  voltage_div: "775"


esphome:
  name: nous-a1t-001
  comment: "Nous Smart Wifi A1T - 001"
  name_add_mac_suffix: true
  project:
    name: "NOUS.Smart-Wifi-Socket_001"
    version: "A1T"

esp8266:
  board: esp8285
  restore_from_flash: true

# Enable logging
logger:

# Enable Home Assistant API
api:
  encryption:
    key: "mykey"

ota:
  password: "mypassword"

wifi:
  ssid: !secret wifi_ssid
  password: !secret wifi_password
  manual_ip:
    # Set this to the IP of the ESP
    static_ip: 192.168.xx.xxx
    # Set this to the IP address of the router. Often ends with .1
    gateway: 192.168.xx.xxx
    # The subnet of the network. 255.255.255.0 works for most home networks.
    subnet: 255.255.xxxx

  # Enable fallback hotspot (captive portal) in case wifi connection fails
  ap:
    ssid: "Nous-A1T-001 Fallback Hotspot"
    password: "mypassword"


captive_portal:

# see: https://esphome.io/components/time.html
time:
  - platform: homeassistant
    id: homeassistant_time

# Enable Web server
web_server:
  port: 80

light:
  - platform: status_led
    id: led
    pin:
      number: GPIO13
      inverted: true

binary_sensor:
  - platform: status
    name: "${devicename} - Status"

  # toggle relay on/off
  - platform: gpio
    pin:
      number: GPIO00
      mode: INPUT_PULLUP
    id: "button_state"
    on_press:
      - switch.toggle: "button_switch"

switch:
  - platform: template
    name: "${devicename} - Switch"
    icon: mdi:power
    optimistic: true
    id: "button_switch"
    lambda: |-
      if (id(relay).state) {
        return true;
      } else {
        return false;
      }
    turn_on_action:
      - switch.turn_on: relay
      - light.turn_on: led
    turn_off_action:
      - switch.turn_off: relay
      - light.turn_off: led
  - platform: gpio
    pin: GPIO14
    id: relay

sensor:
  - platform: wifi_signal
    name: "${devicename} - Wifi Signal"
    update_interval: 60s
    icon: mdi:wifi

  - platform: uptime
    name: "${devicename} - Uptime"
    update_interval: 60s
    icon: mdi:clock-outline

  - platform: total_daily_energy
    name: "${devicename} - Electric Consumption [kWh]"
    power_id: "nous_a1t_watt"
    filters:
      # Multiplication factor from W to kW is 0.001
      - multiply: 0.001
    unit_of_measurement: kWh
    icon: mdi:calendar-clock

  - platform: adc
    pin: VCC
    name: "${devicename} - VCC Volt"
    icon: mdi:flash-outline

  - platform: hlw8012
    sel_pin:
      number: GPIO12
      inverted: True
    cf_pin: GPIO04
    cf1_pin: GPIO05
    change_mode_every: 4
    current_resistor: ${current_res}
    voltage_divider: ${voltage_div}
    update_interval: 3s

    current:
      name: "${devicename} - Ampere"
      unit_of_measurement: A
      accuracy_decimals: 3
      icon: mdi:current-ac

    voltage:
      name: "${devicename} - Voltage"
      unit_of_measurement: V
      accuracy_decimals: 1
      icon: mdi:flash-outline

    power:
      name: "${devicename} - Power"
      id: "nous_a1t_watt"
      unit_of_measurement: W
      icon: mdi:gauge

text_sensor:
  - platform: wifi_info
    ip_address:
      name: "${devicename} - IP Address"
    ssid:
      name: "${devicename} - Wi-Fi SSID"
    bssid:
      name: "${devicename} - Wi-Fi BSSID"
  - platform: version
    name: "${devicename} - ESPHome Version"
    hide_timestamp: true
Because it probably is. Other than esphome the tasmota firmware packs everything (including the stuff you don’t need) into the binary. That’s typically causes to always be short on space having tasmota flashed.
The typical scenario is to flash a tasmota-minimal.bin to have space for a ota update again.
You could probably also just build a esphome firmware with the minimal amount of components possible to still fit in - something like:
Plug the Nous A1T and connect to the WiFi hotspot it created (tasmota-….)
Go to 192.168.4.1 and connect the device to your WiFi….It will show you the IP that the device will use in your home WiFi.
After connecting your PC to your home WiFi, go to this IP. Then upgrade with the file tasmota-minimal.bin.gz from here: Tasmota ESP8266 Binaries Be careful: do not use tasmota-minimal file after finishing these steps (i.e. after flashing ESPHome). There is a possibility to brick your device.
After finishing, reconnect to Tasmota UI with the same IP.
In Home Assistant ESPHome, create a new device (pick ESP8266 at creation) and replace the yaml with the one here: Nous A1t | devices.esphome.io
Add - platform: esphome under ota: and build the configuration (Install, Manual Download)
Flash the ESPHome binary using the Tasmota UI (Firmware Upgrade)
edit:
After flashing the ESPHome file go to check the device is fine (a device reset maybe is required) visiting its IP.
Go to HA integrations and add the Esphome device, or else it will blink green.
This is my configuration template, i think it will help others:
I would add one thing: When using the above yaml in step three, I couldn’t get ESPhome to connect to the device.
ESPhome was expecting the device to broadcast the address “devicename.local”, but the yaml appends a bit from the MAC address to the name the device broadcasts on mDNS. Meaning, ESPhome is looking for “devicename.local” but the device is broadcasting “devicename-randomchars.local”.
So in the bit of yaml here, change name_add_mac_suffix to false.
Generally i avoid hostnames (sometimes these .local hostnames doesnt work). That’s why i use local IP (as stated in my comment). But good to add this info too.
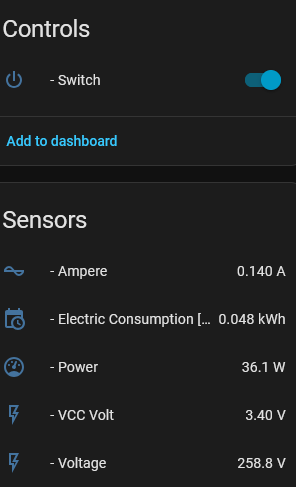
If your sensor name begins with the device name HA will not show that part.
So if i have a device called “Dryer” and it exposes “Dryer - Power” and “Dryer - Switch” they will be dispayed as “- Power” and “- Switch” in many places.
I don’t know if you can prevent this. Removing the dash will make it look correctly in both cases.