Recently Ezlo had the Philio PST02A 4 in 1 sensors on sale for just $15. They are Door/Window + Motion + Temp + Illuminance. Seeing that many folks had struggled to get these set up, I’ve decided to share the steps necessary to get them to work. First of all I want to make it clear that we will be using some of the advanced tools in HA and Wave JS-UI, but everything is done within the user interface. Nothing super technical is necessary.
Two Notes: 1.You’ll need several browser windows open at the same time as it’s much easier this way. 2. You’ll need your physical device and the magnet at hand because we will be triggering the sensor during the setup. Place the magnet next to the sensor for now.
Open this website: User Manual. This page was very helpful in understanding exactly what each parameter does, and is much easier to read than the miniature printed instructions.
In ZW-JS-UI begin the inclusion process (blue icon lower left then green icon to begin inclusion). Select Include and Next, give it a name and location then click next. To wake the device up triple click tamper switch within 1.5 seconds or remove and replace the battery. Once the device is included in your controller switch tabs to the ZWave Integration.
Click on the link that says ## devices. (the number will vary). This opens the Devices page filtered on just Z-Wave integration devices. Find your new device in the list (I will use FRONT DOOR for this guide).
Click FRONT DOOR. It will open the device info page. In the second column, under sensors, ENABE all hidden entities. Click the ## entities not shown link. Select one of the hidden entities and then click the Gear Icon in the popup window. Toggle Enable to ON. Don’t rename the device just yet. Click UPDATE and repeat this process until all entities are active. The Wave integration may refresh during this process and it may freeze for just a second or so. Wait until all changes are fully complete. ** There is no need to enable any disabled entities listed under the Configuration or Diagnostic headings, so leave those alone for now.
Next switch to the Z-Wave-JS-UI interface (in a new tab). Navigate to the Control Panel using the first icon in the vertical menu. Find your new device in this list. It’s typically the last item in the list if you sort by ID number. Highlight the device and click in that row.
This will push open a fly out window below the selected device. Click Configuration v1. This will open another fly out window. Look carefully at the section headings. In this example: [77-112-0-5-2] Test Mode. 77 is the wave device ID. The 112-0 we don’t have to worry about, but the last one or two characters are important, 5-2 in this case.
We will make two changes. In section 7-2 [77-112-0-7-2] we will change the default value of 0 - disable to 1 - ENABLE. Use the dropdown to change the value then click the paper airplane icon to push the changes to the device. You may see a small yellow circling icon. This indicates the sensor is in sleep mode and needs to be awakened. Move the sensor away from the magnet and lift it up to actuate the tamper switch. The yellow icon should turn green and a confirmation box will appear. Setting 7-2 is done.
Go to setting 7-16 and change the default value from 0 (Notification Report) to 1 (Binary Sensor Report). Repeat the process to save and push the settings to the device. Move the sensor away from the magnet and lift it up to actuate the tamper switch. The yellow icon should turn green and a confirmation box will appear. Setting 7-16 is done.
Switch back to the ZWave integration tab. Your new device should still be shown. Watch the Sensor section and move the magnet away from the sensor. One of the listed entities should indicate a change. This is the entity for the Door Sensor. Click that entity then click the gear icon in the popup window. Enter a name you want to see in the front end in the Name field. Change the SHOW AS dropdown to Door. Click Update. The door sensor is now complete. Remove ALL other door sensor entities you don’t need by clicking the entity, selecting the gear icon and unchecking Enabled. Remember to uncheck the Area toggle as well (optional).
Repeat step 10 for the Motion sensor. Change the SHOW AS to Motion. Disable any unnecessary entities. Remember to update before moving to the next step.
Repeat step 10 once more, this time lifting the sensor body up to trigger the tamper switch. Change the SHOW AS to Tamper. Disable any unnecessary entities. Remember to update before moving to the next step.
At this point you should have a working 4 in 1 sensor. Create a simple entities card and populate all the useful device entities. Verify the device works as expected.
Refer to the documentation page for any further changes you may want.
** Parameter 8 - one ‘tick’ is 8 seconds, so a value of 3 in [77-112-0-8] PIR Re-Detect Interval Time equals 24 seconds.
** Parameter 21 & 22. If enabled will blank the Motion Sensor for 1 second every minute as it sends this data. This means that once every minute for one second, the Motion Sensor is blind and will not report.
I know this was very long, but I believe it covers every aspect of getting this very inexpensive sensor working in Home Assistant.
great post, Art. I’m a HA newbie, so very helpful. Although my system looks a little different… I’ve got PST02A by Philio Technology Corp a few days ago and having troubles setting it up. For one, my interface looks different for the config:
And, as visible, the changed values never sent to device no matter what I trigger. I also had to create special script to clear the motion detected flag b/c it was never auto cleared. It looks like my settings are wrong…
Core 2025.1.2
Supervisor 2024.12.3
Frontend 20250109.0
Z-Wave JS: not sure where to see the version, but it’s latest since I just installed everything less than a week ago.
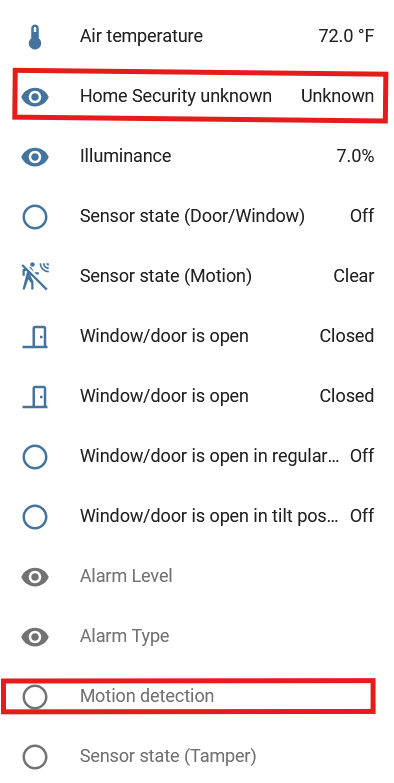
I believe the difference in appearance is that you’re using Z-Wave JS and I’m using Z-Wave JS-UI. Yes, there is a difference, but having never used Z-Wave JS I can’t speak to the differences (other than it looks different than my setup). See screen shot of my Front Door Sensor below.
From what I can see in your screenshot, both interfaces expose the parameters you’d want to modify. In Z-Wave JS-UI the small ‘paper airplane’ icon to the right of each parameter is used to update that parameter to the device. Not sure how its done on your setup. In some instances, you’ll need to ‘wake up’ the device, especially if it’s battery powered. To do that with these sensors move the sensor away from the magnet and lift the main body up to actuate the tamper switch. It’s a tiny lever on the underside, near the top right corner.
If you are unable to get you sensors configured with Z-Wave JS, you may need to consider switching over to Z-Wave JS-UI. I think it is the newer of the two platforms and after coming from a Vera controller it is way superior and I have been very happy with how it works.
Let me know if you succeed using Z-Wave JS or if you need more help after upgrading to Z-Wave JS-UI.
Thanks for advice. I’ve tried JS-UI but it conflicts with JS, I couldn’t make them work together but if I disable JS, JS-UI didn’t pick up all the devices correctly, including the sensor. I didn’t want to restart from scratch, so I’m back to my previous setup. In zwave-js there is no trigger to send changed value like your paper airplane. It queues up the change and sends it on the next device wake up, or so it says. If I change the value and wait for long enough it actually sends it through - it worked once for me. Other time it didn’t. So it is definitely some trick I invoked by chance. Anyway, learning curve… at least my first automations seem to work. Appreciate your help
Great detailed write up. Went back more carefully, and got it to work! It was the fact that HomeAssistant enables the wrong motion entity by default. As you said, you have to find the other one and show as motion.
BTW, Don’t need JS UI, maybe it makes it easier, but regular zwave JS works just fine. Thank you again for the write up!
One thing I cant get to work, is the luminance updating. It only updates when the door contact is triggered.
Glad you got it working. I don’t pay much attention to my Lux readings, but I may be seeing the same thing here. It’s a little hard to tell today, since it’s very overcast. My front door is only a 7% while my sunroom is 95%. Oddly, the front door has been opened (hence triggered) but the sunroom has not. My foyer is darker since it’s at the end of a short hallway, and the sunroom is all windows. So… not really sure what to make of the current readings. Sunroom seems to have updated without activity, but front door seems really low and has had recent activity.
I’m not all that concerned for now, but did plan to use the front door lux as a condition in the doorbell being pressed; If doorbell is pressed and user is home and lux is below x threshold > turn on foyer light.
Let me know if you find a solution or it begins working over time.
Art
I think it updates itself without a trigger, but at a very long interval (~45 minutes from what I’m seeing). I’ve tried a bunch of setting, but nothing changes that interval.
On my system, I had disabled the Home Security sensor. It reads a value of 254 and didn’t seem to serve a purpose for me. Although I didn’t text extensively, I never saw that value change, so it got disabled and ignored. I chalked it up to another value the sensor reports that didn’t have a specific use in my configuration. I’d venture a guess that some devices, like these, add extra sensors to be more widely compatible with many different controllers.