Yeah and they are saved as jpeg. Maybe the actual gimp file would help?
Use the white background image.
Just open the white background image.
Add alpha to the current layer (should be only 1).
Use fuzzy select to select the white background. ![]()
Select delete. (On your keyboard)
Then export with the following settings. (Shift+Ctrl+E)

done that but still get the white background. see below.

I think its something to do with color to alpha as you can see in the image above the color is white?
You shouldn’t have to do anything with the color. When you place the png on the desktop is it transparent?
If it shows up as transparent on the desktop then gimp has done all that it could.
This tutorial shows you how to properly do it as well

it shows transparent you are correct but why is it that when I put it on my HA it shows the white background?
Then the problem is with the picture-elements card or the background of your picture element card being white. It has nothing to do with the image.
The white background is most likely coming from your theme. You’ll probably need card modder to remove the theme on just that card to remove the white background.
right thank you man for putting up with me. let me look into the theme for that particular card.
hi @petro
so I am trying to remove the background using card modder but I am failing on how to. This is my config, can you please help?
views:
  - title: FLOORPLAN
    panel: true
    background: center / cover no-repeat url("/local/back.png") fixed
    icon: mdi:floor-plan
    cards:
      - type: custom:card-modder
        card:
          type: picture-elements
          image: /local/plan.png
          elements:
            - type: image
              tap_action: toggle
              entity: switch.tv
              image: /local/fp_livingroom_off.png
              state_filter:
                "off": opacity(0%)
                "on": opacity(100%)
              style:
                top: 26.7%
                left: 66.9%
width: 17.88%you need to place the transparency css style inside the card-modder. I don’t know the css transparency for the background off the top of my head.
1 Like
thanks alot sorted it
hi @petro
quick question: I am trying to align the cut part of my floorplan onto the full floorplan. The two images were of same size and have not been altered. However on my frontend the cut part shows much smaller.
How can I resize and align it onto the correct part? I have the size in pixels of the cut part if that helps?
Thanks.
are you using the width modifier?
Nope… never used it before either
are you using panel: true on the view?
I have this in my config:
  - background: center / cover no-repeat url("/local/back.png") fixed
    cards:
      - card:
          elements:
            - entity: switch.tv
              image: /local/livingroomnight.png
              state_filter:
                'off': opacity(0%)
                'on': opacity(100%)
              style:
                left: 49.2%
                top: 48.99%
                width: 99.90%
              tap_action: toggle
              type: image
          image: /local/plan.png
          type: picture-elements
        style:
          background-color: 'rgba(0,0,0,0.0)'
          border: 'solid 1px rgba(0,0,0,0.0)'
          box-shadow: '3px 3px rgba(0,0,0,0)'
        type: 'custom:card-modder'
    icon: 'mdi:floor-plan'
    panel: true
    title:
I have managed to fit it but struggling with the top part to align. See below:

I thought you said you weren’t using width? width adjusts the size of the image.
                left: 49.2%
                top: 48.99%
                width: 99.90%
Also, is the size of your image divisible by 2, the height and the width ? If you take the height or width in pixels and divide it by 2, you should get a whole number.
yeah it is divisible by 2 .
well if /i change the width then it messes up. I just need to bring it down to cover the little area which is “light”
right, but for this to work properly, both images need to be the same width and height in pixels. Then all you need to specify for style is
                left: 50.0%
                top: 50.0%
adjusting the width will shrink the image in height and width.
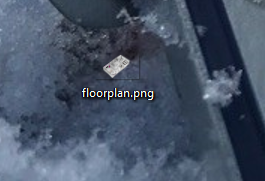
both the images are the same pixels in width and height and I tried left and top as 50% but the dark image appears smaller than the actual floor plan. see below:
UPDATE:
I put the width as 100% and it aligns properly.
1 Like
Maybe it was doing something dumb when you didn’t specify the width. I don’t know the code off the top of my head. At least you got it working now!
1 Like